background image

FORM NO. 56043111 - Adhancer

 - 

37

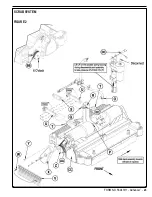
WHEEL DRIVE SYSTEM

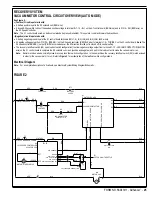
A1 Speed Control

Pin Connection

3

5

13

18

9

6

16

4

POT HIGH

POT WIPER

POT

LOW

SPEED

LIMIT

KSI

R1 Throttle

5K Ohms

100K Ohms

R2 Speed Limit

WHT

BLU

BRN

BLK

BLK

WHT

POT

REV.

STATUS

BRAKE

BLK

WHT

1

1

2

2

3

3

14 BRAKE (+)

14

WHEEL DRIVE SYSTEM


R2 Voltage Values 

R1 Voltage Values


0V = Minimum Speed 

0 – 2.5V Forward


5V = Maximum Speed 

2.5V – 5V Reverse

This drawing shows additional controller input circuit detail.  The R2 pot is shown at the Max speed setting and the R1 pot in neutral.

LOW CURRENT A1 SPEED CONTROL PIN KEY DETAIL

PIN#

WIRE COLOR

CONTROLLER DESCRIPTION and FUNCTION

1

-

Open not used

2

-

Open not used

3

Black

Throttle Pot R1 pot high input

4

Blue

Throttle Pot R1 pot wiper input

5

Brown

KSI (key switch input): Battery (+) powers up controller logic circuits.

6

RED/BLK

Auxiliary Driver: Battery (-) output to main controller (E1) to turn on (activate) all auto scrub functions.

7

-

Open not used

8

-

Open not used

9

ORN/BLU

Status Fault: Speed controller fault output to main control panel fault indicator light (accessory wand).

10

-

Open not used

11

-

Open not used

12

-

Open not used

13

White

Throttle Pot R1 pot low input

14

YEL/BLU

Drive wheel brake release: Battery (+) output to the parking brake (optional)

15

-

Open not used

16

BLU/BLK

Rev/Alarm Driver output Battery (-) command turns off solution Valve. 

17

-

Open not used

18

Brown

Speed limit pot input connection.

FIGURE 3

Содержание Adhancer 56316001(W32-C)

Страница 1: ...7 08 FORM NO 56043111 SERVICE MANUAL Models 56316000 W28 C 56316001 W32 C Adhancer...

Страница 2: ......

Страница 3: ...REMOVAL 30 SQUEEGEE SYSTEM 31 34 SQUEEGEE LIFT LINKAGE ADJUSTMENT 31 SERVICING THE SQUEEGEE 32 ADJUSTING THE SQUEEGEE 32 SQUEEGEE MOUNT ASSEMBLY REMOVAL 33 CASTER WHEEL REMOVAL 34 WHEEL DRIVE SYSTEM 3...

Страница 4: ...e space below to note the Model Number and Serial Number of your machine for future reference MODEL NUMBER ______________________________________________ SERIAL NUMBER ________________________________...

Страница 5: ...machine on or near these agents or operate in areas where flammable liquids exist Do not clean this machine with a pressure washer Do not operate this machine on ramps or inclines of more than a 2 per...

Страница 6: ...114 L Recovery Tank Capacity 30 gal 114 L Debris Hopper Capacity 1 4 gal 5 3 L 1 7 gal 6 4 L Solution Control Precision flow electric pump Solution Flow Rates Regular Flow 0 3 gal min 1 14 L min or 10...

Страница 7: ...FORM NO 56043111 Adhancer 5 TECHNICAL SPECIFICATIONS...

Страница 8: ...off and disconnect the batteries before servicing the machine Check vacuum motor carbon brushes Qty 2 once a year or after 300 operating hours Check brush and wheel drive motor s carbon brushes Qty 4...

Страница 9: ...ot Work 9 Scrub Brushes check for wear and rotate D M W 10 Scrub Brush Motors check for carbon brush wear 500 Hours B C W 11 Scrub Deck check belts for wear or damage B D W 12 Scrub Deck Lift Motor Sk...

Страница 10: ...entioned in the text Note Refer to the service manual for detailed explanations of each item illustrated on the next three pages 9 Scrub Deck Rollers 10 Drive Wheel 11 Solution Filter 12 Solution Shut...

Страница 11: ...cuit Breaker 21 Circuit Breaker for the Control Circuit 22 Squeegee Blade Tension Strap 23 Squeegee Blade Latch 24 Squeegee Blade Alignment Pins 25 Squeegee Mount Thumb Nut 26 Squeegee Adjustment Knob...

Страница 12: ...Indicator D6 Scrub Indicator D7 Recovery Tank FULL Indicator D8 Battery Low Indicator E Wand Switch F Detergent System Switch G Recycle Extended Scrub Switch not used on Adhancer H Scrub Off Switch I...

Страница 13: ...ween on and off The vacuum will only turn on when the throttle is moved from the neutral position The vacuum will remain on for 10 seconds after the throttle returns to neutral Note that the vacuum al...

Страница 14: ...hese indicators will be yellow when the scrub system is switched on and the scrub deck is either moving downward or in its extended scrub position but the drive paddle is in neutral and the machine is...

Страница 15: ...ow volume demand to the scrub brushes See Electrical Diagram Figure 2 The electrical circuit that turns on energizes the solenoid coil and water pump is activated through the A1 control panel s soluti...

Страница 16: ...2 Positive circuit input starts with The battery positive input to the Solution Pump Pressure Switch S1 RED wire on solution pump assembly Negative circuit input starts with A battery negative ground...

Страница 17: ...lution Drain Hose 1 B from its storage area located on the right rear control handle compartment Direct the hose to a designated Disposal Site and flush the tank with clean water 2 Solution Filter Rem...

Страница 18: ...ble Symptoms No solution flow while in the scrub auto solution mode 1 Solution Pump will not operate 2 SYMPTOM ONE Note Activate the Service Test Mode program See the Electrical System Service Test Mo...

Страница 19: ...NG GUIDE ELECTRICAL CONTINUED SYMPTOM TWO Note Activate the Service Test Mode program See the Electrical System Service Test Mode section for instructions All testing will be performed in the Service...

Страница 20: ...re the hoses to the valve body Separate pry the solution outlet hose off of the barbed fitting on the valve body 6 Remove the 2 Hex Screws 7 E that secure the valve to the Mount Bracket F then pull th...

Страница 21: ...ION PUMP REMOVAL Drain the solution tank or turn the solution filter ball valve to the off position to prevent solution loss 1 See Figure 4 2 Loosen the 2 Hose Clamps V and pry off inlet Solution Hose...

Страница 22: ...ve voltage output from terminal J1 14 BRUSH CONTACTOR on the A1 Control Board VIO BLK wire to complete the K1 solenoid coil circuit positive and negative and pull in the load contact to make the brush...

Страница 23: ...LK YEL RED VIO YEL RED WHT WHT GRA BRN VIO BLK BLU BLK RED BLK WHT GRN BRN RED BLK WHT YEL BLK WHT BRN RED WHT GRA WHT BLU BLK BLK BLK BLK ORN BLU BLK BLK BLU BLK BLK BLK BRN WHT BLU BLK BRN WHT BLK P...

Страница 24: ...7 AA and Brush Pulley Z as much as possible making sure the belt is hooked on the Phillips screw with bushing as much as possible Insert a 2 Phillips head screwdriver into the first guide hole 8 BB in...

Страница 25: ...FORM NO 56043111 Adhancer 23 SCRUB SYSTEM FIGURE 2...

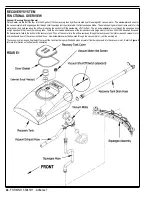
Страница 26: ...r The air and wastewater move through the squeegee hose at high speed until they reach the recovery tank There the air slows down because of the increased volume large size of the tank With the decrea...

Страница 27: ...rol board to complete the K2 solenoid coil circuit positive and negative and pull in the load contact to make the vacuum motor run Note Earlier machines used a normally closed recovery tank float swit...

Страница 28: ...e gasket on the recovery tank cover is sealing and is not damaged Make sure that the recovery tank drain hose cap seals airtight TROUBLESHOOTING GUIDE If water flows around the ends of the squeegee to...

Страница 29: ...m motor to not function at all or to not shut off when the tank is full If daily rinsing of the recovery tank does not keep the switch clean you may need to remove the float arm for cleaning The float...

Страница 30: ...re 4 The Vacuum Motor Inlet Screen 4 should be cleaned on a daily basis DO NOT run water down the screen in an attempt to clean it If you do this you will be running water directly into the vacuum mot...

Страница 31: ...exhaust hose 4 B out of the P clamp on the recovery tank See Figure 5 5 Remove the 4 Phillips pan head screws and flat washers holding the Vacuum Motor Shroud A to the bottom of the recovery tank the...

Страница 32: ...cuum Hose Assembly 4 I from the recovery tank WARNING The recovery tank is relatively heavy You may choose to get some assistance when swinging the recovery tank down after disconnecting the Cable Ass...

Страница 33: ...To adjust Lower the squeegee assembly to the floor 1 See Figure 1 2 The Squeegee Mount Bracket has three Mount Holes A for changing the lift cable length Remove the Hardware Items 3 B from the Squeege...

Страница 34: ...e Front Squeegee Blade 1 Raise the squeegee tool off the floor loosen the two Thumb Nuts 25 disconnect the Recovery Hose 19 then remove the squeegee assembly from the mount 2 Remove both rear tension...

Страница 35: ...e If you choose to jack up the machine make sure you support the machine with safety stands or blocking to prevent the machine from dropping and possibly causing personal injury or machine damage WARN...

Страница 36: ...sembly and have the scrub deck in the up stored position with the scrub brushes 1 installed See Figure 4 2 Place Wood Blocking F in front of the drive wheels to prevent the machine from rolling Jack t...

Страница 37: ...tional powering it up The F3 circuit breaker 30 amp supplies the positive load circuit voltage input to the B controller terminal WHT YEL wire The black wire from the battery negative standoff supplie...

Страница 38: ...RN BLK YEL RED RED BLU BLK RED BLK RED BLK WHT YEL BRN BLU BLK BLK ORN BLU ORN BLU BLU BLK BRN WHT BLU BLK BRN WHT BLK FOR REV REVERSE J1 5 A2 B B SPEED CONTROLLER M1 M2 PIN 3 POT HI PIN 4 POT WIPER P...

Страница 39: ...CRIPTION and FUNCTION 1 Open not used 2 Open not used 3 Black Throttle Pot R1 pot high input 4 Blue Throttle Pot R1 pot wiper input 5 Brown KSI key switch input Battery powers up controller logic circ...

Страница 40: ...otentiometer R1 replace Replace the A2 Speed Control Wheel drive in one direction only loss of either forward or reverse Test the Fwd and Rev R1 wiring outputs pins 3 4 and 13 at the speed control for...

Страница 41: ...der machine without safety stands or blocking to support the machine Drain both the solution and recovery tanks and remove the squeegee 1 Remove the Scrub deck by following the Scrub Deck Removal inst...

Страница 42: ...this location until the drive wheels are approximately 1 off the ground Remove the 6 Locknuts 5 A and then remove the 2 Drive Wheels B from the transaxle Disconnect the drive motor wiring connector 6...

Страница 43: ...safety stands or blocking to support the machine Remove the squeegee and place wood blocking in front and rear of the opposite drive wheel that you are removing to prevent the machine from rolling 1 U...

Страница 44: ...tance should range from approximately 2 5k to approximately 4 8k as the Back Cover Paddle is pulled backward from the neutral position If you do not get resistance readings close to those specified in...

Страница 45: ...asure approximately 100k Use an ohmmeter to measure the resistance across the pot high and middle wiper terminals 4 Black and Brown in Figure 10 If the potentiometer is working correctly the resistanc...

Страница 46: ...Servicing Batteries Remove all jewelry Do not smoke Wear safety glasses rubber gloves and a rubber apron Work in a well ventilated area Do not allow tools to touch more than one battery terminal at a...

Страница 47: ...ufacturer specifies the higher cut out voltage Special Service Note On all the 36V machines a minimum recharge voltage of 2 13 volts per cell must be reached to allow the scrub brush and solution syst...

Страница 48: ...tablespoons of baking soda to one quart liter of water CHARGING GEL VRLA BATTERIES Charge the batteries each time the machine is used or when the Battery Indicator D5 is reading less than full WARNIN...

Страница 49: ...most all battery caps are vented so there s no need to loosen or remove them for charging Keep the Batteries Clean Monthly Use a damp cloth to wipe dirt from the top of the batteries Battery terminals...

Страница 50: ...ing parts long compression spring Spring Housing D and mounting hardware Hold onto the spring housing assembly and press the rocker switch to run the drive motor and retract the spring housing toward...

Страница 51: ...FORM NO 56043111 Adhancer 49 FIGURE 4...

Страница 52: ...onnect the programmer put it in diagnostic mode and read the displayed fault information In this example the display shows No Faults Present indicating 2 that the controller has not detected anything...

Страница 53: ...FORM NO 56043111 Adhancer 51 FIGURE 5 ELECTRICAL SYSTEM...

Страница 54: ...tic brake driver open 2 Electromagnetic brake coil shorted 3 5 000 00000 HPD High Pedal Disable fault 1 Incorrect sequence of throttle and KSI push or inhibit inputs 2 Misadjusted throttle pot 4 1 000...

Страница 55: ...o cycle the key switch to clear the fault code Move the drive paddle to operate the throttle The motor should begin to turn in the selected direction If it does not verify the wiring to the controller...

Страница 56: ...anation of machine operation The secondary function of the main control is to detect any system failures and display an error code on the display panel or store it in the main control board s recall m...

Страница 57: ...07 Vacuum motor overload Normal current load is 23 25 amps 1 Check for debris in the vacuum motor 2 Check for worn carbon brushes 3 Check for defective motor bearings 4 Check for short circuit in vacu...

Страница 58: ...de produced by the speed control Refer to the speed control section for details on these codes If SCS does not display follow the troubleshooting procedures below Disconnect the ORN BLU wire from the...

Страница 59: ...FORM NO 56043111 Adhancer 57 FIGURE 6 ELECTRICAL SYSTEM...

Страница 60: ...rush motor current sensed Brief On Green Flash Brush motor output is off and brush motor current is being sensed abnormal condition Check for voltage at the WHT wire on K1 contactor to battery ground...

Страница 61: ...C This switch is used to toggle the state of the vacuum motor Pressing and releasing this switch will alternately turn the vacuum motor on and off The Vacuum System Indicator N provides the following...

Страница 62: ...personnel to disable some of the fault detection checks to facilitate troubleshooting This will not disable the over current protection on any of the systems To turn the fault checking on or off Turn...

Страница 63: ...to indicate that the recycle system is disabled If it is green press the Recycle Extended Scrub Switch to disable the extended scrub recycling system Note The Adhancer was not designed to be used wit...

Страница 64: ...solution Note These settings are useful if you need to add or remove a small amount of detergent to from the solution but don t wish to change the nominal detergent mix ratio For instance if a 100 1 r...

Страница 65: ...de turn the Key Switch to the Off position Recover Tank Full Switch Orientation FACTORY DEFAULT NORMALLY OPEN The Adhancer control board now has a programmable option to allow it to work with a normal...

Страница 66: ...le Fault Detection Scrub Off Switch H Solution Switch B Recall Clear Stored Error Codes Solution Switch B Display Control Unit Software Revision Level Scrub Off Switch H Detergent System Switch F Scru...

Страница 67: ...cycle Brush Motor is Active 6 9V 0 duty cycle Brush Motor is off 36V Output J2 1 VIO YEL Actuator VDC 36V J2 8 37 6 30 6V 36V while lowering 36 while raising Output J2 2 BLK AXP Board Ground VDC 36V B...

Страница 68: ......

Страница 69: ...Motor K2 Contactor Vac Motor L1 Solenoid Solution M1 Motor Wheel Drive M2 Motor Left Brush M3 Motor Right Brush M4 Motor Vac M5 Motor Brush Actuator M8 Pump Solution M10 Detergent Pump R1 Potentiomet...

Страница 70: ...M BRAKE PIN 14 BRAKE OPTIONAL OPTIONAL B B B B B B B M M8 RECYCLE PUMP M M8 RECYCLE PUMP M M9 CHEMICAL PUMP M M9 CHEMICAL PUMP M M2 MOTOR LEFT BRUSH M M2 MOTOR LEFT BRUSH M M3 MOTOR RIGHT BRUSH M M3 M...

Страница 71: ...E BROOM LOW FEATURE 36V SOLENOID LOCATION HIGH FEATURED MACHINE ONLY HIGH FEATURE 36V SOLENOID LOCATION HIGH FEATURED MACHINE ONLY NOTE K3 FOR HIGH FEATURED MACHINE ONLY LOW FEATURED MACHINE ONLY HIGH...

Страница 72: ...EMATIC Item Description 1 Solution Tank 2 Shut Off Valve 3 Inline Solution Filter 4 Solution Pump 5 Check Valve 6 Detergent Pump 7 Reducer Tee 8 Reducer Coupler 9 Solution Solenoid Valve 10 Detergent...

Страница 73: ...Low Detergent indicator is only accurate if the replacement cartridge is at the same level as the cartridge being replaced To Reset 1 Turn the Key Switch A ON and hold the Detergent Switch F down for...

Страница 74: ......

Отзывы: