


Digital Video Recorder
Configuring Recording Settings
NOTE: Pressing the
REC
button on the front of the DVR will cause the red LED to light
and indicates the DVR is ready to record. However, this does not mean the DVR is
recording. The DVR records video based on the parameters such as schedule and
events defined during configuration. The record indicator on the front display panel
lights when the DVR is recording.
Your DVR offers a variety of flexible recording modes. You can set it up to record all the time
or to only record events. It can be set up to continue recording once the hard disk drive is full by
recording over the oldest video, or you can set it up to alert you when the hard disk is full and
stop recording.
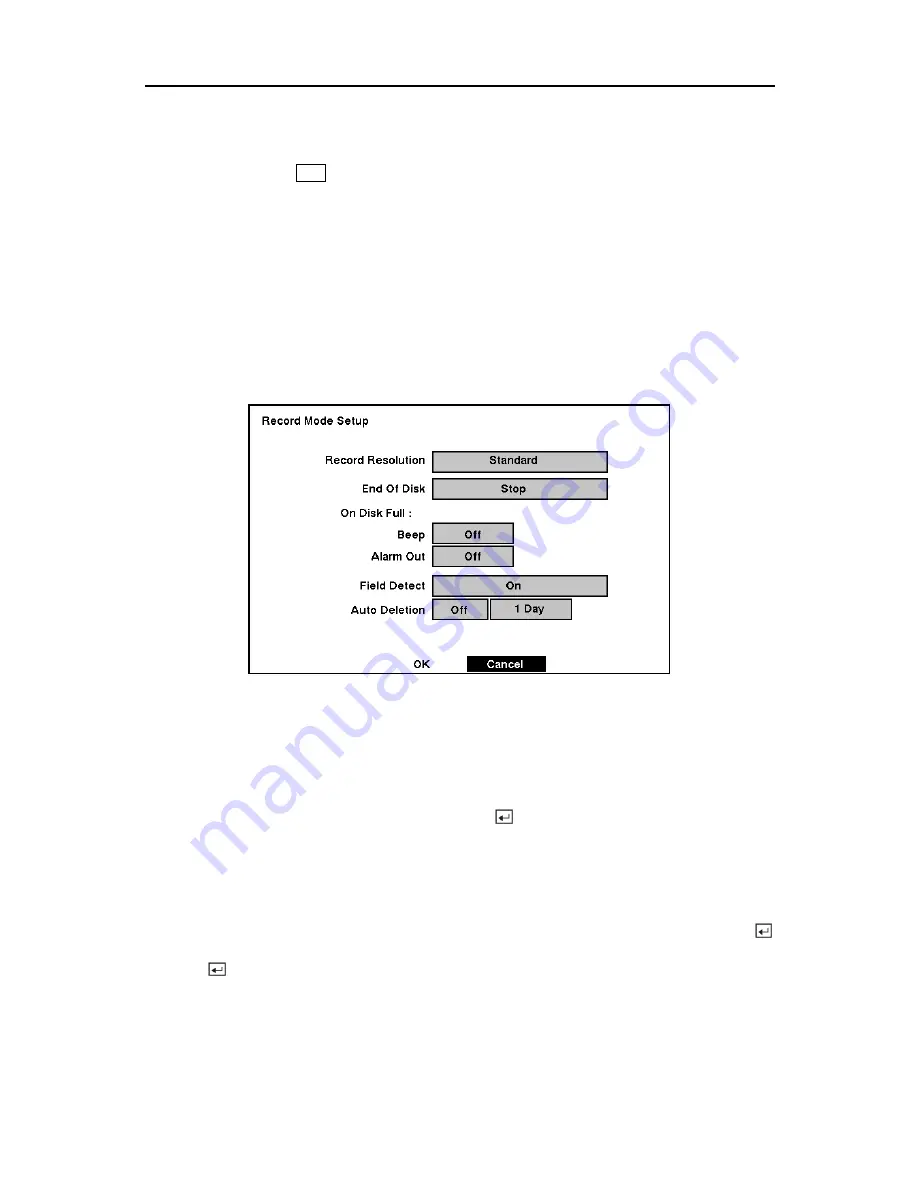
Record Mode Setup Screen
Figure 47 — Record Mode Setup screen.
Highlight the
Record Resolution
box and select from
High
and
Standard
. All other variables
being equal; Selecting High will decrease the recording and playback speed by half than
Standard.
Highlight the box beside
End Of Disk
and press the
button. This toggles between
Overwrite
and
Stop
. When in the
Overwrite
mode, the DVR continues recording when the
hard disk drive is full by overwriting the oldest video. When in the Stop mode, the DVR stops
recording when the hard disk drive is full.
If the DVR is set to the Stop mode, you can set it to beep or activate the
Alarm Out AO1
port
when the hard disk drive is full. Highlight the box beside
On Disk Full: Beep
and press the
button to toggle between
On
and
Off
. Highlight the box beside
On Disk Full: Alarm Out
and
press the
button to toggle between
On
and
Off
.
37
Содержание A-ADRP16E-320
Страница 1: ...A ADRP4E 120 A ADRP9E 240 A ADRP16E 320 Digital Video Recorders...
Страница 2: ...User s Manual ii...
Страница 92: ...User s Manual Appendix E Map of Screens 82...