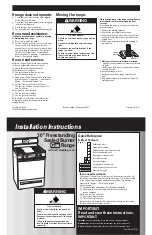
background image

Page  6 

Part list 

SN Part 

Name 

Qty 

SN Part 

Name 

Qty 

1 Chimney 

assy 

1  28 

10 nut 

13 

Guide trough for rear protect plate 

29 

φ

10 oval clamp 

14 

rear plate assy 

30 

orifice connector 

grate 

31 

orifice fixation plate 

short burner assy 

32 

orifice 

stove body assy 

33 

orifice connector nut 

left side plate 

34 

8 nut M14X1.25 

oven thermostat knob scale 

35 

8 clamp 

zinc knob with insert 

36 

orifice angle connector 

10 

inspection plug for gas inlet pipe 

37 

pilot rack   

11 flame 

knob 

6  38 thermocouple 

rack 

12 Front 

control 

panel 

1  39 oven 

thermocouple 

13 

oven door assy 

40 

pilot 

14 

left door decoration bar 

41 

U burner 

15 

front bottom hinge assy 

42 

1/4 to 

10 transfer connector 

16 

bottom door decoration bar 

43 

CE11 sabaf valve 

17 

crumb tray assy 

44 

valve prolong connector 

18 gas 

inlet 

pipe 

1  45 NPT1/8 to 

10 transfer connector 

19 

oven chamber assy 

46 

6 nut M10x1 

20 adjustable 

foot 

4  47 

6 clamp 

21 

door hinge assy 

48 

thermostat rack B 

22 

right door decoration bar 

49 

8 nut M13x1 

23 

right side plate 

50 

thermostat rack A 

24 

V baffle plate 

51 

thermostat valve with micro switch 

25 

oven chamber bottom plate 

52 

NPT1/8 to 

10 transfer angle connector 

26 

wire net in chamber 

53 

stove thermopile 

27 grill 

supporter 


Содержание RGR24X

Страница 1: ...t before installation commences 2 This manual must be handed to the end user after installation and commissioning 3 These instructions are only valid if the country code appears on the appliance If th...

Страница 2: ......

Страница 3: ...tion Construction features Cooking surfaces Electric oven 4 Installation 9 General information Regulatory installation conditions Exhausting fumes Possible environmental interference Preparing for ins...

Страница 4: ...ing minimum output Functional check 6 Operating instructions 15 Before using the appliance Preparing the appliance for use Using the appliance Operating controls Turning the open burners on and off Tu...

Страница 5: ...RGR36X 914 855 1524 1 3mm 1 2mm 1 1mm 1 9mm 1 9mm 36kW 36kW 39kW 36kW 36kW RGR24X 609 855 1524 1 3mm 1 2mm 1 1mm 1 9mm 1 9mm 24kW 24kW 26kW 24kW 24kW Model Oven Dimension mm OVEN orifice size heat inp...

Страница 6: ...Page 5 d Exploded Drawing RGR36X...

Страница 7: ...ntrol panel 1 39 oven thermocouple 1 13 oven door assy 1 40 pilot 1 14 left door decoration bar 1 41 U burner 1 15 front bottom hinge assy 2 42 1 4 to 10 transfer connector 1 16 bottom door decoration...

Страница 8: ...sensory or mental capabilities or lack of experience and knowledge unless they have been given supervision or instruction concerning use of the appliance by a person responsible for their safety Child...

Страница 9: ...towards the operator 3 2 2 Cooking surfaces 1 Unit RGR24X with 4 stabilized flame gas burners made of cast iron and controlled by pilot flames Unit RGR36X with 6 stabilized flame gas burners made of c...

Страница 10: ...ings must meet all the requirements listed below The appliance should be both installed and serviced in accordance with all applicable regulations and standards in force namely Safety regulations on f...

Страница 11: ...4 8 Disposing of packaging materials All packaging materials must be disposed of in compliance with applicable local regulations in force where the appliance is being installed Packaging materials sh...

Страница 12: ...f the appliance which should be closed whenever the appliance is not in operation After connecting the appliance to the gas system check for leaks at joints and pipe fittings to do so use soapy water...

Страница 13: ...pliance 2 Check for gas leaks 3 Check for flame stability throughout the whole control range by going from high to low 4 14 Staff training Inform all personnel assigned to operate the appliance on how...

Страница 14: ...pes of gas you will need to adjust the screw as required until you obtain a stable and even flame Proceed as follows Unscrew the screw Connect a liquid filled pressure gauge for example a U shaped pre...

Страница 15: ...n the piping It may take about 10 seconds 6 2 2 4 Light it with long match lighter hold the knob 10 seconds until the flame is stable Adjust the knob to high flame position for complete ignition of th...

Страница 16: ...emove the most stubborn food residues Use rather pads or spatulas made of stainless steel or softer non ferrous materials Stagnation of substances having acid components such as vinegar lemon juice sa...

Страница 17: ...pliance To avoid the appearance of corrosion spots make sure that any salt residues left on the internal and external walls are carefully removed 6 3 3 Periodic maintenance Only qualified personnel ar...

Страница 18: ...Page 17 Aforementioned failures are just for reference If any failure occurs please stop using and inform professional technician to check and repair...

Страница 19: ...GR24X RGR36X Imported By ADEXA DIRECT LIMITED GROUND FLOOR UNIT 1 214 PURLEY WAY CROYDON CR0 4XG LONDON UNITED KINGDOM Serial Number Year of Manufacture Brand ADEXA Application of Council Directive s...

Отзывы: