background image

77

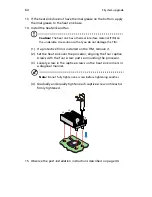
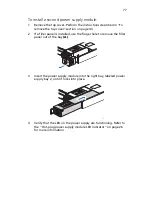
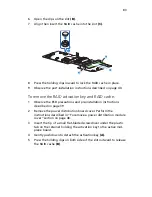
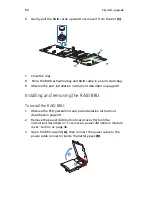
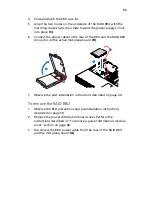
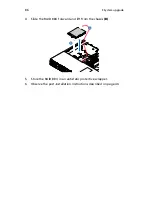
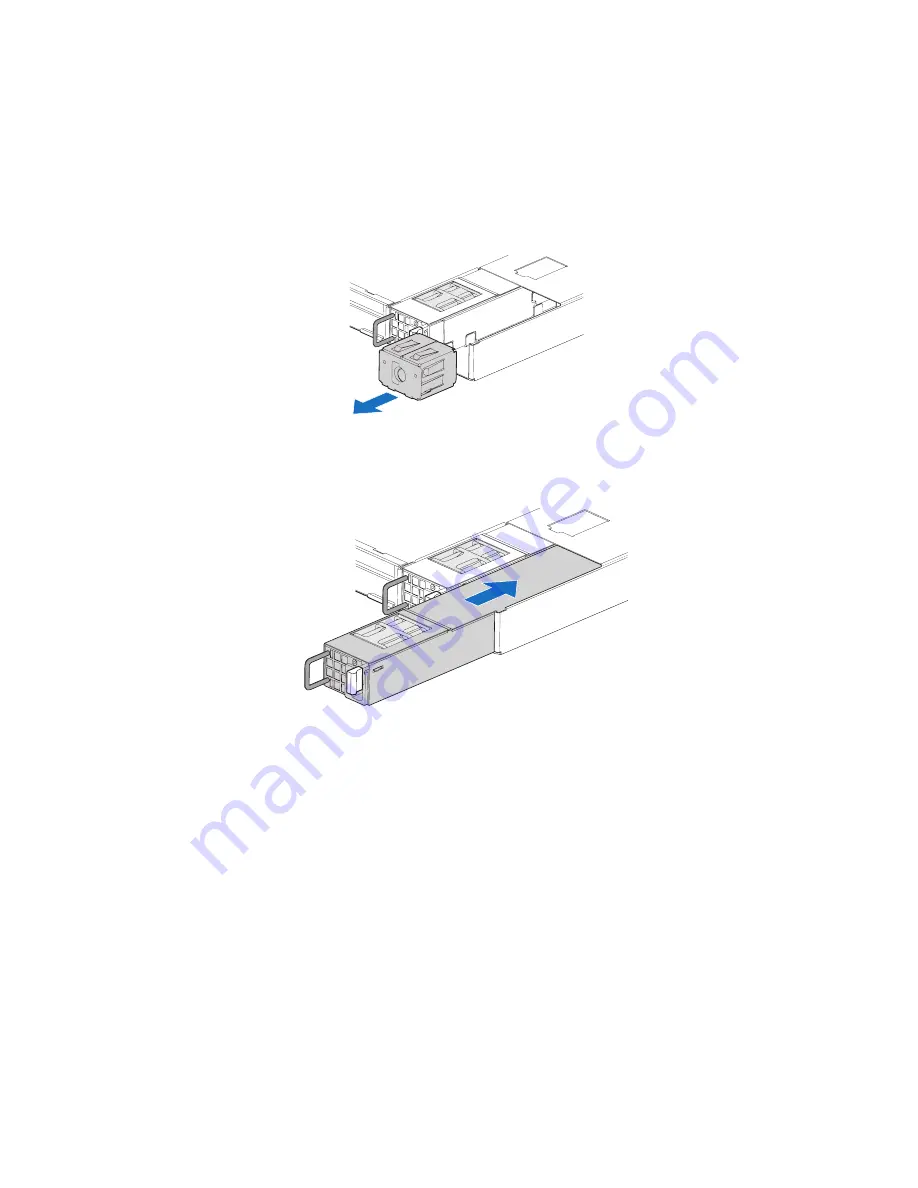
To install a second power supply module:

1

Remove the top cover. Perform the instructions described in “To 
remove the top cover” section on page 43.

2

If a filler panel is installed, use the finger hole to remove the filler 
panel out of the bay 

(A)

3

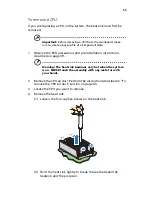
Insert the power supply module into the right bay, labeled power 
supply bay 2, until it locks into place.  

4

Verify that the LED on the power supply are functioning. Refer to 
the  “Hot-plug power supply module LED indicator” on page 26 
for more information. 

TP02242

TP02243

Содержание Network Device Altos R520

Страница 1: ...Acer Altos R520 Series User s Guide...

Страница 2: ...w The serial number and model number are recorded on the label affixed to your server All correspondence concerning your unit should include the serial number model number and purchase information No...

Страница 3: ...n a particular installation If this device does cause harmful interference to radio or television reception which can be determined by turning the device off and on the user is encouraged to try to co...

Страница 4: ...pt any interference received including interference that may cause undesired operation Notice Canadian users This device does not exceed the Class A limits for radio noise emissions from digital appar...

Страница 5: ...ing label If you are not sure of the type of power available consult your dealer or local power company 7 Do not allow anything to rest on the power cord Do not locate this product where persons will...

Страница 6: ...product exhibits a distinct change in performance indicating a need for service 12 Replace the battery with the same type as the product s battery we recommend Use of another battery type may present...

Страница 7: ...panel LED indicators 24 Hot plug HDD LED indicators 25 System jumpers 27 2 System setup 29 Setting up the system 31 Pre installation requirements 31 Connecting peripherals 32 Turning on the system 33...

Страница 8: ...overview 70 Installing and removing a power supply module 76 Removing and installing an ARMC 3 module 79 Installing and removing the SAS hardware RAID components 82 Installing and removing the RAID ac...

Страница 9: ...error beep codes 141 Diagnostic POST code LEDs 142 Appendix A Acer Altos R520 rack installation guide 149 Setting up the system rack 151 System rack installation 153 Vertical mounting hole pattern 15...

Страница 10: ...x...

Страница 11: ...1 System tour...

Страница 12: ...erformance features designed to provide easy server set up remote management highly reliable shared storage and handle more demanding database or high transaction applications This chapter provides a...

Страница 13: ...ory Controller Hub north bridge Intel ESB2 E Enterprise South Bridge I O Controller south bridge Memory Quad memory channels Eight DDR2 FBDIMM fully buffered DIMM slots Supports 512 MB 1 GB and 2 GB D...

Страница 14: ...le of SAS software RAID levels Provides optional hardware RAID support through installation of a RAID activation key and a RAID cache on the mid plane board The SAS hardware RAID levels1 supported inc...

Страница 15: ...rface ATI ES1000 video controller with 16MB DDR SDRAM Server management BMC Baseboard Management Controller IPMI Intelligent Platform Management Interface 2 0 compliant In band and out band server man...

Страница 16: ...nterprise Linux 4 0 Red Hat Enterprise Linux 4 0 EM64T SUSE Linux Enterprise Server 9 0 SUSE Linux Enterprise Server 9 0 EM64T ASM Acer Server Manager 3 Easy Build 2 Power supply Supports one to two 6...

Страница 17: ...e front bezel is closed Separate front bezels are available to support systems that use a mini control panel or standard control panel The front bezel is removable to allow access to the server s hard...

Страница 18: ...s R520 dual purpose bay supports either the standard control panel or two 2 5 hot plug HDD drives Item Component Item Component A Rack handles D Dual purpose bay B Slim line optical drive bay E 2 5 ho...

Страница 19: ...nstallation of an ARMC 3 module Item Component Item Component A PS2 mouse port G H USB 2 0 ports B Low profile PCI expansion slot I VGA monitor port C Full height PCI expansion slot J K Gigabit LAN po...

Страница 20: ...ower distribution board G Memory modules B Power distribution board cover H CPU air duct C Power supply module 1 I System fan modules D Power supply module bay 2 filler panel shown J Mid plane board a...

Страница 21: ...mainboard becomes accessible once you open the system It should look like the figure shown below Item Description Item Description A Rolling BIOS jumper W Battery B Intel ESB2 E I O controller X Powe...

Страница 22: ...E SATA 5 connector J Gigabit LAN1 and LAN 2 ports FF SATA software RAID activation key connector K Serial B port GG ARMC 3 module connector L PS2 mouse top and keyboard bottom port HH System recovery...

Страница 23: ...kplane board installed on the rear side of the hot plug drive bay provides support for both SAS and SATA hard drives Front view Item Description Item Description A Slim line optical drive con nector C...

Страница 24: ...1 System tour 14 Rear view Item Description Item Description A Control panel connector D Mid plane connectors B USB connector E Backplane power connector C IDE connector...

Страница 25: ...I 1068 SAS controller that provides support for up to eight hot plug SAS HDDs By default the active mid plane provides software RAID levels 0 1 and 10 With the installation of an optional RAID activat...

Страница 26: ...d 10 With the installation of an optional SATA software RAID activation key can support software RAID level 5 E Fan 6 power connector K Fan 3 power connector F RAID cache slot Item Description Item De...

Страница 27: ...res Both control panels utilize a combination of control buttons status LED indicators along with I O ports to centralize system control monitoring and accessibility Mini control panel Item Component...

Страница 28: ...LAN 2 activity indicator G System ID indicator B LAN 1 activity indicator H System ID button C Power sleep button I Reset button D Power sleep indicator J USB 2 0 port E HDD actvity indicator K NMI bu...

Страница 29: ...memory download can be performed to determine the cause of the problem Reset button Reboots and initializes the system Power sleep button Toggles the system power on and off This button also function...

Страница 30: ...1 System tour 20 System LED indicators This section describes the different LED indicators located on Mainboard Control panel Hot plug HDD carrier LAN port Hot plug power supply module...

Страница 31: ...ode number As each configuration routine is started BIOS will display the given POST code to the POST Code Diagnostic LEDs found on the rear of the mainboard To assist in troubleshooting a system hang...

Страница 32: ...tialization when AC power is applied to the system Green On System booted and ready or normal operation Blink System degraded Unable to use all of the installed memory System loses memory redundancy w...

Страница 33: ...VRD hot asserted Fans failed or not present Correctable error threshold in non sparing and non mirroring mode crossed Off AC power off D DIMM error indicators On System BIOS disables a DIMM after it...

Страница 34: ...n System has power applied to it or ACPI S0 state Blink System is in ACPI S1 state sleep mode HDDactivity indicator Green Random blink HDD is active Off No HDD activity System ID indicator Blue On Sys...

Страница 35: ...ng RAID HDD is powered on and is in a fault condition Green Blink Ongoing hot plug activity Off No HDD is installed HDD is initiated but has no current activity Hot plug HDD failure indicator Amber On...

Страница 36: ...or State Description Status Off No AC power to the power supply Green On System has power applied to it Blink AC power cord is plugged into an active AC power source Amber On No AC power Power supply...

Страница 37: ...1 2 default 2 3 BIOS clear CMOS Forced CMOS clear J3H1 BIOS select 1 2 2 3 default Force lower bank Normal operation J1D1 BMC force update mode 1 2 default 2 3 BMC force update disabled BMC force upda...

Страница 38: ...1 System tour 28...

Страница 39: ...2 System setup...

Страница 40: ...This chapter gives you instructions on how to set up the system Procedures on how to connect peripherals are also explained...

Страница 41: ...ee Stable surface free from vibration Well ventilated and away from sources of heat Secluded from electromagnetic fields produced by electrical devices such as air conditioners radio and TV transmitte...

Страница 42: ...40 VAC only Do not connect the system to an incorrect voltage source Refer to the illustration below for specific connection instructions on the peripherals you want to connect to the system Note Cons...

Страница 43: ...ystem 1 Remove the front bezel See To remove the front bezel section on page 41 2 Press the power button on the control panel The system starts up and displays a welcome message on the monitor After t...

Страница 44: ...nected to the power source and to the AC input connector No power comes from the grounded power outlet Have an electrician check your power outlet Loose or improperly connected internal power cables C...

Страница 45: ...edges to avoid smudges or fingerprints 4 Gently press the disc down to make sure that it is properly inserted Caution While pressing the disc be careful not to bend the disc tray Make sure that the d...

Страница 46: ...Shut Down select Shut down from the drop down window then click on OK You can then turn off all peripherals connected to your server If you are using another OS refer to the OS documentation for instr...

Страница 47: ...3 System upgrade...

Страница 48: ...This chapter discusses the precautionary measures and installation procedures you need to know to upgrade the system...

Страница 49: ...metal part of the server before handling components If a wrist strap is not available maintain contact with the server throughout any procedure requiring ESD protection Pre installation instructions P...

Страница 50: ...you are a qualified service technician Post installation instructions Perform the steps below after installing a server component 1 See to it that all components are installed according to the describ...

Страница 51: ...the server before you can install additional components The front bezel and top cover are removable to allow access to the system s internal components Refer to the following sections for instruction...

Страница 52: ...tem upgrade 42 To install the front bezel 1 Line up the center notch on both ends of the bezel with the center guide on the rack handles 2 Slide the front bezel onto the chassis until it clicks into p...

Страница 53: ...instructions described on page 39 2 Remove the screw located on the top cover A 3 Press and hold the blue release button B then slide the cover toward the back of the chassis until the cover disengage...

Страница 54: ...nd pre installation instructions described on page 39 2 Place the top cover on the chassis so that the tabs on the cover align with the slots on the chassis 3 Slide the top cover toward the front of t...

Страница 55: ...need to remove the CPU air duct to perform the following procedures Removing and installing a CPU air baffle Removing and installing the PCI riser assembly Removing and installing the PCI card Removi...

Страница 56: ...CPU air duct over the two processor sockets The front edge of the air duct should touch the front fan module and the top of the installed air duct should be flush with the top of the PCI riser assembl...

Страница 57: ...system Do not remove the memory air deflector 1 Observe the ESD precautions and pre installation instructions described on page 39 2 Turn the CPU air duct over 3 Remove the air dam by sliding slotted...

Страница 58: ...form the following procedures Removing and installing the RAID activation key and RAID cache Removing and installing a RAID BBU 1 Observe the ESD precautions and pre installation instructions describe...

Страница 59: ...precautions and pre installation instructions described on page 39 2 Lower the power distribution board cover to the chassis A 3 Tighten the thumbscrew to secure the cover to the chassis B 4 Observe t...

Страница 60: ...disk drive Note Use only Acer qualified SAS or SATA HDDs To purchase a SAS or SATA HDD contact your local Acer representative Caution To ensure proper airflow and server cooling all drive bays must co...

Страница 61: ...3 Press the green HDD carrier latch to open the drive A 4 Pull out the lever and slide the carrier from the chassis B 5 Place the HDD carrier on a clean static free work surface 6 If you are replacing...

Страница 62: ...o the HDD carrier A 3 Remove the air baffle from the HDD carrier B 4 Save the air baffle and screws for later use 5 Remove the HDD from its protective packaging 6 Install a hard disk on the HDD carrie...

Страница 63: ...emoving or replacing the drive you must first power down the server unplug the AC power cord from the system and turn off all peripherals devices connected to the server Caution To maintain proper sys...

Страница 64: ...tall the filler panel in the drive bay If installing a new optical drive see succeeding section To install a slim line optical drive 1 Observe the ESD precautions and pre installation instructions des...

Страница 65: ...cal drive kit 6 Slide the optical drive tray into the front opening in the server Make sure the back end of the plastic guide plugs into the matching connector on the backplane board 7 Verify that the...

Страница 66: ...d to maintain proper airflow inside the server This section explains how to access the PCI riser assembly and remove and install PCI cards To remove the PCI riser assembly 1 Observe the ESD precaution...

Страница 67: ...the chassis 6 Place the riser assembly on a clean static free work surface 7 If you need to replace PCI cards See Removing and installing a PCI card on page 58 8 Observe the post installation instruct...

Страница 68: ...l seat into the matching sockets on the mainboard 4 Connect the cables to the installed PCI card 5 Observe the post installation instructions described on page 40 Removing and installing a PCI card To...

Страница 69: ...ing PCI X cards into the full height riser board the cards must be installed starting with the top slot first followed by the middle and then the bottom Any card populated in the bottom PCI slot will...

Страница 70: ...on the front of the riser assembly by rotating it 90 degrees outward B 6 Remove the filler panel if installed 7 Insert the PCI card into the selected slot C Make sure the card is properly seated 8 Cl...

Страница 71: ...n only one CPU is installed it must be installed in CPU 1 socket System is designed to provide up to 130 W of current per processor Processors with higher current requirements are not supported To ins...

Страница 72: ...load plate up slightly A 7 Lift the load plate B 8 Remove the CPU from its protective packaging 9 Position the CPU over the socket A making sure the CPU cutouts match the socket notches then insert t...

Страница 73: ...t cover by grasping the socket cover tab A and pulling it away from the load plate B 11 Store the protective socket cover for future use 12 Close the load plate A then press the retainer lever down to...

Страница 74: ...protective film is installed on the TIM remove it 2 Set the heat sink over the processor aligning the four captive screws with the four screw posts surrounding the processor 3 Loosely screw in the ca...

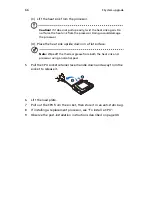
Страница 75: ...tructions described on page 39 Warning The heat sink becomes very hot when the system is on NEVER touch the assembly with any metal or with your hands 2 Remove the CPU air duct Perform the instruction...

Страница 76: ...pside down on a flat surface Note Wipe off the thermal grease from both the heat sink and processor using an alcohol pad 5 Pull the CPU socket retainer lever handle down and away from the socket to re...

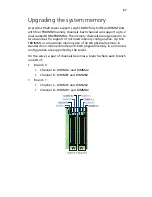
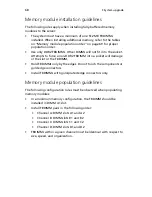
Страница 77: ...nches for support of mirrored memory configuration Up to 8 FBDIMMs or a maximum memory size of 32 GB physical memory in standard non mirrored mode and 16 GB physical memory in a mirrored configuration...

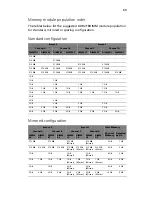
Страница 78: ...ocket will damage or the slot or the FBDIMM Hold FBDIMMs only by the edges Do not touch the components or gold edge connectors Install FBDIMMs with gold plated edge connectors only Memory module popul...

Страница 79: ...GB 1 GB 1 GB 1 GB 1 GB 1 GB 1 GB 1 GB 1 GB 1 GB 1 GB 2 GB 2 GB 2 GB 2 GB 2 GB 2 GB 2 GB 2 GB 2 GB 2 GB 2 GB 2 GB 2 GB 2 GB 2 GB 2 GB 2 GB 2 GB 2 GB 2 GB 2 GB Branch 0 Branch 1 Total Memory Channel A C...

Страница 80: ...ory Channel A Channel B Channel C Channel D Physical Memory Detected by OS DIMM A1 DIMM A2 DIMM B1 DIMM B2 DIMM C1 DIMM C2 DIMM D1 DIMM D2 512 MB Sparing 512 MB 1 GB 512 MB 512 MB Sparing 512 MB 512 M...

Страница 81: ...on the memory modules must be populated in DIMM slots A1 and B1 first then DIMM slots C1 and D1 It allows both memory branches to operate in parallel and simultaneously to achieve equivalent performan...

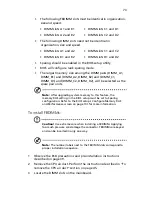
Страница 82: ...ced in reserve so it can be use to replace a failed FBDIMM Note FBDIMM sparing occurs within a given bank of memory and is not supported across branches The system supports two types of memory sparing...

Страница 83: ...setup s Configure Memory RAS and Performance screen on page 101 for more information To install FBDIMMs Caution Use extreme care when installing a FBDIMM Applying too much pressure can damage the con...

Страница 84: ...a FBDIMM but it does not fit easily into the socket you may have inserted it incorrectly Reverse the orientation of the FBDIMM and insert it again 7 Observe the post installation instructions describe...

Страница 85: ...described on page 39 2 Press the holding clips on both sides of the DIMM slot outward to release the DIMM A 3 Gently pull the DIMM upward to remove it from the DIMM slot B 4 Observe the post installa...

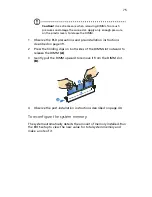
Страница 86: ...wer supply module You can also consider wearing protective gloves WARNING To reduce the risk of personal injury from electric shock hazards do not open the power supply modules There are no serviceabl...

Страница 87: ...iller panel is installed use the finger hole to remove the filler panel out of the bay A 3 Insert the power supply module into the right bay labeled power supply bay 2 until it locks into place 4 Veri...

Страница 88: ...ch power supply module has failed Refer to the Hot plug power supply module LED indicator on page 26 for more information 2 Remove the AC power cord from the power supply being replaced 3 Press the po...

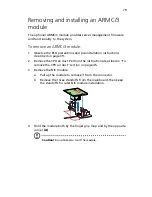
Страница 89: ...described on page 39 2 Remove the CPU air duct Perform the instructions described in To remove the CPU air duct section on page 45 3 Remove the NIC module a Pull up the module to remove it from the co...

Страница 90: ...ule module you must remove the server management port cover module cover on the rear of the server 1 Observe the ESD precautions and pre installation instructions described on page 39 2 Remove the CPU...

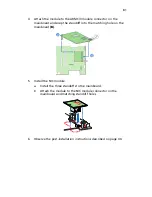
Страница 91: ...standoff into the matching hole on the mainboard B 5 Install the NIC module a Install the three standoffs to the mainboard b Attach the module to the NIC module connector on the mainboard and matchin...

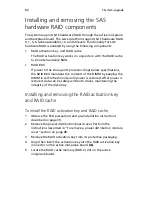
Страница 92: ...f the DIMM by keeping the DIMM in self refresh mode until power is restored After power is restored data can be safely written to drives maintaining the integrity of the disk array Installing and remo...

Страница 93: ...pre installation instructions described on page 39 2 Remove the power distribution board cover Perform the instructions described in To remove a power distribution module cover section on page 48 3 I...

Страница 94: ...n page 40 Installing and removing the RAID BBU To install the RAID BBU 1 Observe the ESD precautions and pre installation instructions described on page 39 2 Remove the power distribution board cover...

Страница 95: ...on the active mid plane board D 7 Observe the post installation instructions described on page 40 To remove the RAID BBU 1 Observe the ESD precautions and pre installation instructions described on pa...

Страница 96: ...em upgrade 86 4 Slide the RAID BBU forward and lift from the chassis B 5 Store the RAID BBU in an antistatic protective wrapper 6 Observe the post installation instructions described on page 40 TP0225...

Страница 97: ...2 Remove the power distribution board cover Perform the instructions described in To remove a power distribution module cover section on page 48 3 Locate the SATA software RAID activation key connecto...

Страница 98: ...o remove a power distribution module cover section on page 48 3 Tightly squeeze the two ends of the RAID activation key to create a small gap at the lock points on the front and rear of the key A 4 Wh...

Страница 99: ...4 BIOS setup...

Страница 100: ...This chapter gives information about the system BIOS and discusses how to configure the system by changing the settings of the BIOS parameters...

Страница 101: ...es to the BIOS setup Note If you repeatedly receive Run Setup messages the battery may be bad In this case the system cannot retain configuration values in CMOS Ask a qualified technician for assistan...

Страница 102: ...screens shown in this User s Guide display default system values These values may not be the same as those in the system Note the following reminders when moving around the setup screen Use the Left...

Страница 103: ...F9 to load the default configuration Press F10 to save changes and close the BIOS setup Press Esc to close the BIOS setup In the descriptive table following each of the screen illustrations settings i...

Страница 104: ...ble The System Date and System Time parameters lets you define the sytem s time and date settings The real time clock keeps the system date and time After setting the date and time you do not need to...

Страница 105: ...abled POST Error Pause If Enabled the system will pause if an error is found during POST Disabled Enabled System Date Sets the date following the month day year format Valid values for weekday month d...

Страница 106: ...alues that define how the system behaves on startup Warning Be cautious in setting parameter values in the Advanced menu as any incorrect value may cause the system to malfunction Press Enter to enter...

Страница 107: ...icates the processor front side bus speed Hyper Threading Technology Enables or disables the Hyper Threading Technology function of the processor Enabled Disabled Enhanced Intel SpeedStep Technology W...

Страница 108: ...Enabled Disabled Hardware Prefetcher Enables or disables the speculative prefetch unit within the processor s Note Changing this feature may affect system performance Enabled Disabled Adjacent Cache...

Страница 109: ...99 Processor Information The screen below appears when you select the Processor 1 or 2 Information menu...

Страница 110: ...of onboard memory The memory size is automatically detected by BIOS during the POST If you install additional mamory the system automatically adjusts this parameter to display the new memory size Eff...

Страница 111: ...y configuration details and configure the memory modules in the server Configure Memory RAS and Performance Press Enter to access the Configure Memory RAS and Performance submenu DIMM information Indi...

Страница 112: ...ements of the selected configuration Yes No Memory Sparing Possible Indicates whether a sparing configuration is possible with the current installed memory If No is displayed you may need to install m...

Страница 113: ...Enables or disables the integrated parallel ATA controller Enabled Disabled Onboard SATA Controller Enables or disables the integrated Serial ATA controller Enabled Disabled SATA Mode When set to Enha...

Страница 114: ...Command Queuing and hot plug Note Requires an AHCI aware OS Disabled Enabled ConfigureSATA as RAID Enables or disables the software RAID technology Option ROM within the ESB2 E controller Disabled En...

Страница 115: ...ller Enabled Disabled SAS Option ROM If enabled initializes the the embedded SAS device Option ROM Enabled Disabled Configure SAS as SW RAID Enables or disables the Embedded Server RAID Technology on...

Страница 116: ...Parameter Description Option Serial A Enable Enables or disables the onboard serial A port Enabled Disabled Address Set the base I O address for the serial A port 3F8 2F8 2E8 3E8 IRQ Set the interrup...

Страница 117: ...address for the serial B port 2F8 3E8 2E8 3F8 IRQ Set the interrupt request line for the serial B port 3 4 Parameter Description Option USB Controller Enables or disables the USB controller If disabl...

Страница 118: ...elect the number of seconds POST waits for the USB mass storage device after the start unit command 20 Sec 10 Sec 30 Sec 40 Sec Storage Emulation When set to Auto USB mass storage devices with less th...

Страница 119: ...channel card Parameter Description Option PCI Memory Mapped IO Space This selects the amount of memory that is reserved for PCI address space below 4GB for PCI devices 2 50 GB 2 75 GB 3 00 GB 3 25 GB...

Страница 120: ...bled NIC1 and NIC2 cannot be used to boot the system Enabled Disabled NIC 1 or 2 MAC Address Indicates the media access control of the system s LAN controller I O Acceleration Technology Enables or di...

Страница 121: ...ormance Acoustics Altitude When set to less than 300 m 980 ft it will provide the best performance option for servers operating at or near sea level When set to 301m 900m 980 ft 2950 ft it will provid...

Страница 122: ...zed access to the BIOS setup utility Not Installed Installed User Password Secures the system against unauthorized use Once you set this password you have to type it whenever you boot the system User...

Страница 123: ...s Change Administrator Password or Change User Password then press Enter 2 Type the original password then press Enter 3 Type a new password then press Enter 4 Retype the password to verify the first...

Страница 124: ...events that occur in the system eg system temperature changes fan stops over temperature over voltage fan failures etc Parameter Description Option Assert NMI on SERR Enables or disables the PCI bus...

Страница 125: ...e When Enabled the BMC Baseboard Management Controller will reset the system if BIOS does not complete the POST before the FRB 2 Fault Resilient Booting timer expires Enabled Disabled O S Boot Watchdo...

Страница 126: ...4 BIOS setup 116 Console Redirection The Console Redirection submenu lets you enable or disable the console redirection parameters for server management tasks over the serial port...

Страница 127: ...117 System Information The System Information submenu displays basic information about the server unit...

Страница 128: ...ets the automatic boot time out value Note A value ot 65535 will disable the timeout completely 10 1 Boot Option 1 Sets the device from which the system will first attempt to boot up Boot Option 2 Set...

Страница 129: ...priority sequence for available CD drives Floppy Order Specifies the boot device priority sequence for available FDD Network Device Order Specifies the boot device priority sequence for available net...

Страница 130: ...u specify the preferred settings for system bootup Parameter Description Option Network Device Sets the boot order of the Bootstrap Entry Vector Devices Network devices are devices which have a bootab...

Страница 131: ...the device priority during system bootup The server will attempt to boot from the first device on the list If the first device is not available it will continue down the list until it reaches an avai...

Страница 132: ...4 BIOS setup 122 Error Manager The Error Manager menu lets you view the system POST errors detected by the system...

Страница 133: ...changes made and close the BIOS setup Save Changes Saves changes made in the BIOS setup Discard Changes Discards all changes made in the BIOS setup Restore Defaults Loads the default settings for all...

Страница 134: ...4 BIOS setup 124 Save as User Default Values Saves current values to be restored later Restore User Default Values Restores previously saved user default values Parameter Description...

Страница 135: ...hat are provided in the Readme file distributed with the BIOS image file before attempting a BIOS upgrade The release notes contain critical information regarding jumper settings specific fixes or oth...

Страница 136: ...4 BIOS setup 126...

Страница 137: ...5 Troubleshooting...

Страница 138: ...This chapter provides possible solutions for specific problems If you cannot correct the problem contact your local Acer representative or authorized dealer for assistance...

Страница 139: ...e system Before going through in depth troubleshooting attempt first to reset the system using one of the methods below G K Problems following initial system installation Problems that occur at initia...

Страница 140: ...oards and peripheral devices correct If applicable ensure that there are no conflicts for example two expansion boards sharing the same interrupt Are all peripheral devices installed correctly Are all...

Страница 141: ...he system Turn on the video monitor Set its brightness and contrast controls to at least two thirds of their maximum ranges see the documentation supplied with your video display monitor 4 If the oper...

Страница 142: ...power cord is connected correctly Make sure that the wall outlet has power Test it by plugging another device Remove all expansion cards and see if the system boots If successful add the cards back i...

Страница 143: ...according to the system requirements Remove and reseat the CPU HDD activity indicator does not light Do the following Make sure the drive is not disabled in the BIOS setup utility Make sure the drive...

Страница 144: ...is unscratched Make sure ODD and plastic guide are properly connected Hard drives are not recognized Do the following Make sure the disk controller is not disabled in the BIOS setup Make sure the dri...

Страница 145: ...curely attached to the correct connector at the system rear panel Try a different network cable Make sure you are using the correct and the current drivers Make sure the driver is loaded and the proto...

Страница 146: ...reinstall the drivers Run the diagnostics Network activity indicator does not light Do the following Make sure the correct network drivers are loaded on the system Network might be idle Try accessing...

Страница 147: ...cards and see if the system boots If successful add the cards back in one at a time with a reboot between each addition Make sure the memory modules comply with the system requirements Make sure the m...

Страница 148: ...e the video monitor s signal and power cords properly connected Is the video monitor working correctly when plugged into a different system System cooling fan do not rotate properly If the system cool...

Страница 149: ...e beep codes to inform you of error conditions The beep code occurs only when a critical error occurs or when the BIOS fails to boot to the operating system Not all error conditions are supported by t...

Страница 150: ...11 Indicates a fatal error Consult your dealer or local Acer representative for assistance If beep codes are generated even when all PCI cards are absent consult your system manufacturer s technical s...

Страница 151: ...initiated 1 5 1 1 Processor failure Reseat or replace the failed processor 1 5 2 1 No processor is installed or the CPU 1 socket is empty Reseat or replace the failed processor 1 5 2 3 Processor confi...

Страница 152: ...er Each bit in the upper nibble is represented by a red LED and each bit in the lower nibble is represented by a green LED If both bits are set in the upper and lower nibbles then both red and green L...

Страница 153: ...troller settings 0x27h OFF G A G Initializing memory such as ECC init 0x28h G OFF R OFF Testing memory PCI Bus 0x50h OFF R OFF R Enumerating PCI busses 0x51h OFF R OFF A Allocating resources to PCI bu...

Страница 154: ...A Disabling the console controller 0x7Ah G R A R Enabling the console controller Keyboard PS 2 or USB 0x90h R OFF OFF R Resetting the keyboard 0x91h R OFF OFF A Disabling the keyboard 0x92h R OFF G R...

Страница 155: ...e IDE CDROM detection etc 0xBCh A G R R Enabling configuring a removable media device Boot Device Selection 0xD0 R R OFF R Trying boot device selection 0xD1 R R OFF A Trying boot device selection 0xD2...

Страница 156: ...ion module use PEIM Driver Execution Environment DXE Core 0xE4h R A R OFF Entered EFI driver execution phase DXE 0xE5h R A R G Started dispatching drivers 0xE6h R A A OFF Started connecting drivers DX...

Страница 157: ...set Reset System has been called Pre EFI Initialization Module PEIM Recovery 0x30h OFF OFF R R Crisis recovery has been initiated because of a user request 0x31h OFF OFF R A Crisis recovery has been i...

Страница 158: ...5 Troubleshooting 148...

Страница 159: ...Appendix A Acer Altos R520 rack installation guide...

Страница 160: ...This appendix shows you how to set up the Acer Altos R520 server in a rack mount configuration...

Страница 161: ...e or more systems are fully extended out of the rack assembly You must also consider the weight of any other devices installed in the rack assembly The equipment rack must be installed according to th...

Страница 162: ...mperature Reduced airflow The amount of airflow required for the safe operation of the equipment should not be compromised when installing the system in a rack Mechanical loading Exercise care when mo...

Страница 163: ...on The Acer Altos R520 server should be mounted into a rack A tool less rack rail and CMA cable management arm kit is available for installing system to a rack cabinet The figure below shows the serve...

Страница 164: ...les with closer spacing to the center of the next pair is equivalent to 1U Note The unit of measurement used in this guide is U 1U 1 75 inches or 44 45 mm The total sum of the heights of all component...

Страница 165: ...e that two or more people help in installing the server To install the system into a four post rack 1 Remove the inner rails from the mounting rails 1 Extend the inner rail from the mounting rail unti...

Страница 166: ...rsonal injury care should be taken when pressing the inner rail release latches and sliding the component into the rack 2 Attach the inner rails to both sides of the server Align the screw holes of th...

Страница 167: ...attern on page 154 for more information 2 Align and insert the mounting rails into the rack posts mounting holes A 3 Make certain the proper mounting holes on rack post are selected 4 Use two metal sc...

Страница 168: ...Appendix A Acer Altos R520 rack installation guide 158 6 Fully extend the mounting rails on the rack...

Страница 169: ...ponent into the rack 1 Carefully align the inner rails attached to the server with the fully extended mounting rails on the rack 2 Press the release latch on both sides of the server A 3 Insert the in...

Страница 170: ...nds keeping the cables untangled and attached to the system 1 Insert the smaller CMA extension into the rear of the left inner rail A1 2 Insert the larger CMA extension into the rear of left mounting...

Страница 171: ...161 6 Connect the power peripheral and networking cables into their appropriate ports Refer to Connecting peripherals on page 32 for detailed instructions 7 Route all cables through the cable clips...

Страница 172: ...Appendix A Acer Altos R520 rack installation guide 162...

Страница 173: ...Appendix B RAID configuration...

Страница 174: ...This appendix gives an overview of the different RAID configuration that you can use to configure RAID settings for the system hard drives...

Страница 175: ...n during the POST Power On Self Test press Ctrl G to enter the Intel RAID BIOS Console Virtual Configuration When the Adapter Selection page displayed on the screen please click on Start to continue L...

Страница 176: ...d 8 Click on Home to go back to the configuration menu 9 Select Exit click on Yes and press Ctrl Alt Del to reboot the system Now you can reboot the system and install the Operating System Assigning a...

Страница 177: ...the Options to Enabled 3 Press F10 save the configuration changes and exit setup Enter the integrated SAS SW RAID Configuration Utility When you see the Intel Embedded Server RAID Technology II infor...

Страница 178: ...tting and press Enter to return to the ARRAY SELECTION MENU 8 Press Enter to end the array configuration 9 Select Yes to Save Configuration and press any key to return to the Configure menu Initial RA...

Страница 179: ...the options to Enabled 3 Press F10 save the configuration changes and exit setup Enter the onboard SATA RAID Configuration Utility When you see the Intel Embedded Server RAID Technology II informatio...

Страница 180: ...setting and press Enter to return to the ARRAY SELECTION MENU 8 Press Enter to end the array configuration 9 Select Yes to Save Configuratio and press any key to return to the Configure menu Initial R...

Страница 181: ...m OS 35 control panel 17 mini control panel 17 standard control panel 18 CPU installing 61 removing 65 CPU air dam removing 47 CPU air duct installing 46 removing 45 46 D DIMM module installation guid...

Страница 182: ...S RAID create RAID Volume 165 integrated SAS SW RAID create RAID Volume 167 onboard SATA RAID create RAID Volume 169 RAID configuration utility 163 rear panel 9 LED indicators 26 removing ARMC 3 modul...

Страница 183: ...35 cannot detect bootable drive 134 cannot detect memory 134 cannot eject DVD CD tray 134 cannot read DVD CD 134 controller stopped working 136 CPUs not recognized 133 DVD CD drive no light 133 HDD LE...

Страница 184: ...174...
Отзывы: