Appendix B: RAID configuration
168
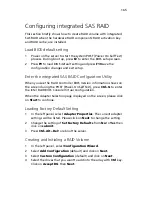
2
Select
New Configuration
from the Configuration menu and
select
Yes
to continue. An array selection menu displays the
devices connected to the current controller.
3
Press the arrow keys to choose specific physical drives and press
spacebar to associate the selected drive with the current array. The
indicator for selected drive change from READY to ONLINE
4
Add 2 drives to current array and press
Enter
to finish creating
current array.
5
Press
Enter
again to select array to configure.
6
Press spacebar to select the array and press
F10
to configure the
logical drive
7
The default RAID level for 2 disk drives is RAID1. Select
Accept
to
use the default setting and press
Enter
to return to the ARRAY
SELECTION MENU.
8
Press
Enter
to end the array configuration.
9
Select
Yes to Save Configuration
and press any key to return to
the Configure menu.
Initial RAID Volume
1
Press
Esc
to return to the Management Menu.
2
Select
Initialize
from Management menu. All logical drives should
be listed under Logical Drives.
3
Press spacebar to select drives for initialization. The selected drive
will be shown in yellow.
4
After selecting the drives, press
F10
and select
Yes
to start the
initialization process.
5
When initialization is complete, press any key to continue.
6
Press
Esc
to return to the Management Menu.
Save and Exit Embedded RAID II Configuration Utility
1
When RAID configuration and initialization is complete, press
Esc
in the Management Menu
2
Select
Yes
to exit the Embedded RAID Configuration Utility.
3
Press
Ctrl
+
Alt
+
Del
to reboot the server.
Содержание Network Device Altos R520
Страница 1: ...Acer Altos R520 Series User s Guide...
Страница 10: ...x...
Страница 11: ...1 System tour...
Страница 38: ...1 System tour 28...
Страница 39: ...2 System setup...
Страница 47: ...3 System upgrade...
Страница 99: ...4 BIOS setup...
Страница 109: ...99 Processor Information The screen below appears when you select the Processor 1 or 2 Information menu...
Страница 127: ...117 System Information The System Information submenu displays basic information about the server unit...
Страница 132: ...4 BIOS setup 122 Error Manager The Error Manager menu lets you view the system POST errors detected by the system...
Страница 136: ...4 BIOS setup 126...
Страница 137: ...5 Troubleshooting...
Страница 158: ...5 Troubleshooting 148...
Страница 159: ...Appendix A Acer Altos R520 rack installation guide...
Страница 160: ...This appendix shows you how to set up the Acer Altos R520 server in a rack mount configuration...
Страница 168: ...Appendix A Acer Altos R520 rack installation guide 158 6 Fully extend the mounting rails on the rack...
Страница 172: ...Appendix A Acer Altos R520 rack installation guide 162...
Страница 173: ...Appendix B RAID configuration...
Страница 184: ...174...


