Appendix A: Acer Altos R520 rack installation guide
156
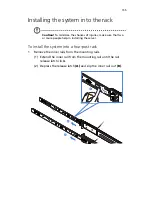
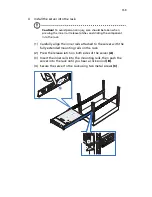
(3) Do the same thing to the other mounting rail.
Caution!
To avoid personal injury, care should be taken when
pressing the inner rail release latches and sliding the component
into the rack.
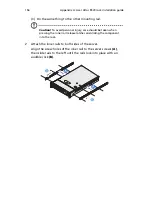
2
Attach the inner rails to both sides of the server.
Align the screw holes of the inner rail to the server screws
(A)
,
then slide rails to the left until the rails lock into place with an
audible click
(B)
.
Содержание Network Device Altos R520
Страница 1: ...Acer Altos R520 Series User s Guide...
Страница 10: ...x...
Страница 11: ...1 System tour...
Страница 38: ...1 System tour 28...
Страница 39: ...2 System setup...
Страница 47: ...3 System upgrade...
Страница 99: ...4 BIOS setup...
Страница 109: ...99 Processor Information The screen below appears when you select the Processor 1 or 2 Information menu...
Страница 127: ...117 System Information The System Information submenu displays basic information about the server unit...
Страница 132: ...4 BIOS setup 122 Error Manager The Error Manager menu lets you view the system POST errors detected by the system...
Страница 136: ...4 BIOS setup 126...
Страница 137: ...5 Troubleshooting...
Страница 158: ...5 Troubleshooting 148...
Страница 159: ...Appendix A Acer Altos R520 rack installation guide...
Страница 160: ...This appendix shows you how to set up the Acer Altos R520 server in a rack mount configuration...
Страница 168: ...Appendix A Acer Altos R520 rack installation guide 158 6 Fully extend the mounting rails on the rack...
Страница 172: ...Appendix A Acer Altos R520 rack installation guide 162...
Страница 173: ...Appendix B RAID configuration...
Страница 184: ...174...


