


12
Chapter 1
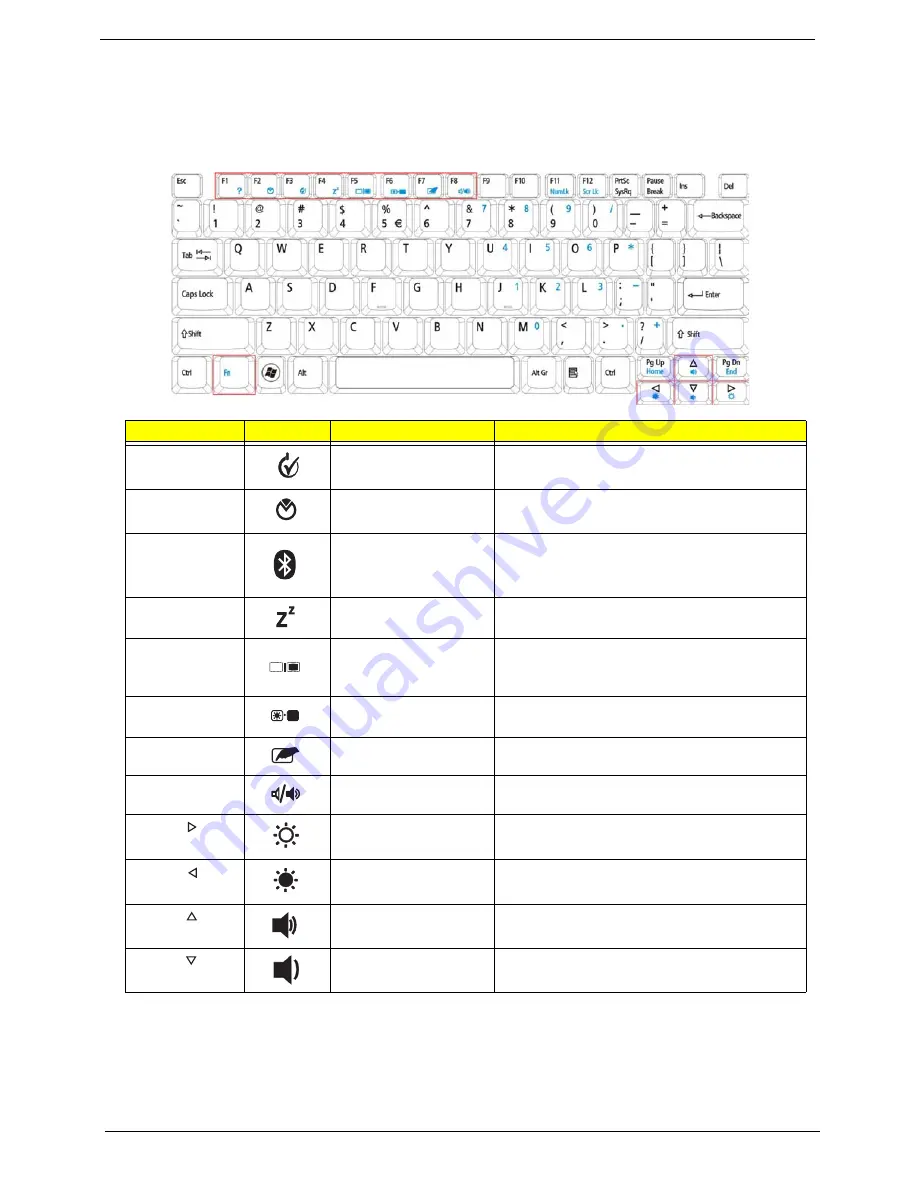
Hot Keys
The computer employs hotkeys or key combinations to access most of the computer's controls like screen
brightness and volume output.
To activate hotkeys, press and hold the
<Fn>
key before pressing the other key in the hotkey combination.
Hotkey
Icon
Function
Description
<Fn> + <F1>
Power Options
Display the Power Options Properties
dialog box.
<Fn> + <F2>
System
Properties
Display the System Properties dialog box.
<Fn> + <F3>
Bluetooth
communication
switch
Enables/disables the Bluetooth function.
<Fn> + <F4>
Sleep
Puts the computer in Sleep mode.
<Fn> + <F5>
Display toggle
Switches display output between the display
screen, external monitor (if connected) and
both.
<Fn> + <F6>
Screen blank
Turns the display screen backlight off to save
power. Press any key to return.
<Fn> + <F7>
TouchPad toggle
Turns the internal TouchPad on and off.
<Fn> + <F8>
Speaker toggle
Turns the speakers on and off.
<Fn> + < >
Brightness up
Increases the screen brightness.
<Fn> + < >
Brightness down
Decreases the screen brightness.
<Fn> + < >
Volume up
Increases the sound volume.
(only for certain models)
<Fn> + < >
Volume down
Decreases the sound volume.
Содержание Aspire One AOP531h
Страница 6: ...VI ...
Страница 10: ...X Table of Contents ...
Страница 41: ...Chapter 2 31 Clear User or Supervisor Password 1 Open the RAM door 2 Short RTC_RST ...
Страница 54: ...44 Chapter 3 Removing the SIMM card 1 Press the SIMM card in to eject it 2 Pull the card out from the slot ...
Страница 62: ...52 Chapter 3 7 Lift the Keyboard FFC securing latch as shown 8 Disconnect the FFC and remove the Keyboard ...
Страница 83: ...Chapter 3 73 Pull the cable completely away from the bezel ...
Страница 93: ...Chapter 3 83 Replacing the Camera Board 1 Reconnect the connector as shown 2 Place the camera pcb ...
Страница 95: ...Chapter 3 85 4 Replace the four screws and screw caps ...
Страница 107: ...Chapter 3 97 The upper cover is now ready to attach to the bottom cover ...
Страница 109: ...Chapter 3 99 Turn the unit over and affix the five screws in the top cover ...
Страница 115: ...Chapter 3 105 Replacing the SIMM Card Insert the SIMM Card into the slot ...
Страница 130: ...120 Chapter 4 ...
Страница 138: ...128 Chapter 4 ...
Страница 152: ...142 Chapter 6 ...
Страница 153: ...Chapter 6 143 ...
Страница 267: ...257 Appendix A ...
Страница 268: ...Appendix A 258 ...
Страница 274: ...264 Appendix B ...
Страница 276: ...266 Appendix C ...
Страница 279: ...269 W Windows 2000 Environment Test 260 Wireless Function Failure 119 WLAN Antennas Removing 77 Replacing 79 ...
Страница 280: ...270 ...


