


30
Chapter 2
Information
The Information screen displays a summary of your computer hardware information.
NOTE:
The system information is subject to different models.
Parameter
Description
CPU Type
This field shows the CPU type and speed of the system.
CPU Speed
This field shows the speed of the CPU.
HDD Model Name
This field shows the model name of HDD installed on primary IDE master.
HDD Serial Number
This field displays the serial number of HDD installed on primary IDE master.
ATAPI Model Name
This field shows the model name of the Optical device installed in the system.
System BIOS Version
Displays system BIOS version.
VGA BIOS Version
This field displays the VGA firmware version of the system.
Serial Number
This field displays the serial number of this unit.
Asset Tag Number
This field displays the asset tag number of the system.
Product Name
This field shows product name of the system.
Manufacturer Name
This field displays the manufacturer of this system.
UUID Number
Universally Unique Identifier (UUID) is an identifier standard used in software
construction, standardized by the Open Software Foundation (OSF) as part of
the Distributed Computing Environment (DCE).
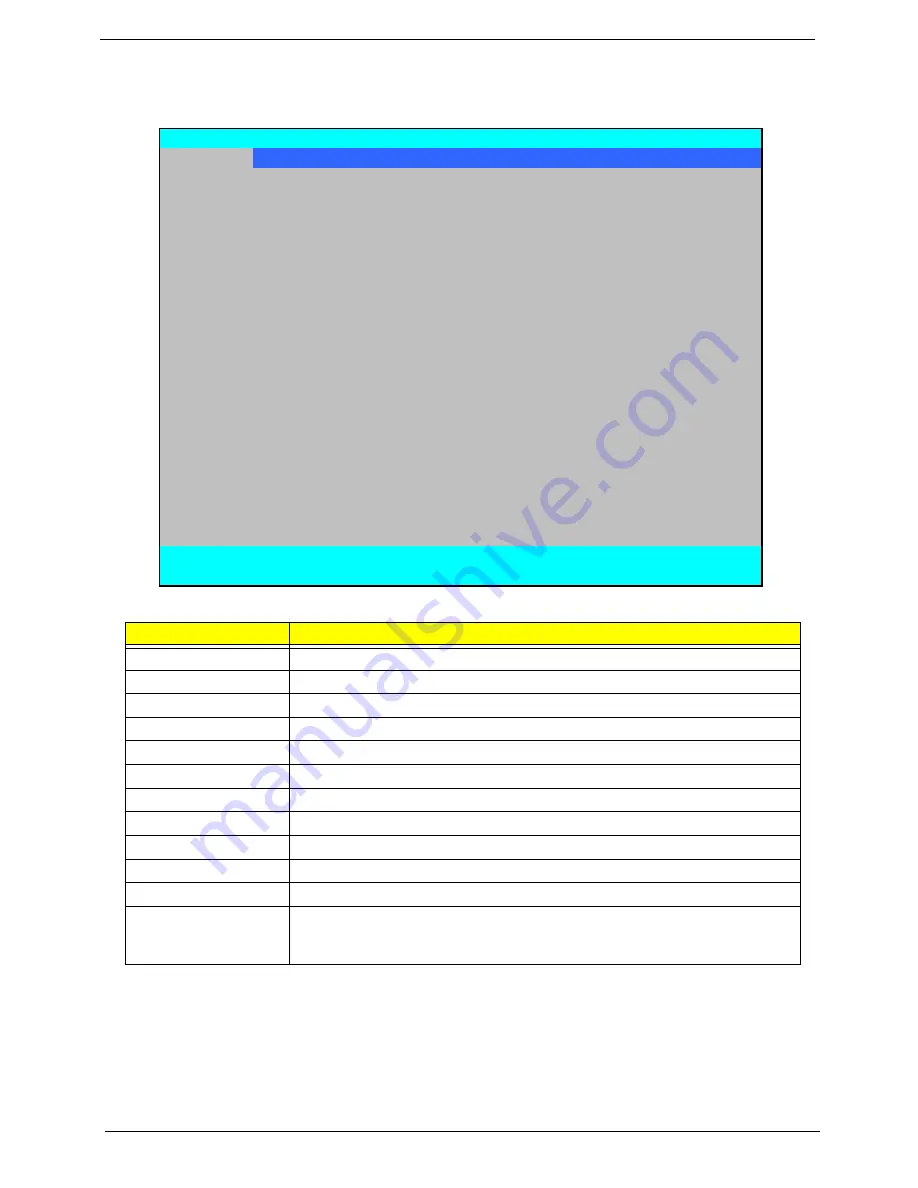
InsydeH20 Setup Utility
Rev 3.5
Information
Main Advanced
Security
Power
Boot
Exit
CPU Type:
Intel(R) Core(tm)2 Duo CPU P7350 @ 2.00 GHz
CPU Speed:
2.00 GHz
HDD Model Name:
ST9160310AS
HDD Serial Number:
5SV06JJS
ATAPI Model Name:
Slimtype DVD A DS8A2S
System BIOS Version:
V0.09
VGA BIOS Version:
Intel V1659
Serial Number:
Asset Tag Number:
Product Name:
Aspire 4935
Manufacturer Name:
Acer
UUID:
21401492-B677-3996-B6BB-001EECCA8F37
F1
Help
↑↓
Select Item
F5/F6
Change Values
F9
Setup Default
ESC
Exit
←→
Select Menu
Enter
Select
X
Submenu
F10
Save and Exit
Содержание Aspire 4935 Series
Страница 6: ...VI ...
Страница 10: ...X Table of Contents ...
Страница 60: ...50 Chapter 2 ...
Страница 68: ...58 Chapter 3 7 Carefully open the HDD Cover ...
Страница 95: ...Chapter 3 85 5 Remove the TouchPad Bracket from the Upper Base ...
Страница 100: ...90 Chapter 3 5 Lift the USB Board clear of the casing ...
Страница 104: ...94 Chapter 3 7 Lift the mainboard right side first to remove from the base ...
Страница 112: ...102 Chapter 3 4 Lift the bezel away from the panel ...
Страница 115: ...Chapter 3 105 4 Lift the LCD Panel out of the casing as shown ...
Страница 122: ...112 Chapter 3 13 Ensure that the securing pin is properly located ...
Страница 130: ...120 Chapter 3 7 Insert the cable through the casing to the top side as shown ...
Страница 143: ...Chapter 3 133 13 Replace the two securing screws ...
Страница 148: ...138 Chapter 3 4 Turn the computer over and replace the six securing screws as shown ...
Страница 154: ...144 Chapter 3 ...
Страница 193: ...Chapter 6 183 ...
Страница 232: ...Appendix A 222 ...
Страница 240: ...230 Appendix C ...


