


1SFC132081M0201 | Installation and commissioning manual |
Installation
35
4.2.6.1
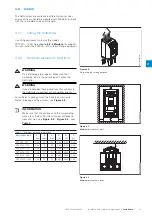
Installation Movable HMI
INFORMATION
Do not use shielded RJ45 cables. Use a cable
length of maximum 3m to reduce distortion of the
communication.
INFORMATION
The Softstarter HMI is IP66 approved when
installed on the enclosure door.
You can use the movable HMI to copy parameters
from one Softstarter to another during commissioning
(temporarily handheld).
Included with the Softstarter comes:
• Rubber
gasket
• Plastic
screw-nut
• RJ45 Network cable
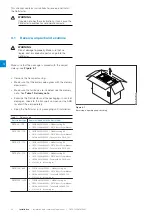
1.
To remove the movable HMI from the Softstarter,
loosen the plastic latch below the movable HMI,
see
1
and
2
in
Figure 4.9.
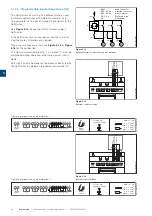
2.
Drill a hole where to attach the movable HMI.
Maximum dimension of the hole is Ø26 (Ø 1.02”),
see
1
in
Figure 4.9
. Put the rubber packing
around the threaded network connector on the
movable HMI, see
2
in
Figure 4.9
. Push the
threaded network connector through the drilled
hole.
See
3
in
Figure 4.9
. Fasten the plastic screw-nut
on the threaded network connector, with 2 Nm
(17.7 lb/in).
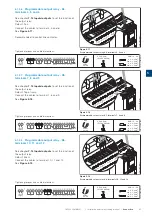
3.
Remove the RJ45 plug see
4
. Connect one end of
the network cable to the network port on the front
of the Softstarter
5
in
Figure 4.10.
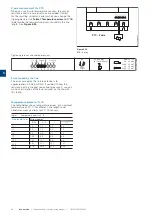
4.
Connect the other end of the network cable to the
network port on the back of the movable HMI, see
6
in
Figure 4.11.
5.
Make sure that the network cable is properly
inserted into the 2 ports. Prevent the rest of the
cable to get caught between the door, see
7
in
Figure 4.12.
Close the door of the enclosure and
set the operation voltage switch to ON. Make sure
that the external HMI works.
Figure 4.9
Drill a hole for the detachable keypad
2 Nm (17,7 lb.in)
(Ø 1.02”)
Ø26
Min. Ø25,5 (Ø 1,0”)
Max. Ø28 (Ø 1,1”)
1SFC132081M0201
3
2
1
Figure 4.10
Connect one end of the network cable
1SFC132081M0201
5
4
Figure 4.11
Connect the other end of the network cable
1SFC132081M0201
6
Figure 4.12
Roll the rest of the hanging cable
1SFC132081M0201
7
4
Содержание PSTX Series
Страница 1: ...1SFC132081M0201 Softstarters Type PSTX30 PSTX1250 Installation and commissioning manual...
Страница 4: ......
Страница 6: ......
Страница 10: ...10 Introduction Installation and commissioning manual 1SFC132081M0201 1...
Страница 16: ...16 Quick start Installation and commissioning manual 1SFC132081M0201 2...
Страница 29: ...1SFC132081M0201 Installation and commissioning manual Description 29 3...
Страница 30: ...30 Description Installation and commissioning manual 1SFC132081M0201 3...
Страница 36: ...36 Installation Installation and commissioning manual 1SFC132081M0201 4...
Страница 50: ...50 Connection Installation and commissioning manual 1SFC132081M0201 6...
Страница 72: ...72 Human machine interface HMI Installation and commissioning manual 1SFC132081M0201 6...
Страница 143: ...1SFC132081M0201 Installation and commissioning manual Functions 143 7...
Страница 144: ...144 Functions Installation and commissioning manual 1SFC132081M0201 7...
Страница 148: ...148 Communication Installation and commissioning manual 1SFC132081M0201 8...
Страница 156: ...156 Maintenance Installation and commissioning manual 1SFC132081M0201 9...
Страница 168: ...168 Troubleshooting Installation and commissioning manual 1SFC132081M0201 10...
Страница 176: ...176 Wiring and application diagrams Installation and commissioning manual 1SFC132081M0201 11...
Страница 181: ...1SFC132081M0201 Installation and commissioning manual Third party licenses 181 12...
Страница 183: ...1SFC132081M0201 Installation and commissioning manual Revision 183 13...
Страница 187: ...1SFC132081M0201 Installation and commissioning manual Index 187 14...