ABB PSTX Series Скачать руководство пользователя страница 131

1SFC132081M0201       |   Installation and commissioning manual   |   

Functions

           131

7.23 Settings

The settings menu contains these Softstarter set-up 

parameters:

• Language

•  Date and time

•  Display settings (for HMI)

•  Reset from defaults 

For settings and navigation, 

 see chapter 6.4.6 Settings.

7.24 Assistants

 
The Assistants menu contains default settings and 
parameters. Use this menu to set only the necessary 
parameters before you can start the motor. All necessary 
input data shows up in an automatic loop. The Assistants 
menu is divided in:

• Basic 

set-up 

• Application 

set-up

INFORMATION

After you select an application and make your 
changes, do not select this application again 
because this resets the application to the default 
settings.

Enter the Assistants menu


Push  “Menu” and select Assistants with the Navigation 
keys.  
Push  “Select” to enter the Assistants menu. 

Basic set-up


The Basic set-up menu is divided in 5 steps: 
Language, Date and time, Motor data and System 
configuration.

Application set-up


The Application set-up are quick settings for Applications, 
Values and Tune settings. Use the Navigation keys to 
select Application set-up. Push  “Select” to enter the 
Application set-up. 
Select for what type of application you use the Softstarter 
by pushing  “Select”. 
For more details, see


chapter

 2 Quick start. 

7

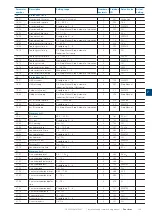
Содержание PSTX Series

Страница 1: ...1SFC132081M0201 Softstarters Type PSTX30 PSTX1250 Installation and commissioning manual...

Страница 2: ...tion to third parties is not permitted This document is written carefully If you nd an error please notify us as soon as possible The data contained in this manual is intended solely for the product d...

Страница 3: ...sonal injury WARNING Approved personnel are allowed to install and make the electrical connection of the Softstarter in accordance with existing laws and regulations INFORMATION Information sign tells...

Страница 4: ......

Страница 5: ...cription 4 Installation 5 Connection 6 Human machine interface HMI 7 Functions 8 Communication 9 Maintenance 10 Troubleshooting 11 Wiring and application diagrams 12 Third party licenses 13 Revision 1...

Страница 6: ......

Страница 7: ...ioning manual Introduction 7 1 1 1 Documentation for Softstarter PSTX30 PSTX12500 8 1 1 1 Installation and commissioning manual 1 2 Intended audience 9 1 3 Revision notes and other documents 9 1 4 Acr...

Страница 8: ...Third party Licenses 3 rd party licenses used by Softstarter 13 Revision Shows all revisions of the manual 14 Index Index of the content of this manual 1 1 2 Installation and commissioning manual Sho...

Страница 9: ...abb com lowvoltage Select the link Control Products on the site and then continue to Softstarters 1 4 Acronyms and abbreviations Table 3 Acronyms and abbreviations Acronym Abbreviation Description BP...

Страница 10: ...10 Introduction Installation and commissioning manual 1SFC132081M0201 1...

Страница 11: ...132081M0201 Installation and commissioning manual Quick start 11 2 2 1 Connection 12 2 2 Configuration 14 2 2 1 Basic set up 14 2 2 2 Application set up 14 2 3 How to start stop the motor 15 2 Quick s...

Страница 12: ...1 Connection 1 To install the Softstarter see chapter 4 Installation INFORMATION You can connect PSTX Softstarters In Line 1 and Inside Delta 2 see Figure 2 1 2 Connect the main circuit terminals 1L1...

Страница 13: ...l supply voltage switch to ON 10 The green Ready LED is constant lit if the following conditions are fulfilled Control supply voltage is detected Mains three phase voltage is detected Mains frequency...

Страница 14: ...or not Use the Navigation keys to select Yes or No and then push Save 7 Push to enter step 5 5 and then Push Done to finish the Basic setup For more settings enter Application set up 2 2 2 Application...

Страница 15: ...ftstarters PSTX30 PSTX170 to the operation voltage for the rst time apply control supply voltage to open the bypass relays see 2 1 Connection This is necessary to avoid an accidental start of the equi...

Страница 16: ...16 Quick start Installation and commissioning manual 1SFC132081M0201 2...

Страница 17: ...efined protection 19 3 1 3 Warning functions 19 3 1 4 Fault detection functions 19 3 1 5 Softstarter overview 20 3 1 6 Type designation 21 3 1 7 Environmental influence 21 3 1 8 Specifications 21 3 2...

Страница 18: ...the Softstarter in general specifications and available components and spare parts 3 1 Overview The PSTX Softstarter has the latest technology for soft start and soft stop of squirrel cage motors The...

Страница 19: ...urrent imbalance warning Overvoltage warning Under voltage warning EOL time to trip warning EOL warning Total Harmonic Distortion THD warning Voltage imbalance warning Power factor underload warning C...

Страница 20: ...lected most parameters can also be changed from this interface Overview See Figure 3 1 Figure 3 1 Softstarter overview Ready Run Fault Protection Com1 Com2 4T2 2T1 6T3 3L2 1L1 5L3 PSTX L 100 250V 50 6...

Страница 21: ...370A Softstarter range 1SFC132081M0201 3 1 8 Specifications Table 2 Specifications General data Description Degree of protection Main circuit PSTX30 105 IP10 PSTX142 1250 IP00 Degree of protection Sup...

Страница 22: ...2 coordination semiconductor fuses must be used Table 5 Fuses ratings and power losses Current range Max power loss at rated Ie Max fuse raiting main circuit 1 2 Bussmann fuses DIN43 620 Knife Power...

Страница 23: ...00 PSTX170 690 70 1SFA898211R7000 51 3 171A 90 110 160 160 200 257 171 300 PSTX210 370 PSTX210 600 70 1SFA898112R7000 63 210A 59 110 132 102 184 250 210 360 PSTX210 690 70 1SFA898212R7000 63 210A 110...

Страница 24: ...000 50 60 125 150 75 100 200 250 169 292 PSTX170 690 70 1SFA898211R7000 125 150 200 250 169 292 PSTX210 370 PSTX210 600 70 1SFA898112R7000 60 75 150 200 100 125 250 300 192 332 PSTX210 690 70 1SFA8982...

Страница 25: ...mm 4 7 in 298 5 mm 11 7 in 7 5 mm 0 3 in 314 mm 12 4 in 258 mm 10 2 in 30 mm 1 2 in 4x 14 2x 1SFC132081M0201 Figure 3 3 Dimensions PSTX30 105 219 6 mm 8 6 in 238 3 mm 9 3 in 377 mm 14 8 in 165 mm 6 5...

Страница 26: ...151 mm 5 9 in 18 2x 200 mm 7 9 in 258 mm 10 2 in 43 7 mm 1 7 in 4x 19 6 mm 0 8 in 6x 1SFC132081M0201 Figure 3 5 Dimensions PSTX210 370 1SFC132081M0201 361 mm 14 2 in 282 15 mm 11 1 in 262 82 mm 10 3 i...

Страница 27: ...2 4 in 152 2x mm 5 9 in 39 mm 1 5 in 172 mm 6 7 in 435 mm 17 1 in 173 4 mm 6 8 in 261 6 mm 10 2 in 46 5 mm 1 8 in Figure 3 7 Dimensions PSTX720 840 Figure 3 8 Dimensions PSTX1050 304 5 mm 11 9 in 515...

Страница 28: ...m 5 2 in 301 5 mm 11 8 in 50 6x mm 1 9 in 84 35 mm 3 32 in 84 35 mm 3 32 in 565 mm 22 2 in 515 mm 20 2 in 430 mm 16 9 in 261 3 mm 10 2 in 62 6 6x mm in 8 6x mm 0 3 in 366 5 mm 14 4 in 62 mm 2 4 in 152...

Страница 29: ...1SFC132081M0201 Installation and commissioning manual Description 29 3...

Страница 30: ...30 Description Installation and commissioning manual 1SFC132081M0201 3...

Страница 31: ...Receive unpack and examine 32 4 2 Install 33 4 2 1 Lifting the Softstarter 33 4 2 2 Minimum distance to wall front 33 4 2 3 Minimum enclosure dimensions 34 4 2 4 Maximum installation angle 34 4 2 5 D...

Страница 32: ...e immediately Keep the Softstarter in its packaging until installation Table 1 Delivery note Softstarter type Items included with the Softstarter PSTX30 105 1SFB262001D1000 HMI Mounting Kit 1SFC132082...

Страница 33: ...ause the Softstarter to overheat or not operate correctly For sufficient cooling install the Softstarter vertically Prefect blockage of the airways see Figure 4 2 INFORMATION Make sure that the distan...

Страница 34: ...ty 230m3 h 4 2 4 Maximum installation angle Make sure that the distances to the walls are sufficient Use the installation angle given in Figure 4 2 5 Dimensions and drilling plan For dimensions and dr...

Страница 35: ...2 in Figure 4 9 Push the threaded network connector through the drilled hole See 3 in Figure 4 9 Fasten the plastic screw nut on the threaded network connector with 2 Nm 17 7 lb in 3 Remove the RJ45 p...

Страница 36: ...36 Installation Installation and commissioning manual 1SFC132081M0201 4...

Страница 37: ...onal ground terminal 22 40 5 1 2 3 Start and Stop terminals 13 14 18 19 20 21 41 5 1 2 4 Programmable inputs terminals 15 16 and 17 43 5 1 2 5 Programmable inputs Sequence start 44 5 1 2 6 Programmabl...

Страница 38: ...ftstarter and the motor because this can cause current peaks which can burn the thyristors in the Softstarter If you must use such capacitors connect them on the line side of the Softstarter 5 1 1 Mai...

Страница 39: ...5L3 3 4 16 UNF 2A 375 lb in PSTX210 370 2T1 4T2 6T3 ATK185 AWG4 to 300kcmi l Cu 75 C only max 30 mm 1 181 in M10 M10 28 Nm 240 lb in Using lug bar Using lug bar max 24 mm 0 945 in max 24 mm 0 945 in...

Страница 40: ...2 24 0 5 Nm 4 3 lb in 3 5 x 0 6 mm 0 138 x 0 024 in M3 5 L 100 250V 50 60 Hz K4 K5 K6 Start Stop In0 In1 In2 GND 24V N 1SFC132081M0201 5 1 2 2 Functional ground terminal 22 Ground the Softstarters wit...

Страница 41: ...2 5 mm2 2x0 2 1 5 mm2 0 2 2 5 mm2 2x0 2 1 5 mm2 AWG 12 24 0 5 Nm 4 3 lb in 3 5 x 0 6 mm 0 138 x 0 024 in M3 L 100 250V 50 60 Hz K4 K5 K6 Start Stop In0 In1 In2 GND 24V N 1SFC132081M0201 A conventiona...

Страница 42: ...nty will no longer be valid Tightening torques and cable dimensions 0 2 2 5 mm2 2x0 2 1 5 mm2 0 2 2 5 mm2 2x0 2 1 5 mm2 AWG 12 24 0 5 Nm 4 3 lb in 3 5 x 0 6 mm 0 138 x 0 024 in M3 L 100 250V 50 60 Hz...

Страница 43: ...see chapter 5 1 2 5 Programmable inputs Sequence start Tightening torques and cable dimensions 0 2 2 5 mm2 2x0 2 1 5 mm2 0 2 2 5 mm2 2x0 2 1 5 mm2 AWG 12 24 0 5 Nm 4 3 lb in 3 5 x 0 6 mm 0 138 x 0 024...

Страница 44: ...mm2 2x0 2 1 5 mm2 0 2 2 5 mm2 2x0 2 1 5 mm2 AWG 12 24 0 5 Nm 4 3 lb in 3 5 x 0 6 mm 0 138 x 0 024 in M3 L 100 250V 50 60 Hz K4 K5 K6 Start Stop In0 In1 In2 GND 24V N 1SFC132081M0201 Tightening torques...

Страница 45: ...9 See Figure 5 18 Tightening torques and cable dimensions 0 2 2 5 mm2 2x0 2 1 5 mm2 0 2 2 5 mm2 2x0 2 1 5 mm2 AWG 12 24 0 5 Nm 4 3 lb in 3 5 x 0 6 mm 0 138 x 0 024 in M3 5 L 100 250V 50 60 Hz K4 K5 K...

Страница 46: ...ent grounds between master and PSTX make sure that they are totally isolated grounds and that the master has isolated power The master must not have any offset to the PSTX ground Figure 5 21 See chapt...

Страница 47: ...terminals 26 and 27 Use Table 1 Temperature errors in C K to determine the temperature errors caused by the line length See Figure 5 23 Tightening torques and cable dimensions 0 2 2 5 mm2 2x0 2 1 5 m...

Страница 48: ...p In Com 3 1SFC132081M0201 Error caused by the line The error caused by the line resistance is to approximately 2 5 Kelvin Ohm If you don t know the resistance of the line and you cannot measure it yo...

Страница 49: ...Nm 4 3 lb in 3 5 x 0 6 mm 0 138 x 0 024 in M3 23 24 25 26 27 T1 T2 T3 28 29 30 B A 24V GND Analog out Temp In Com 3 1SFC132081M0201 5 1 3 Extension I O If more inputs and outputs are necessary you ca...

Страница 50: ...50 Connection Installation and commissioning manual 1SFC132081M0201 6...

Страница 51: ...6 2 4 Motor jog 58 6 3 Options screen 59 6 3 1 Overview 59 6 3 2 Edit home view 43 6 3 2 1 Add information screens to home view 59 6 3 2 2 Edit information screens in home view 59 6 3 2 3 Display slo...

Страница 52: ...y volt age Us is On and operation voltage Ue is On Run 2 Green Off When the motor does not run Flashing light When Softstarter is con trolling operation voltage Ue during start or stop ramp Steady lig...

Страница 53: ...p key is the stop switch for the Softstarter When you push this key the motor stops with the set parameters You can push stop command during the start ramp if necessary Only active in local control mo...

Страница 54: ...s highlighted black Then Push or to change the value of the selected number Push Save to save See Figure 6 6 On off switch Use or o navigate or to change the value of the selected switch 1 on 0 off Pu...

Страница 55: ...or more information about Motor Current Ie see chapter 7 Functions 1 The Home view is the top level Push Menu to enter the menu The screen now appears as in Figure 6 9 2 Push Select to select Paramete...

Страница 56: ...lock keypad See Figure 6 10 2 Service profile See Figure 6 11 3 Lock parameter by a lock code See Figure 6 12 4 Lock keys by a lock code See Figure 6 13 5 Emergency mode See Figure 6 14 Figure 6 13 Em...

Страница 57: ...tor Jog follow this path in menu Menu X Motor jog 6 2 1 Start key The start key is the start switch for the Softstarter Push this key to start the motor and operate with the set parameters See 1 in Fi...

Страница 58: ...ast jog backward and jog forward You can use this function through the HMI I O or Fieldbus Push Menu to enter the Motor jog menu and then select Motor Jog Use and to jog forward or backwards See Figur...

Страница 59: ...you can set the new screen with these options Signal Push Edit to see the list of signals available for the home view Use the Navigation keys and then push Select to select the signal Selected signal...

Страница 60: ...signal min as Display signal max as Display unit Display signal min as Push Edit to select the scaled minimum value in the Home view Use the Navigation keys to change the value Push Save to save the v...

Страница 61: ...e If you have forgotten the lock code you can reset all parameters to default see chapter 6 4 6 4 Reset to defaults If you have entered the service profile you will not be asked to provide the current...

Страница 62: ...e 5 Parameters screen Chapter Description 6 4 1 1 Complete list Shows all parameters for advanced setup 6 4 1 2 Favorites Select favorite parameter functions for quick selection 6 4 1 3 Modified Shows...

Страница 63: ...full parameter list see chapter 7 28 Service 28 01 ID 28 02 Line contactor close time 28 03 TOR relay delay time 28 04 Start without start command 28 05 Step down level 28 06 Torque profile start 28 0...

Страница 64: ...dified menu contains changed parameters that are different from defaults Push Select and then Edit to edit the different parameter Push Save to save and go back Or push Cancel to go back without savin...

Страница 65: ...Enter the Assistants menu Push Menu and select Assistants with the Navigation keys Push Select to enter the Assistants menu Basic set up Use the Navigation keys to select Basic set up Push Select to e...

Страница 66: ...e and Event count Push the i key to see information about the Protection Push Back to go back to Protections log menu Warnings Use the Navigation keys to select a Warning and push Details to read deta...

Страница 67: ...y month and year it was created Replace backup The Softstarter can store 2 backups Use the Navigation keys to select an earlier backup and push Replace to replace a backup A backup does not change the...

Страница 68: ...set all parameters Reset operating data 6 4 6 5 Change HMI heading The HMI heading is displayed in the status bar at the top of the HMI Max 10 characters You can set the settings with Keypad and Field...

Страница 69: ...menu The icon symbols a wrench 4 Highlight the first alternative and push Select and then Edit to enter Language settings 5 Use and to select language See Figure 6 36 6 Push Save to save the selected...

Страница 70: ...n menu Menu X Settings X Display settings For navigation see Figure 6 39 The Display settings include all display configurations of the Softstarter To change the Display settings Push Edit to enter th...

Страница 71: ...ut Parameters Operating data 3 Push Select to select the data which must be reset 4 Push Yes to reset or push No to cancel 5 Confirmation of reset shows as Done on the screen Reset operating data Rese...

Страница 72: ...72 Human machine interface HMI Installation and commissioning manual 1SFC132081M0201 6...

Страница 73: ...irect stop 81 7 6 Stand still brake 82 7 7 Current limit 83 7 8 Kick start 84 7 9 Slow speed 85 7 10 Motor heating 86 7 11 Motor braking 86 7 12 Sequence start 89 7 13 Automatic restart 90 7 14 Inputs...

Страница 74: ...ers via Fieldbus PLC When Fieldbus is used you can change parameters from the PLC A different document specification shows more details about parameter settings changed through Fieldbus PLC see chapte...

Страница 75: ...stop a motor by controlling the output voltage or torque The stop ramp state ends and goes into stand by state when the output voltage comes at the pre set Stop ramp end level Available stop function...

Страница 76: ...The Start ramp time is the time it takes to go from Start ramp initial level to full voltage The time to come at Top of ramp can be longer than the set Voltage ramp time because this is subject to the...

Страница 77: ...e Figure 7 3 Configuration of the Voltage stop ramp with these parameters Parameter Description Setting range Default value 02 02 Stop mode Set to voltage ramp No ramp Voltage ramp Torque ramp Dynamic...

Страница 78: ...use which curve The curves are Constant Linear High inertia Progressive When using the Torque start ramp the acceleration is constant if the set torque curve is the same as the actual load curve The...

Страница 79: ...02 03 Start ramp Initial level Sets the torque level from where the start ramp initiates 10 99 30 02 04 Start ramp time Sets the time it takes for the voltage to come at 100 1 120 s 10 s 03 05 Torque...

Страница 80: ...level for Voltage stop and torque level for Torque stop 10 99 30 02 06 Stop ramp time Sets the time it takes for the voltage to come at end level 1 120 s 10 s 28 05 Step down level Sets the level from...

Страница 81: ...onfiguration of the Full voltage start with these parameters Parameter Description Setting range Default value 02 01 Start mode Set to Full voltage start Voltage ramp Torque ramp Full voltage start Vo...

Страница 82: ...e motor warm we recommend to use a PTC or PT100 element to monitor the temperature In some conditions the built in EOL is not accurate for this feature INFORMATION Stand still brake only works when th...

Страница 83: ...nt limit See Figure 7 6 When the current comes at the Dual current limit the Softstarter behaves as for normal Current limit Dual current limit can be used as a back up function to prevent overheating...

Страница 84: ...urrent limit function does not work during kick start Kick start has these parameters Parameter Description Setting range Default value 04 01 Kick start Enables a voltage peak at the beginning of the...

Страница 85: ...the nominal speed for as long as the slow speed signal remains active When the Slow speed signal is deactivated the Softstarter immediately cuts the voltage applied to the motor and the motor stops Fo...

Страница 86: ...quipment WARNING Because Motor heating function warms up the motor we recommend to use a PTC or PT100 element for temperature monitoring In some conditions the built in EOL is not accurate for this fe...

Страница 87: ...n time Parameter 7 2 Motor brake time only works as a timeout The goal should be to choose the lowest possible braking strength and still fulfill the user s deceleration time requirements 1 Set parame...

Страница 88: ...hat the speed has be below the threshold before the switch to DC brake occurs Configure this parameter only if the switch occurs too soon or too late 0 1 100 0 s 3 0 s 02 02 Stop mode Sets the desired...

Страница 89: ...ramp time seq 1 08 32 seq 2 08 62 seq 3 Sets the time it takes for the voltage to come at 100 1 120 s 10 s 08 05 Start ramp init lev seq 1 08 33 seq 2 08 63 seq 3 Sets the level from where the start r...

Страница 90: ...operation Overrides all other inputs except LOCAL CONTROL Slow speed forward While the digital input is high the motor will slowly move forward Slow speed reverse While the digital input is high the...

Страница 91: ...sion module The I O Extension module provides these 8 Digital input 4 Relay output 1 Analog output To use an extension I O provides the same possibilities to use all the Softstarters functions as for...

Страница 92: ...Emergency mode active high Wired Fieldbus Wired Emergency mode active low Wired Fieldbus Wired Fieldbus disable control Wired Wired Start1 Wired Fieldbus Wired Start2 Wired Fieldbus Wired Start3 Wire...

Страница 93: ...ke Start reverse User defined protection Emergency mode active high Emergency mode active low Fieldbus disable control Start 1 Start 2 Start 3 Switch to remote control Cancel brake Pump cleaning autom...

Страница 94: ...y open terminal NO and 1 normally closed terminal NC See Figure 7 8 Normally open Circuit is open in normal mode circuit is not shorted to common Normally closed Circuit is closed in normal mode the c...

Страница 95: ...type Sets the Analog output type Motor current Mains voltage Active power Active power Reactive power Apparent power Active energy Reactive energy cos fi Motor temperature Thyristor temperature Motor...

Страница 96: ...starter has a 3 wire PT100 input that can be combined and share terminals with the PTC input The trip temperature is set by the user The maximum trip temperature is 250 and lowest is 25 The PT100 meas...

Страница 97: ...rip on fieldbus communication failure protection P1E00 and with the default configuration the motor will be stopped INFORMATION If the fieldbus communication system is setup in such a way that command...

Страница 98: ...None 12 03 Fieldbus control Enables control from fieldbus Off On Off 12 04 Fieldbus address Sets the Bus address 0 65535 0 12 05 Fieldbus ip address Fieldbus IP Sets the IP address 0 0 0 0 255 255 25...

Страница 99: ...edback Pump cleaning auto status Pump cleaning forward status Pump cleaning backward status External digital 1DI0 status External digital 1DI1 status External digital 1DI2 status External digital 1DI3...

Страница 100: ...Sets the AI 2 programmable analog input signal Phase L2 current 12 24 Fieldbus AI 3 Sets the AI 3 programmable analog input signal Phase L3 current 12 25 Fieldbus AI 4 Sets the AI 4 programmable anal...

Страница 101: ...7 Event groups numbered from 0 to 6 All event functions are set as default to 1 Event group There are 7 event groups that you can use in any way Event groups 4 6 are completely unassigned by default a...

Страница 102: ...e type of event in the event list Protections can be set to have automatic reset or manual reset For every protection there is a parameter called Operation which can be set to Stop Automatic The engin...

Страница 103: ...s protection is part of Eventgroup 0 6 0000010 13 05 EOL operation Sets the operation of this protection Off Stop Manual Stop Automatic Indication Stop Manual 7 17 2 Locked rotor protection The motor...

Страница 104: ...rt of Eventgroup 0 6 0000010 13 13 Max no of starts per hour op Sets the operation of this protection Off Stop Manual Stop Automatic Indication Off 7 17 4 Current underload protection The motor curren...

Страница 105: ...is protection is part of Eventgroup 0 6 0000010 14 10 Pwr factor underload op Sets the operation of this protection Off Stop manual Stop auto Indication Off 7 17 6 Current imbalance protection This pr...

Страница 106: ...nder voltage trip level 165 760 V 165 V 15 06 Under voltage trip time Sets the time that the voltage is below the trip level to trip 0 1 100 0 s 1 0 s 15 07 Under voltage op Sets the operation of this...

Страница 107: ...17 11 Frequence range protection Sets the trip level for the frequency Frequency range protection has these parameters Parameter Description Setting range Default value 16 03 Freq range lower trip lv...

Страница 108: ...sensor PTC PT100 3Wire PT100 2Wire Bi metal switch No sensor 17 01 PTC out Identifies the Event groups this protection is part of Eventgroup 0 6 0000010 17 02 PTC op Sets the operation of this protect...

Страница 109: ...tarter is not accurate or fast enough to protect people The only purpose of this function is to protect equipment Ground fault protection has these parameters Parameter Description Setting range Defau...

Страница 110: ...tart time out out Specifies the Event groups this protection belongs to Eventgroup 0 6 0000010 1816 Auto restart time out op Sets the operation of this protection Off Stop Manual Stop Automatic Indica...

Страница 111: ...fault value 19 03 Fieldbus failure out Identifies the Event groups this protection is part of Eventgroup 0 6 0000010 19 04 Fieldbus failure op Sets the operation of this protection Off Stop Manual Sto...

Страница 112: ...7 18 1 Electronic overload warning The motor temperature is higher than the set warning level of max temperature Electronic overload warning has these parameters Parameter Description Setting range D...

Страница 113: ...current is lower than the Warning level to trip 0 30 s 1 s 21 03 Curr underload delay time Sets the time delay after Top of ramp when the warning is enabled 0 30 s 5 s 21 04 Curr underload out Identif...

Страница 114: ...r than the set value Overvoltage warning has these parameters Parameter Description Setting range Default value 22 01 Overvoltage level User set warning level in Volts 208 760 V 650 V 22 02 Overvoltag...

Страница 115: ...ted time to trip assumes that the current stays on existing level Electronic overload time to trip warning has these parameters Parameter Description Setting range Default value 23 01 EOL time to trip...

Страница 116: ...ts out Specifies the Event groups this warning belongs to Eventgroup 0 6 0000100 24 03 Number of starts Enables Number of starts warning Off On Off 7 18 14 Modbus configuration warning The built in mo...

Страница 117: ...otor runtime warning has these parameters Parameter Description Setting range Default value 24 10 Motor runtime limit Max runtime in hours 1 100 000 h 10 000 h 24 11 Motor runtime out Specifies the Ev...

Страница 118: ...fault LED illuminates 2 The home screen gives the type of fault 3 The type of event is stored on the event list 4 The power supply to the motor which is connected to the Softstarter is set to off Dir...

Страница 119: ...nt groups this fault is part of Eventgroup 0 6 0000001 25 02 Shunt fault op Sets the operation of this fault Stop manual Stop auto Stop manual 7 19 1 2 Short circuit fault The Softstarter has a short...

Страница 120: ...lt is signaled to protect thyristors from overheating INFORMATION If Automatic restart is set to on a thyristor overload fault will automatically start the motor again For more information about Autom...

Страница 121: ...has these parameters Parameter Description Setting range Default value 26 01 Phase loss out Identifies the Event groups this fault is part of Eventgroup 0 6 0000001 26 02 Phase loss op Set the operati...

Страница 122: ...nt groups this fault belongs to Eventgroup 0 6 0000001 26 08 High current op Sets the operation of this fault Stop manual Stop auto Stop manual 7 19 2 5 Faulty usage fault Faulty usage fault is on if...

Страница 123: ...ll be visible see chapter 6 1 5 Symbols in the screen When the Softstarter is in Emergency mode and a fault or protection is detected the Softstarter will try to run the motor with the start and stop...

Страница 124: ...hases in case of short circuit of 1 set of thyristors Replace the thyristors when this warning is on if the short circuit warning is enabled Limp mode has these parameters Parameter Description Settin...

Страница 125: ...pt the ones given below Demo mode Demo is used mainly for training purposes to simulate a load condition without having the Softstarter connected to main power WARNING When the Softstarter is connecte...

Страница 126: ...d or clogged it s recommended to use one of the following methods When an object is stuck in the pump the motor uses more current and the Softstarter will trip on EOL Electronic Overload see chapter 7...

Страница 127: ...decides which start method should be used to accelerate the motor in the forward direction Default is Full voltage start which very quickly accelerated the motor up to full speed in the forward direc...

Страница 128: ...The Dynamic brake can be adjusted by the parameter 29 06 Pump clean brake strength and parameter 29 07 Pump clean brake timeout However if water hammering which can damage the pipes is a problem the...

Страница 129: ...ed Sets the slow speed reverse Fast jog reverse is 33 jog reverse is 20 and creep reverse is 9 of the nominal motor speed Fast jog Jog Creep Jog 29 02 Pump clean reverse strength Parameter related to...

Страница 130: ...cleaning on pumps which have impeller or rotating shaft parts which can loosen or jam during reverse rotation If you do not obey these instructions this can cause equipment damage 7 22 Fast take off T...

Страница 131: ...ion set up INFORMATION After you select an application and make your changes do not select this application again because this resets the application to the default settings Enter the Assistants menu...

Страница 132: ...tage ramp No ramp Escalator 10 30 30 3 5 Voltage ramp No ramp High pressure pump 10 10 40 30 4 5 Voltage ramp Torque ramp Hydraulic pump 10 30 30 3 Voltage ramp No ramp Lift Elevator 10 30 30 3 5 Volt...

Страница 133: ...Slow speed forward Fast jog Jog Creep 0 184 Jog 05 02 Slow speed fwd strength 10 100 0 187 50 05 03 Slow speed reverse Fast jog Jog Creep 0 188 Jog 05 04 Slow speed rev strength 10 100 0 189 50 06 Mo...

Страница 134: ...222 0 02 09 Automatic restart 09 01 Auto reset delay time 0 3600 s 0 223 10 s 09 02 Auto restart On Off 0 224 Off 09 03 Auto restart max attempts 1 10 0 225 5 10 Internal IO 10 01 In0 function None R...

Страница 135: ...ent group 0 Event group 1 Event group 2 Event group 3 Event group 4 Event group 5 Event group 6 Sequence 1 Run Sequence 2 Run Sequence 3 Run Sequence 1 TOR Sequence 2 TOR Sequence 3 TOR 0 153 None 11...

Страница 136: ...ent group 5 status Event group 6 status Sequence 1 Run status Sequence 2 Run status Sequence 3 Run status Sequence 1 TOR status Sequence 2 TOR status Sequence 3 TOR status Run reverse status Enable st...

Страница 137: ...eactive energy high range 0 168 Phase L1 current 12 23 Fieldbus AI 2 0 43 0 169 Phase L2 current 12 24 Fieldbus AI 3 0 43 0 172 Phase L3 current 12 25 Fieldbus AI 4 0 43 0 174 Max phase current 12 26...

Страница 138: ...tage level 165 850 V 0 71 165 V 15 06 Under voltage trip time 0 1 100 0 s 1 69 1 0 s 15 07 Under voltage op Off Stop Manual Stop Automatic Indication 0 70 Off 15 08 Under voltage out Eventgroup 0 6 0...

Страница 139: ...HMI control 0 257 Stop Manual 19 03 Fieldbus failure out Eventgroup 0 6 0 97 0000010 19 04 Fieldbus failure op Off Stop Manual Stop Automatic Indication Switch to I O control 0 258 Stop Manual 19 05 E...

Страница 140: ...0 24 05 Faulty fan On Off 0 79 On 24 06 Modbus_RTU w o auxport out Eventgroup 0 6 0 176 0000100 24 7 Phase loss trip time 0 5 100 0 1 3 0 24 8 Phase loss out Eventgroup 0 6 0 0000100 24 9 Phase loss O...

Страница 141: ...ck setting Automatic lock 50 Hz manual lock 60 Hz manual lock 0 Automatic lock 28 15 Minimum trig time 0 0 1 0 ms 3 0 208 ms 28 16 Accel adapt U start ramp On Off 0 290 Off 28 17 U start ramp switch l...

Страница 142: ...ed User login Yes No 0 No 28 46 User security code 0 0 28 47 Enable secure settings Yes No 0 No 28 48 Disable Service login Yes No 0 No 28 49 Shunt fault trip time 0 1 120 0 s 1 5 0 s 28 50 Shunt faul...

Страница 143: ...1SFC132081M0201 Installation and commissioning manual Functions 143 7...

Страница 144: ...144 Functions Installation and commissioning manual 1SFC132081M0201 7...

Страница 145: ...on 145 8 8 1 Built in modbus RTU 146 8 2 Anybus CompactCom option 146 8 3 1 Instructions 147 8 2 2 Necesssary components 146 8 3 ABB Fieldbus plug interface option 147 8 3 1 Instructions 147 8 3 2 Nec...

Страница 146: ...odule and or the com1 and socket INFORMATION The ports used for communication are the standard ports for each Ethernet based communication protocol Ethernet IP TCP port number 44818 UDP port number 22...

Страница 147: ...correct position and tighten the screw with 0 8 Nm 7 1 lb in and additional 1 4 turn These Fieldbus protocols are available DeviceNet Profibus DPV0 DPV1 Modbus RTU 8 3 1 Instructions Instructions for...

Страница 148: ...148 Communication Installation and commissioning manual 1SFC132081M0201 8...

Страница 149: ...1SFC132081M0201 Installation and commissioning manual Maintenance 149 9 9 1 Regular maintenance 150 9 2 Service and repair 151 9 3 Firmware upgrade 152 9 Maintenance...

Страница 150: ...ten the terminal screws and bolts on the connection bars if necessary For tightening torques see chapter 5 1 1 1 Tightening torques and cable dimensions WARNING Make sure that the Softstarter is de en...

Страница 151: ...g a correctly rated short circuit protection device e g a fuse or a circuit breaker the damage is limited to 1 of the 2 categories specified in IEC 60947 4 2 and EN 60947 4 2 Type 1 The Softstarter ca...

Страница 152: ...rter The current firmware versions is found using the HMI Navigate to Menu X System info X Softstarter se Figure 9 12 or section 6 4 5 System info for more information If the HMI cannot be used then c...

Страница 153: ...n the tool bar of the Service Engineer Tool to start the firmware upgrade wizard 5 Select the firmware cab files that where unzipped during the preparation and then Click Next 6 An information dialog...

Страница 154: ...Visual C Redistributable for Visual Studio 2015 package INFORMATION Download the Visual C Redistributable package vc_redist x86 exe from microsoft com 4 Unzip and Install SoftstarterCare onto the PC...

Страница 155: ...the Service Engineer Tool to start the firmware upgrade wizard 8 Select the firmware cab files that where unzipped during the preparation and then Click Next 9 An information dialog opens with the te...

Страница 156: ...156 Maintenance Installation and commissioning manual 1SFC132081M0201 9...

Страница 157: ...hooting 157 10 10 Troubleshooting 10 1 General 158 10 2 Troubleshooting 158 10 3 Overview of faults protections and warnings 161 10 4 Protection indication shown on screen 163 10 5 Fault indication sh...

Страница 158: ...es that the Softstarter does not show such as humming sounds 10 2 Troubleshooting Table 1 Troubleshooting Status Possible cause Solution Motor humming starts without given start signal Bypass relay cl...

Страница 159: ...rol wiring is not correct Start and stop command given at the same time Keypad is in Local control mode Do a check of the connections for start and stop Make sure that start and stop command is not gi...

Страница 160: ...trol parameter is set to On Shown phase currents in screen do not agree with motor current Inside Delta connection If the Softstarter is connected Inside Delta the phase currents shown are 58 1 3 of t...

Страница 161: ...e ned protection P14xx X X X X X X X X X X Ground fault P15xx X X X X X X X X Overvoltage P16xx X Under voltage P17xx X Voltage imbalance P18xx X X X X X X X X PT100 protection P19xx X X X X X X X X X...

Страница 162: ...circuit thyristor F0Axx X X X X Unspeci ed fault F0Bxx X X X X X X X X X X Invalid ID F0Cxx X X X X X X X X X X Faulty connection F0Dxx X Faulty usage F0Exx X X X Warnings Current imbalance W23xx X C...

Страница 163: ...nd do a check of the main currents and voltage Current imbalance Current imbalance between the phases Start the motor again and do a check of the main currents and voltage Current underload The motor...

Страница 164: ...for the next start interval For parameter see chapter 7 Functions Auto restart time out The time between trip and auto restart attempt exceeds setting Do a check of the automatic restart parameters a...

Страница 165: ...the resistance on each phase between motor and load side of the Softstarter If one phase is shorted there might be a shorted thyristor or a welded contactor see below for test Incorrect connections C...

Страница 166: ...ameters might be out of range and such cases result in Invalid ID fault on next power on The reason why we have several Ie parameters is because of the sequence start function Procedure on how to rest...

Страница 167: ...k Thyristor overload The calculated thyristor temperature is higher than the warning level Voltage imbalance Voltage imbalance between the phases is higher than the warning level Short circuit There i...

Страница 168: ...168 Troubleshooting Installation and commissioning manual 1SFC132081M0201 10...

Страница 169: ...IEC version 170 11 1 2 Circuit diagram PSTX30 PSTX1250 UL version 170 11 2 Application diagrams 170 11 2 1 Inside Delta 171 11 2 2 Start at optional direction 171 11 2 3 Start at optional direction a...

Страница 170: ...xtension I O Fieldbus 23 24 25 26 27 28 2 1 29 30 Anybus External control voltage 24V DC 18 13 14 Stop Start M U V W 2T1 4T2 6T3 1L1 3L2 5L3 V5 V6 K2 V4 V3 V2 V1 Ct1 Ct2 Ct3 2T1 1L1 K5 K4 12 11 10 9 8...

Страница 171: ...4 7 10 K4 K5 K6 Com 3 HMI 30 GND 29 28 24V 27 T3 26 T2 25 T1 24 A 23 B Temp In Analog out Com 1 Com 2 Anybus E I E II E O Alt with fuses 2 3 F1 1 1L1 3L2 5L3 K21 2 T1 1 L1 4 T2 3 L2 6 T3 5 L3 K22 2 T...

Страница 172: ...High speed Stop 4 7 10 K4 K5 K6 Com 3 HMI 30 GND 29 28 24V 27 T3 26 T2 25 T1 24 A 23 B Temp In Analog out Com 1 Com 2 E O K8 S23 E I E II S24 K24 22 2 5 8 11 9 6 12 Alt with fuses 2 3 F1 1 1L1 3L2 5L...

Страница 173: ...10 K4 K5 K6 Com 3 HMI 30 GND 29 28 24V 27 T3 26 T2 25 T1 24 A 23 B Temp In Analog out Com 1 Com 2 O I K7 K1 K7 2 wire control W1 V1 U1 6T3 2T1 4T2 Alt with fuses 2 3 F1 1 13 Start 22 14 Stop 15 In0 1...

Страница 174: ...op 15 In0 16 In1 17 In2 18 DGND 19 GND 24V 2 5 8 11 9 6 12 21 20 Alt with fuses 2 3 F1 1 95 96 F3 95 96 F4 6T3 2T1 4T2 PSTX 5L3 1L1 3L2 1L1 3L2 5L3 K1 2 T1 1 L1 4 T2 3 L2 6 T3 5 L3 13 Start 14 Stop 20...

Страница 175: ...5 K6 Com 3 HMI 30 GND 29 28 24V 27 T3 26 T2 25 T1 24 A 23 B Temp In Analog out Com 1 Com 2 O I E O K25 S27 E I S25 H26 K26 K25 K12 E O K27 S29 E I S27 H28 K28 K27 K12 E O K29 S27 E I S29 H30 K30 K29 K...

Страница 176: ...176 Wiring and application diagrams Installation and commissioning manual 1SFC132081M0201 11...

Страница 177: ...ual Third party licenses 177 12 12 Third party licenses The 3rd party software components in the following sections are all part of the PSTX HMI firmware 12 1 Pawn AMX Abstract Machine Wrapper 12 1 Pa...

Страница 178: ...o the work an example is provided in the Appendix below Derivative Works shall mean any work whether in Source or Object form that is based on or derived from the Work and for which the editorial revi...

Страница 179: ...se You may add Your own attribution notices within Derivative Works that You distribute alongside or as an addendum to the NOTICE text from the Work provided that such additional attribution notices c...

Страница 180: ...t PUFF from the compression library zlib The component has been adapted by ABB The software is licensed under the zlib libpng license The zlib libpng License Copyright c 2002 2010 Mark Adler This soft...

Страница 181: ...1SFC132081M0201 Installation and commissioning manual Third party licenses 181 12...

Страница 182: ...2081M0201 C 5 7 Text and illustration updated 2014 11 14 1SFC132081M0201 D 3 7 Text and illustration updated 2015 06 26 1SFC132081M0201 E Text and illustration updated 2015 09 30 1SFC132081M0201 F 5 I...

Страница 183: ...1SFC132081M0201 Installation and commissioning manual Revision 183 13...

Страница 184: ...up 63 current 9 Current imbalance protection 97 Current imbalance warning 106 Current Lim Dual current limit 79 Ramp current limit 79 Current limit 79 Normal current limit 79 Current underload protect...

Страница 185: ...der voltage warning 106 M Main circuit 36 Maintenance 137 Maximum mounting angle 32 Max number of starts protection 96 Menu screen 58 Favorites 60 Modi ed 60 Parameters 58 Minimum distance to wall fro...

Страница 186: ...116 Step down level 117 Stop key 51 54 Stop ramp 71 Storage 21 22 System info 64 System mode 117 T Table Application settings 119 Technical data 22 Technical data for external keypad 22 Temperature 9...

Страница 187: ...1SFC132081M0201 Installation and commissioning manual Index 187 14...

Страница 188: ...er s Sweden E mail sales se abb com www abb com lowvoltage Softstarters Type PSTX Installation and commissioning manual 1SFC132081M0201 rev L July 2018 Copyright 2018 ABB All rights reserved Specifica...

Отзывы: