


1SFC132081M0201 | Installation and commissioning manual |
Maintenance
155
9.3.2.3
Upgrade firmware
1.
Make sure that the PSTX Softstarter is
disconnected from both operational voltage and
control supply voltage (100-250V).
2.
Connect the jumper cable to the Control Board
COM2 port, see section
3.1.5 Softstarter overview
.
3.
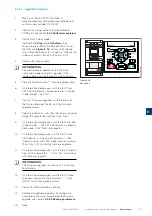
Set the HMI in boot mode.
Hold both the
Stop
and
L/R button
when
connecting the USB cable between the PC and
the HMI, see
Figure 9.16
. All four LEDs (Ready,
Run, Protection and Fault) will light up. Release the
buttons and verify that all 4 LEDs are still lit.
4.
Remove the jumper cable.
INFORMATION
The Control Board need to restart itself into
application mode during the upgrade. If the
jumper cable is not removed this is not possible.
5.
Start the SoftstarterCare™ - Service Engineer Tool.
6.
An information dialog opens with the text “Your
PSTX Control Board is disconnected or is running
in boot mode”. Click “OK”.
7.
Click on “Firmware upgrade” on the tool bar of
the Service Engineer Tool to start the firmware
upgrade wizard.
8.
Select the firmware (.cab) files that where unzipped
during the preparation and then Click “Next”.
9.
An information dialog opens with the text “Set HMI
in boot mode...”. The PSTX Softstarter is already in
boot mode, Click “Next” to proceed.
10.
An information dialog opens with the text “Your
PSTX device is using an old Firmware...”. Click
“Select” and set the PSTX model number manually.
Then Click “OK” to start the firmware upgrade.
11.
An information dialog opens with the text “Failed to
back up the parameters...”. Click “Yes” to continue
with firmware upgrade.
INFORMATION
The firmware upgrade can take up to 15 minutes
to complete.
12.
An information dialog opens with the text “Failed
to backup and restore the parameters...”. Click
“Finish” to exit the upgrade wizard.
13.
Restart the SoftstarterCare software.
14.
Restore all modified parameters by setting each
parameter to the value stored before the firmware
upgrade, see section
9.3.2.2 Backup parameters
.
15. Done.
Figure 9.16
Boot mode
PSTX
L
100-250V
50/60 Hz
K4
K4
K4
Start Stop Reset In1 In2 DGND DND +24V GND
N
Options
Menu
1SFC132081M0201
3
2
1
4
1
Start
Options
Menu
1
4
4
Stop
9
Содержание PSTX Series
Страница 1: ...1SFC132081M0201 Softstarters Type PSTX30 PSTX1250 Installation and commissioning manual...
Страница 4: ......
Страница 6: ......
Страница 10: ...10 Introduction Installation and commissioning manual 1SFC132081M0201 1...
Страница 16: ...16 Quick start Installation and commissioning manual 1SFC132081M0201 2...
Страница 29: ...1SFC132081M0201 Installation and commissioning manual Description 29 3...
Страница 30: ...30 Description Installation and commissioning manual 1SFC132081M0201 3...
Страница 36: ...36 Installation Installation and commissioning manual 1SFC132081M0201 4...
Страница 50: ...50 Connection Installation and commissioning manual 1SFC132081M0201 6...
Страница 72: ...72 Human machine interface HMI Installation and commissioning manual 1SFC132081M0201 6...
Страница 143: ...1SFC132081M0201 Installation and commissioning manual Functions 143 7...
Страница 144: ...144 Functions Installation and commissioning manual 1SFC132081M0201 7...
Страница 148: ...148 Communication Installation and commissioning manual 1SFC132081M0201 8...
Страница 156: ...156 Maintenance Installation and commissioning manual 1SFC132081M0201 9...
Страница 168: ...168 Troubleshooting Installation and commissioning manual 1SFC132081M0201 10...
Страница 176: ...176 Wiring and application diagrams Installation and commissioning manual 1SFC132081M0201 11...
Страница 181: ...1SFC132081M0201 Installation and commissioning manual Third party licenses 181 12...
Страница 183: ...1SFC132081M0201 Installation and commissioning manual Revision 183 13...
Страница 187: ...1SFC132081M0201 Installation and commissioning manual Index 187 14...