52
Screens
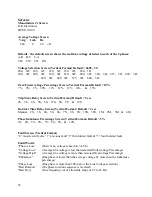
Manufacturer’s Screen
R-K Electronics
DPM v0.0.00
Average Voltage Screen
VAvg
Imb
Hz
460
0
60
off
Default – the default screen shows the real time voltage detected in each of the 3 phases:
A-B B-C C-A
460 459 461 ON
Voltage Selection Screen (Vertical Format) Default = 460V, 3
Ø
200, 1Ø; 208, 1Ø;
220, 1Ø; 230, 1Ø; 240, 1Ø;
200, 3Ø; 208, 3Ø;
220, 3Ø; 230, 3Ø; 240, 3Ø;
380, 3Ø; 415, 3Ø; 440, 3Ø;
460, 3Ø;
480 3Ø;
575, 3Ø;
600, 3Ø;
Over/Under voltage Percentage Screen (Vertical Format) Default = 10%
7% 8%
9% 10% 11% 12% 13% 14%
&
15%
Trip Time Delay Screen (Vertical Format) Default = 5 sec
2S, 3S, 4S, 5S, 6S, 27S, 8S, 9S & 10S
Re-Start Time Delay Screen (Vertical Format) Default = 2 sec
Manual, 2S, 3S, 4S, 5S, 6S, 7S, 8S, 9S, 10S, 30S, 1M, 2M, 3M & 4M
Phase Imbalance Percentage Screen (Vertical Format) Default = 5%
3% 4% 5% 6% 7% 8% 9% & 10%
Fault Screen (Vertical Format)
“0” most recent faults, “1” previous fault “2” third oldest fault & “3” fourth oldest fault.
Fault Words:
“Phase a Loss”
(There is no voltage sensed on 3-L1/S)
“Voltage Low”
(Average line voltage is less than selected Undervoltage Percentage)
“Voltage High”
(Average line voltage is more than selected Overvoltage Percentage)
“Imbalance”
(One phase is lower than the average voltage by more than the Imbalance
percentage)
“Phase Loss
(One phase is more than 30% below the Line Voltage selection)
“Bad Rotation”
(The phase rotation sequence is reversed)
“Bad Freq”
(Line frequency out of allowable range of 45 to 65 Hz)
Содержание SA-028
Страница 2: ......
Страница 20: ...20 Figure 2 One Piece Single Unit Lifting Details...
Страница 21: ...21 Figure 3 Two Piece Single Unit Coil Section Lifting Details...
Страница 22: ...22 Figure 4 Two Piece Single Unit Fan Section Lifting Details...
Страница 23: ...23 Figure 5 One Piece Dual Unit Lifting Details...
Страница 24: ...24 Figure 6 Two Piece Dual Unit Coil Section Lifting Details...
Страница 25: ...25 Figure 7 Two Piece Dual Unit Fan Section Lifting Details...
Страница 27: ...27 Figure 8 Dual unit without splices and before being bolted together Figure 9 Dual Unit Assembly Details...
Страница 28: ...28 Figure 10 Dual unit with splices after being bolted together...
Страница 63: ...63...


