


NEED HELP? GIVE US A CALL
833.232.9711
NEED HELP? GIVE US A CALL
833.232.9711
1
2
3
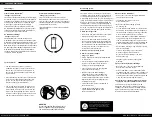
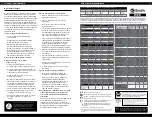
"
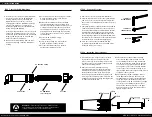
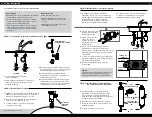
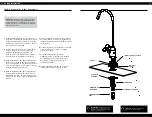
Depth to insert tubing
Diagram is actual size.
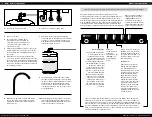
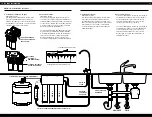
1
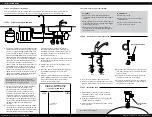
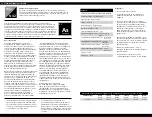
Supply water connection
(1/4" white tubing)
Use a length of 1/4" white tubing to connect the
water supply. Insert one end of the tubing into
the fitting on the inlet valve and the other end
into the “inlet” fitting on the System Manifold.
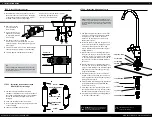
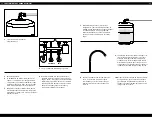
4
Drain connection
Connect the piece of 1/4" white tubing previously
connected to the faucet air gap onto the System
Manifold. Cut off any excess tubing and insert the
loose end of the tubing into the “drain” fitting
on the System Manifold.
Connect the piece of 3/8" white tubing previously
connected to the faucet air gap onto the drain
fitting. Cut off any excess tubing and insert the
loose end of the tubing into the drain fitting that
was previously assembled to the drain pipe.
STEP 10 - Connect tubing
3
Tank connection
(1/4" white tubing)
Use a length of 1/4" white tubing to connect
the System Manifold to the Storage Tank. Insert
one end of the tubing to the “tank” fitting on
the System Manifold and the other end into the
shutoff valve on the top of the Storage Tank.
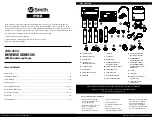
INSTALLATION GUIDE
8
9
2
Outlet connection
(1/4" white tubing)
Use a length of 1/4" white tubing to connect the
System Manifold to the Remineralizer Cartridge.
Insert one end of the tubing into the “outlet”
fitting on the System Manifold and the other
end into the “inlet” fitting on the Remineralizer
Cartridge.
Use a second length of 1/4" white tubing to
connect the Remineralizer Cartridge to the
dispensing faucet. Insert one end of the tubing
into the “outlet” fitting on the Remineralizer
Cartridge and the other end into the supply
fitting on the dispensing faucet.
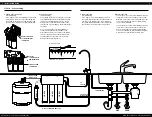
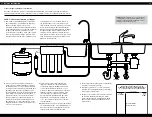
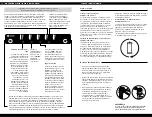
STORAGE TANK
CONNECTION
TO FAUCET DISPENSE LINE (1/4")
TO DRAIN LINE
FROM COLD
WATER LINE
TO
FAUCET
ST
AGE 5
ST
AGE 4
ST
AGE 2
ST
AGE 1
DRAIN CONNECTION
COLD-WATER INLET
CONNECTION
STORAGE TANK
CONNECTION
OUTLET
CONNECTION (TO
REMINERALIZER)
HOT COLD