


Managed Industrial Ethernet Switch User Manual
3onedata proprietary and confidential 57
Copyright © 3onedata Co., Ltd.
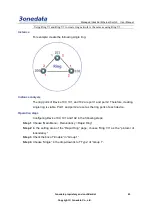
For instance: port trunking
For example: if the port 1 and port 2 of switch A and switch B share the same rates
and duplex modes, we could improve bandwidth by grouping them into a Trunking
group.
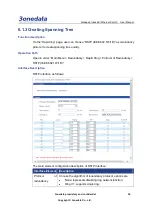
Operation Steps
Configure switch A and switch B in the same way respectively.
Log in Web configuration page.
Step 1
Choose “Main Menu > Redundancy > Port Trunking > Static Trunking”.
Step 2
On the page of “Static Trunking”, check the box of “Yes” in the “Enable” bar.
Step 3
Choose “1” in the droplist of “Group”.
Step 4
Check the box of Port 1 and Port 2 in the “join port” bar.
Step 5
Click “Add/Edit”.
Step 6
Click “Apply”.
Step 7
End.
Step 8
All attributes of ports in trunking group should be the same, including rates and duplex
modes, etc.
Setting one port as both ring network port and trunking port is not supported.
Each trunking group should have 2 ports at least, up to 4.
One port can only join a trunking group.


