


Managed Industrial Ethernet Switch User Manual
3onedata proprietary and confidential 46
Copyright © 3onedata Co., Ltd.
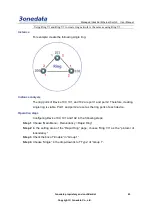
Choose “Main Menu > Redundancy > Rapid Ring”.
Step 1
In the “Settings” area of “Rapid Ring” page, choose “Ring V3” as “Protocol of
Step 2
Redundancy”.
Check the “Enable” box in the “Group 1”.
Step 3
Choose “Single” in the drop-down list of “Type” of “Group 1”.
Step 4
Enter “1” into the “ID” textbox of “Group 1”.
Step 5
Set “Port 1” and “Port 2” to “02” and “03” respectively.
Step 6
Note:
“Port 1” and “Port 2” cannot be set to the same port.
For Device 106/107/108/109, choose “Slave” in the drop-down list of “Master-slave” of
Step 7
“Group 1”.
For Device 105, choose “Master” in the drop-down list of “Master-slave” of “Group 1”.
Step 8
Click “Apply”. Enter “Main Menu > System Management > Device Address”.
Step 9
In the area of “reboot the device”, click “reboot”.
Step 10
End.
Step 11
Operation Step 2: configuring Ring 2 in WEB interface
Configuring Device 100, 101, 102, 103 and 104 in the following steps respectively.
Choose “Main Menu > Redundancy > Rapid Ring”.
Step 1
In the “Settings” area of “Rapid Ring” page, choose “Ring V3” as “Protocol of
Step 2
Redundancy”.


