


Managed Industrial Ethernet Switch User Manual
3onedata proprietary and confidential 21
Copyright © 3onedata Co., Ltd.
Step 2
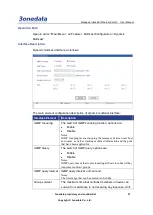
On the displayed VLAN settings interface, configure “Type” of each port in the
column of “VLAN Port Settings”.
Notes:
All factory defaults of the port “Type” are “Access”.
Step 3
In the column of “VLAN Port Settings”, enter the default VLAN “PVID” value of each
port.
Step 4
In the column of “802.1Q VLAN Settings”, enter “VID” value of VLAN entry to be
created.
Step 5
In the drop-down list of “Type”, choose the member type of each port.
Step 6
Click “Add” button to add VLAN entry to the “Port”.
Step 7
Click “Apply” button and reboot the device, and then VLAN creation is finished.
Step 8
End.
Example: Modify IEEE 802.1Q VLAN
The operation can reconfigure the existing VLAN and change the “Type”,
“Quantity”,etc.
Operation steps
Step 1
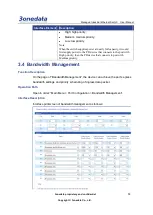
Open “Main Menu > L2 Feature > VLAN”.
Step 2
In the column of “802.1Q VLAN Settings”, click a VLAN entry to be modified in the
“Port”, such as VLAN1. And then the type of VLAN1 will display in the option of current
VLAN entry settings.
Step 3
Modify the “VID” as required.
Step 4
Modify the “Type” as required.
Step 5
Click “Add” button.
Step 6
A prompt box pops up.
Step 7
Click “Yes” to add the modified VLAN entry to the list.
Step 8
Click “Apply”.
Step 9
Open “Main Menu > Basic Settings > Network & Reboot”.
On the column of “Device Reboot”, click the button of “Reboot”.
Step 7
Step 10
END.
VLAN configuration will take effect after rebooting.


