background image

HOW TO MAINTAIN 

YOUR ROBOT

Cleaning the filter bag

We recommend that you clean the filter bag at the end of each cycle.
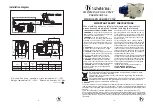
>  Bring the robot in by pulling on the cable 

Diagam


12


or using the manual mode 

(see page 14 for manual mode utilisation)

.

>  Switch the robot off and unplug the control unit from the mains.
>  As soon as the robot is out of the water, pick it up by the handle and 

lay it upside down on the poolside, so that you have access to the  
filter-holder plate located beneath the robot 

Diagram


13 to 19

>  Push down on the outside of the 2 clips that hold the filter-holder  

plate in position and free it from the robot, still holding it upside down, 
so that the debris stays in the bag. The filter is attached to the plate.

>  Remove the filter from the plate (There is slight resistance behind  

the clips).

>  Empty the bag and clean it with running water or if necessary with 

slightly soapy water. If you use soap, rinse it thoroughly whilst turning 
it over. Do not wring it out. You can also machine wash it, following the 
instructions given on the label inside the bag.

>  Also rinse the filter-holder plate and remove any debris caught under  

the valves.

>  Replace the bag in the filter-holder plate by pressing down on the  

filter’s frame in the corners and behind the clips, so that the frame  
is firmly in position on the plate.  
Important: the bag must be facing the right way. When the bag is in 
position on the filter-holder plate, the Zodiac label must be visible.


>  Fit the filter-holder plate back onto the robot when the filter-bag  

is dry and click it into place. Make sure that the clip attachments  
are properly in place by pushing them outwards.

open

shut

17

Diagram 

12

Diagram 

17

Diagram 

18

Diagram 

19

Diagram 

14

Diagram 

15

Diagram 

16

Diagram 

13

Summary of Contents for LAZERNAUT

Page 1: ...ormation He will advise you on the usage and maintenance of your robot He can also supply you with spare parts and is qualified to provide you with after sales service CONTENTS HOW TO INSTALL YOUR LAZ...

Page 2: ...cing backwards Diagram 3 Installation For your safety and for the LAZERNAUT to function correctly place the control unit at a distance of at least 3 5 metres from the edge of the pool making sure that...

Page 3: ...he Time In manual mode this button turns the robot to the left while it is still underwater In automatic mode this button selects the Programme or Time menus During programming it validates the Progra...

Page 4: ...0 P 01 See chapter Programmes page 16 for selecting programmes The modified value flashes and is then validated by or cancelled by Cancel The length of the cycle can be set for 30 min to 6 hours in 30...

Page 5: ...or The Lazernaut is controlled by a microprocessor to ensure optimal cleaning in all pool configurations This microprocessor also offers the following functions Poolside system In the event that your...

Page 6: ...ght resistance behind the clips Empty the bag and clean it with running water or if necessary with slightly soapy water If you use soap rinse it thoroughly whilst turning it over Do not wring it out Y...

Page 7: ...Do not leave your robot permanently in the water You should not oil any external mechanical part that is accessible by the user Disconnect the cable from the control box and wind it round the hooks o...

Page 8: ...s for submerging the robot respecting the recommendations given earlier in this document point by point Turn the robot right over and hold it underwater so that all the air trapped in the shell can es...

Page 9: ...oncerning use of the appliance by a person responsible for their safety Product waste disposal Protection of the environment In accordance with the provisions of the Waste Electrical and Electronic Eq...

Page 10: ...arantee Normal wear and tear of the operational parts such as the foam brushes or the filter bags Electrical damage caused by lightning or a bad electrical connection Breakage due to impact Under no c...

Reviews: