Unpacking
The packaging should contain the following items:
> the LAZERNAUT™,
> the transport trolley including the control unit.
Check that your appliance has not suffered any damage during transport
(bumps, broken parts, etc.) If you detect the slightest problem, please
contact your retailer immediately before using your LAZERNAUT™.
> Assembling the transport trolley:
Before removing the appliance from its box
- Pull the upper section of the trolley containing the control unit out of
the box,
- Remove the robot from the box being careful not to let the cable get
caught up in the trolley,
- Remove the lower section of the trolley,
- Loosen the lock-wheels completely and remove the screw from the
axle-pin,
- Fit the upper section of the trolley into the lower section so that the
control unit's keyboard is facing the front of the trolley
Diagram
1
.
- Fix the screws in place to hold the 2 sections of the trolley
together. Be sure to position a plastic washer on both sides of these
screws. Tighten the lock-wheels as far as they will go (the 'lock-wheels'
must face the back of the trolley)
Diagram
2
.
- Make sure the cable wrap-around hooks are facing backwards
Diagram
3
.
Installation
For your safety and for the LAZERNAUT™ to function correctly, place the
control unit at a distance of at least
3.5 metres
from the edge of the pool
making sure that the unit is not exposed to direct sunlight.
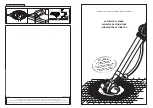
Submerging the robot
Important :
Under no circumstances should anyone be allowed to swim
when the LAZERNAUT™ is in your pool.
Stage 1 :
Submerge the robot in the water and evacuate any air that it
contains by turning it over
Diagram
4
.
Stage 2 :
Squeeze the foam brushes with your hands to push out the air
and to allow water in
Diagram
5
. It is essential that the appliance sinks to
the bottom of the pool and stays there without aid.
Stage 3 :
Lay out the cable on the pool leaving the float closest to the
control unit on the pool’s edging.
To get the best out of your LAZERNAUT, run in the foam pads. To do this,
carry out four 11/2 - hour cleaning cycles in “bottom only” mode
(see paragraph “Programming the Robot”, page 15).
Electrical connections
Connect the robot’s cable to the control unit
and lock the connector under the unit
Diagram
6
; Only connect the control unit to a
plug fitted with a security residual current
protection system of
30 mA
maximum (if
in doubt, contact an electrician/installer).
HOW TO INSTALL YOUR
LAZERNAUT
TM
13
Diagram
1
Diagram
3
Diagram
2
Diagram
4
Diagram
5
Diagram
6