background image

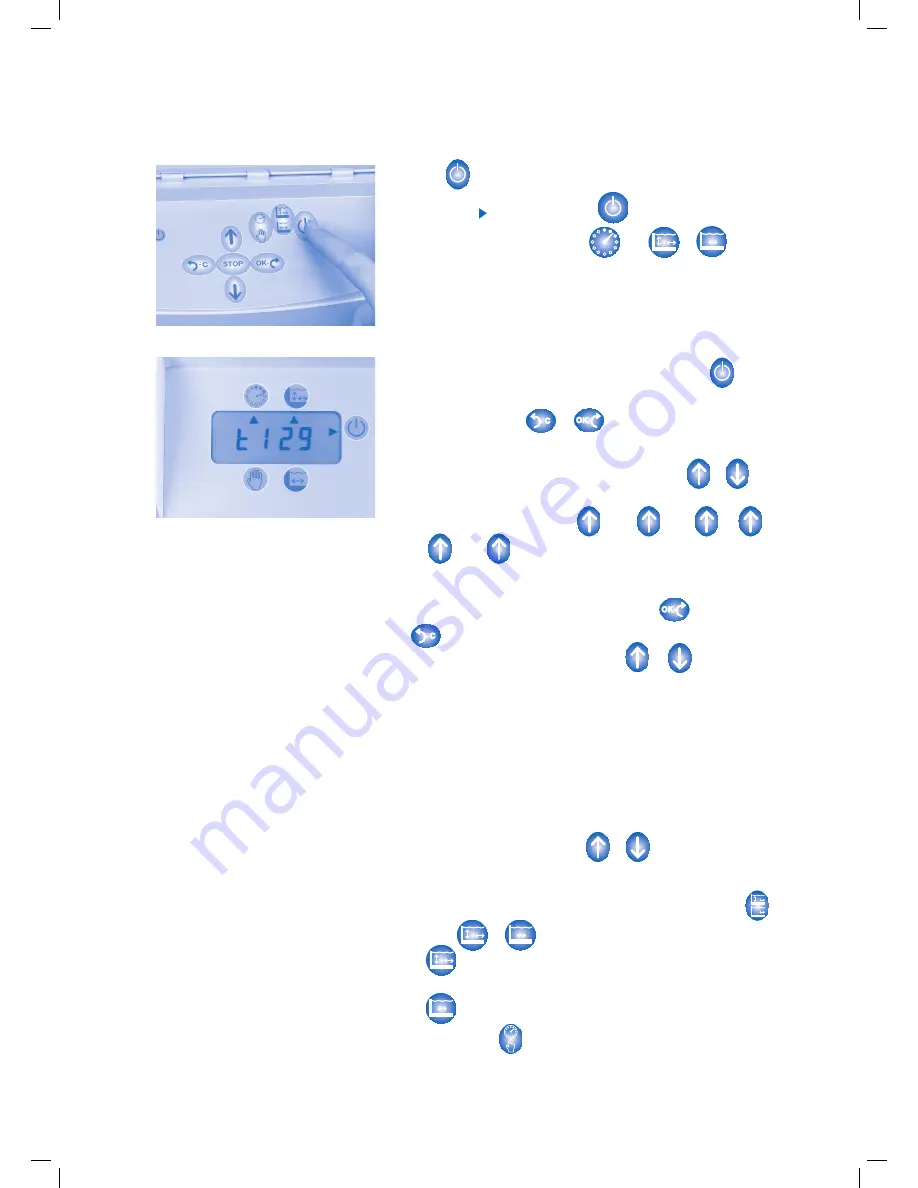
The control keyboard

When switched on, the robot is in sleep mode and the display is blank. 
The robot is now waiting for a start or programming command.

To start

When the        button is pressed, the robot starts in automatic mode.

Diagram


10

.

A small triangle     appears opposite the           indicator on the top 

right-hand side of the screen and the           and           or          mode 

indicators. The programme, the length of operation time and the ‘bottom only’ 
or ‘ sides’ parameters are those memorised during the previous 
cleaning cycle. The amount of time remaining before the system is due to stop 
appears on the screen  

Diagram


11.


Programming of the robot

When the robot is in sleep mode, pressing any button except 

takes one into the programming mode.  The screen displays the length 

of the cycle.  By pressing          or          , one moves alternatively 

 between the Time and the Programme menu. The active menu is shown on 
the display (t: time; P: Programme). 
The possible values are increased or decreased using the        or       
 buttons.

Example for the programmes P : 01        P : 02        P : 03        ….       

P : 24        P : 00        P : 01 

(See chapter Programmes, page 16 for 

selecting programmes).

The modified value flashes and is then validated by           or cancelled 

by          (Cancel). The length of the cycle can be set for 30 min. 

to 6 hours, in 30 minute intervals, using the         or        buttons.

You can also use a programming clock (not supplied): the robot starts  
and stops automatically according to the time and programming 
 parameters that you have defined using this clock. In this case, the cycle 
time must be set to  

t0:00.


During the cycle

While the robot is operating, the display screen shows the time remaining 
before the cleaning process is programmed to stop. In automatic mode one 
can, at any given time, increase or reduce the amount of time remaining 

before the system stops by using the        or        , buttons 
(in 30 minute intervals).
However, the Programme menu cannot be changed during the cycle.

You can also adjust the robot’s operating mode. When you press the        , 

button, the           or           indicator is activated on the screen. 

If the           indicator is active, the robot cleans the bottom and the sides

of the pool.

If the          indicator is active, the robot only cleans the bottom of the pool.

When you press the         button, you move from automatic mode to 
manual mode and vice versa.

15

Diagram 

10

Diagram 

11

Summary of Contents for LAZERNAUT

Page 1: ...ormation He will advise you on the usage and maintenance of your robot He can also supply you with spare parts and is qualified to provide you with after sales service CONTENTS HOW TO INSTALL YOUR LAZ...

Page 2: ...cing backwards Diagram 3 Installation For your safety and for the LAZERNAUT to function correctly place the control unit at a distance of at least 3 5 metres from the edge of the pool making sure that...

Page 3: ...he Time In manual mode this button turns the robot to the left while it is still underwater In automatic mode this button selects the Programme or Time menus During programming it validates the Progra...

Page 4: ...0 P 01 See chapter Programmes page 16 for selecting programmes The modified value flashes and is then validated by or cancelled by Cancel The length of the cycle can be set for 30 min to 6 hours in 30...

Page 5: ...or The Lazernaut is controlled by a microprocessor to ensure optimal cleaning in all pool configurations This microprocessor also offers the following functions Poolside system In the event that your...

Page 6: ...ght resistance behind the clips Empty the bag and clean it with running water or if necessary with slightly soapy water If you use soap rinse it thoroughly whilst turning it over Do not wring it out Y...

Page 7: ...Do not leave your robot permanently in the water You should not oil any external mechanical part that is accessible by the user Disconnect the cable from the control box and wind it round the hooks o...

Page 8: ...s for submerging the robot respecting the recommendations given earlier in this document point by point Turn the robot right over and hold it underwater so that all the air trapped in the shell can es...

Page 9: ...oncerning use of the appliance by a person responsible for their safety Product waste disposal Protection of the environment In accordance with the provisions of the Waste Electrical and Electronic Eq...

Page 10: ...arantee Normal wear and tear of the operational parts such as the foam brushes or the filter bags Electrical damage caused by lightning or a bad electrical connection Breakage due to impact Under no c...

Reviews: