


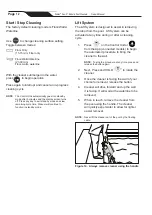

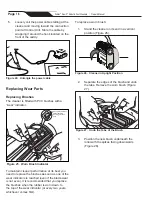

Lift System
The Lift System is designed to assist in retrieving
the robot from the pool. Lift System can be
activated at any time during or after a cleaning
cycle.
IMPORTANT
: Only use Lift System when in view of the
cleaner.
1. From the main screen, select
Lift
System
to enter automated procedure.
2. Use the
left
and
right
arrow icons to rotate
the cleaner to face the wall of your choice.
3. Press the
Lift System
icon to drive the
cleaner up the wall it is facing. The cleaner
will wait at the water line to be retrieved.
NOTE
: To stop the procedure at any time, press and release
the button again.
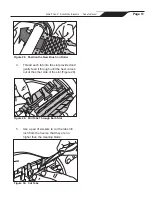
4. When in reach, grab the cleaner handle
and begin to pull cleaner out of the water.
The cleaner will quickly expel water to
allow for lighter, easier removal.
NOTE
: Never lift the cleaner out of the pool by
the floating cable.
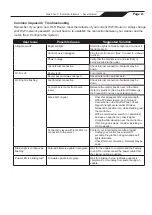
In-App Error Messages and
Troubleshooting
If an error occurs, the status bar will show a
warning symbol and: "Cleaning Interrupted".
1. Click on the warning symbol to view
troubleshooting advice
on how to fix the issue.
2. Choose
Clear Error
if you believe you have
fixed the problem and want to re-try. Choose
OK
if you want to suspend the cleaner in error
mode and work on the troubleshooting fix at a
later time.
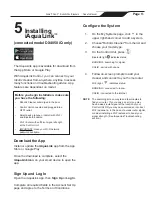
System Settings
Access System Settings by pressing the gear icon
in the upper right hand corner of the app screen.
7
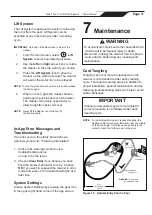
Maintenance
WARNING
To avoid electric shock and other hazards which
could result in permanent injury or death,
disconnect (unplug) the cleaner from the power
source before performing any cleaning and
maintenance.
Cord Tangling
Tangling can occur more frequently when the
cleaner is not attended to after each cleaning
cycle. The tangle-reducing swivel, in addition to
proper installation, general maintenance and the
following troubleshooting steps can help to avoid
cable challenges.
IMPORTANT
Cleaner power cable may become tangled if
correct procedure is not followed after each
cleaning cycle.
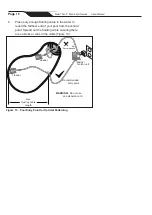
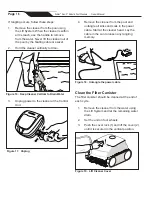
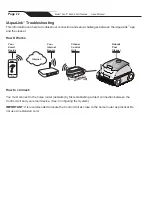
NOTE:
For optimal patterning and reduced tangling, the
floating cable should enter the water near the middle
of the pool length. Only place enough cable in the
water to reach the farthest point in the pool.
Max
Floating Cable
Length
caddy /
control unit
cleaner
cleaner
Recommended
entry point
Not
Recommended
WARNING:
Do not use
an extension cord
Figure 15. Optimal Entry Point in Pool
Page
15
Zodiac
®
Duo-X
™
Robotic Pool Cleaners
|
Owner's Manual


