background image


  Z3-MVE-100 V1.05.01a


___________________________________________________________________________________________ 

Z3 Technology, LLC 

 100 N 8

th

 ST, STE 250 

 Lincoln, NE 68508-1369 U.S.A. 

 +1.402.323.0702


10 

5.3  Setting Up the Control PC 


(4) Set the PC IP address to one that can communicate with the Z3-MVE-100 


(a) Find the IP address of the Z3-MVE-100.  It can be found on the sticker on the bottom of the 

Z3-MVE-100.  It should be 192.168.81.68.   


(b) This means you need to set your PC to an IP address of 192.168.x.y, where x and y do not 

equal “81.68.”  Decide on an address (if any will do, we recommend using 192.168.0.6). 


(c) If you are using a Windows PC, bring up the IP Properties window of your PC.  Though this 

may vary depending on the version of Windows running on your PC, a typical sequence would 

be something like: 


(i)    Find the “My Network Places” icon and double-click on it to bring up the “My Network 

Places” window. 


(ii)   On the left side of that window, find “View Network Connections” and click on that. 


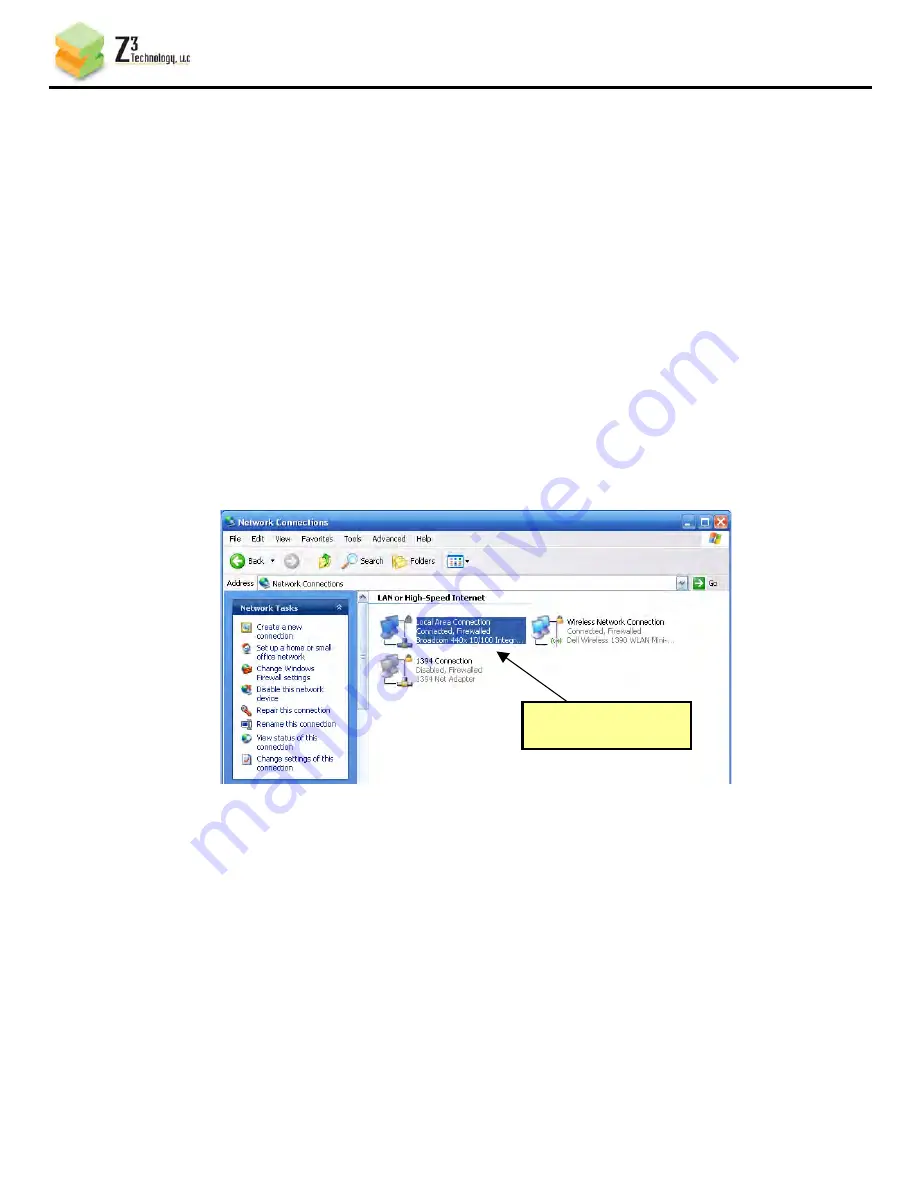
(iii)  This should bring up a list of connections.  If the Ethernet cable is connected, one of 

the connections that shows up is “Local Area Connection”.  Right-click on this and 

select “Properties”: 


(iv)  You should then see a “Local Area Connection Properties” Window.  In this window, one 

                 of the options is “Internet Protocol (TCP/IP)”.  Select this and click on “Properties”: 


Figure 5  Windows PC Network Connections Window 

Right-click and select 

“Properties” 

Summary of Contents for Z3-MVE-100

Page 1: ...r and Streamer Model Name Z3 MVE 100 DOC USR 0047 02 Manual Version 1 05 01a Software Version 1 05 01 February 25 2014 Before attempting to connect or operate this product please read these instructions carefully and save the manual for future use ...

Page 2: ... U S A 1 402 323 0702 2 Revision History Version Date Change Note Author 0 01 00 05 24 12 Original System NC 1 02 07 06 06 12 Correction to revision system clean up of sections 6 3 9 1 NC 1 02 08 07 17 12 Address update NC 1 03 00 03 25 13 Formatting changes MC 1 05 01 09 19 13 Modifications to reflect v1 05 01 RC 1 05 01a 2 25 14 HW Warranty Temp Humidity other updates MS ...

Page 3: ...ting up the Video Source 9 5 2 Connecting the Z3 MVE 100 9 5 3 Setting Up the Control PC 10 5 4 Configuring the Z3 MVE 100 12 5 5 Opening a VLC Client to Receive the Encoded Stream 14 5 6 Streaming RTP 16 6 0 RUNNING DECODE ON THE Z3 MVE 100 17 7 0 PERFORMING OTHER OPERATIONS WITH THE Z3 MVE 100 19 7 1 Saving Current Settings 19 7 2 Making a Firmware Update 23 8 0 SUMMARY OF OPTIONS 25 8 1 The Enc...

Page 4: ...s Front 12 Figure 9 Z3 MVE 100 Web Interface Configuration Menu 13 Figure 10 Z3 MVE 100 Configured for TS Encode 14 Figure 11 VLC Open Network Screen 15 Figure 12 Example of Z3 Video Streaming to VLC MPEG 2 TS 15 Figure 13 Example of Z3 Video Streaming to VLC RTP 16 Figure 14 MVE 100 Connections for Decode 17 Figure 15 Operating Mode Selector 17 Figure 16 Z3 MVE 100 Decoder Configuration Menu 18 F...

Page 5: ...t HD video up to 1080p60 The Z3 MVE 100 features HD performance compact size and low latency while having less power consumption than a PC based encoder platform 1 1 Thermal Management Install the unit in a location with plenty of cool air flow Allow enough room on all sides of the Z3 MVE 100 for proper ventilation Cool air must be able to run through the enclosure vents and hot air must be allowe...

Page 6: ..._____________________________ Z3 Technology LLC 100 N 8th ST STE 250 Lincoln NE 68508 1369 U S A 1 402 323 0702 6 2 0 INCLUDED PARTS LIST Figure 1 Parts Shipped with the Z3 MVE 100 Z3 MVE 100 Power Supply 3 BNC to BNC Cables DB9 Serial Cable HDMI Cable Gender Changer RCA to RCA Cable ...

Page 7: ...0 25 and 720p60 50 H 264 and optional MPEG 2 support Inputs HDMI ASI Component Outputs HDMI ASI HD SDI Interfaces to 1Gb Ethernet SATA2 USB2 0 x2 RS 232 Outputs RTP or MPEG 2 Transport Stream Web based configuration software Optional internal HDD Operating Temperature and Humidity 0 to 40 degrees C at 20 80 relative humidity non condensing Storage Temperature and Humidity 10 to 50 degrees C at 20 ...

Page 8: ... U S A 1 402 323 0702 8 4 0 INPUTS AND OUTPUTS Figure 2 Front View of the Z3 MVE 100 Figure 3 Rear View of the Z3 MVE 100 1 Power Switch 2 Status LEDs 3 Serial Port 4 Audio In R 5 SDI Out 6 ASI SDI In 7 SDI In 8 Component Pb In 9 Ethernet 10 Audio In L 11 ASI Out 2 12 ASI Out 1 13 Component Y In 14 Component Pr In 15 HDMI DVI In 16 HDMI Out 17 SATA 18 USB 1 2 19 12V Power ...

Page 9: ...HD Source to a monitor Set the HD Source to 1080p or 1080i output Select and begin playback of the content If you see playback on the monitor you ve confirmed the source works Now move the HDMI cable from the monitor to HDMI In on the Z3 MVE 100 so that the cable runs from the HD Source to the Z3 MVE 100 see Figure 4 5 2 Connecting the Z3 MVE 100 2 Connect an Ethernet cable to Ethernet on the Z3 M...

Page 10: ...f you are using a Windows PC bring up the IP Properties window of your PC Though this may vary depending on the version of Windows running on your PC a typical sequence would be something like i Find the My Network Places icon and double click on it to bring up the My Network Places window ii On the left side of that window find View Network Connections and click on that iii This should bring up a...

Page 11: ...on Use the following IP address and set the IP Address to the value you determined in step 4b default value 192 168 0 6 Also make sure the netmask is 255 255 0 0 Then click Ok to save these values e If you are using Linux you can set up an alias network address to match what you need An example of a command doing this would be sudo ifconfig eth0 0 192 168 0 6 netmask 255 255 0 0 a Make sure this i...

Page 12: ...inute 7 Open a web browser FireFox is recommended Type in http 192 168 81 68 You should then see the Z3 MVE 100 Configuration Menu if you don t see this please see the Troubleshooting section on page 30 Figure 7 Windows PC IP Address Internet Protocol Window Set to 192 168 0 6 or whatever value you decide on that begins with 192 168 x y and does not equal 192 168 81 68 Make sure the netmask is set...

Page 13: ... 68508 1369 U S A 1 402 323 0702 13 8 In the menu you should see 3 tabs Encoder Settings Configure the encoder decoder System Setup Configure the board s IP address netmask gateway User Presets Save and retrieve settings 9 You are now ready to configure the encoder From the default settings change Video Source Figure 9 Z3 MVE 100 Web Interface Configuration Menu ...

Page 14: ...he menu settings should look like after the 3 changes Figure 10 Z3 MVE 100 Configured for TS Encode 10 Next click on Start You should see the system state change from idle to Starting After about 5 seconds the state should then change to Running If you hooked up HDMI Out to an HDMI monitor in Step 2 you should see the video being encoded on the HDMI monitor 5 5 Opening a VLC Client to Receive the ...

Page 15: ...2 323 0702 15 11 Run VLC on your PC version used in testing at Z3 2 08 12 Select Media Open Network Stream In the box type udp 192 168 0 6 5004 where 192 168 0 6 is the IP address of your PC and 5004 is the value of Dest Port from 9 13 Press Enter 14 You should now see video streaming from VLC Figure 11 VLC Open Network Screen Figure 12 Example of Z3 Video Streaming to VLC MPEG 2 TS ...

Page 16: ...xample file is provided with the software release from Z3 To stream using RTP do the following steps 15 In the GUI click on Stop to stop the current encoding session 16 Change Output Format from MPEG 2 TS to RTP see Figure 10 17 Confirm that Dest Port is 5004 this will be important for the VLC configuration 18 Copy the z3 netra unicast sdp file received from Z3 to your PC 19 Open VLC Select Media ...

Page 17: ...3 MVE 01 and access the web server to control settings Steps 1 to 7 2 Connect the streaming source to a hub router that is connected to the control PC Connect the Ethernet port of the Z3 MVE 100 to this same hub router 3 Connect HDMI Out of the Z3 MVE 100 with an HDMI cable to an HDMI monitor 4 The control PC should still have the Web GUI of the Z3 MVE 100 If the encoder is still running from the ...

Page 18: ...369 U S A 1 402 323 0702 18 6 This should cause the GUI to change to the Decoder configuration menu 7 Make sure Input Interface is Ethernet 8 Make sure Input Format and IP Port matches what the source is streaming to 10 Make sure Output Interface is set to HDMI 11 Click Start Decoder 12 You should see video on the monitor Figure 16 Z3 MVE 100 Decoder Configuration Menu ...

Page 19: ...e it so that when the Z3 MVE 100 is powered off and back on it automatically uses those settings This can be done with the steps described below In this example we will set the encoder to a lower bitrate save that configuration and confirm that this configuration is what is used when booting up 1 Click on the Encoder Settings tab In this tab if the Encoder or Decoder is running click on Stop If in...

Page 20: ...23 0702 20 2 Next click on the User Presets tab This brings up the User Presets options 3 Click on new This brings up the New User Preset input box Type in low_bitrate and click ok 4 Once you click ok you should see that low_bitrate shows up as one of the configurations Figure 18 The User Presets Tab Figure 19 The New User Preset Input Box 1 Click on new 2 Type in low_bitrate 3 Click ok ...

Page 21: ...tion you would simply check the box to the left of low_bitrate and then click on rename or delete For now leave it as it is 5 While still in the User Presets menu go to the bottom and click on the box to the right of preset You should see 2 choices come up Select low_bitrate and then click Save Figure 20 Example of New Configuration Figure 21 Saving Custom Configuration as Default New option appea...

Page 22: ...r 7 Power the board back up and bring the Web GUI back up 8 Confirm that the Web Interface is using the low_bitrate setting and that 3Mbps is being used for encode 9 You have now successfully used a customized setting One final note factory defaults is also an option Simply select encoder factory default from the preset menu Figure 22 Example of Custom Configuration Being Used After Reboot Low bit...

Page 23: ...8508 1369 U S A 1 402 323 0702 23 7 2 Making a Firmware Update 1 Bring up the Web Interface steps 1 7 in Section 5 2 Click on the System Setup tab 3 On the opening screen click on update device firmware 4 This brings you to the update image screen In this screen click on Browse Figure 23 Selecting update device firmware Figure 24 The Update Image Screen Click here ...

Page 24: ...S A 1 402 323 0702 24 5 From here select the name of the img file to update with will likely end in UPD img and click Open 5 Click on Upload and Update 6 You will see screens stating that the image is being uploaded and that the flash is being updated After about one minute you should see the main menu again 7 Your Z3 MVE 100 is now updated Figure 25 The File Browsing Screen ...

Page 25: ...the video stream Video Profile High Main Baseline The H264 profile of the bitstream Generally High is used for 1080p Main for D1 and Baseline for D1 Frame Rate 1 60 The target frame rate 30 can be used for 30 or 29 997 If the frame rate is set to 30 and the input signal is actually 29 997 the Z3 MVE 100 will automatically detect this and use the frame rate of 29 997 A similar autodetect occurs for...

Page 26: ...m goes to The user can select between Ethernet DVB ASI or both Note that for RTP Ethernet must be selected Video Passthru HDMI SDI Where the passthru video is sent to Allows the user to see the video that is being encoded through either HDMI or SDI Output Format MPEG 2 TS RTP Selects between MPEG 2 TS encapsulated streams sent over UDP or RTP Dest IP Address 192 168 x y 192 168 0 6 The IP address ...

Page 27: ...ult of 225 1 2 3 denotes a multicast address STC PCR Offset 0 Deprecated Recommend leaving this at 0 Video Codec H 264 The video format in the stream Must be H 264 in this release Audio Codec AAC None The audio format in the stream Must be AAC or none in this release Stream Format auto detect 1080p 1920x1080 1080i 1920x1080 720p 1280x720 NTSC 720x480 PAL 720x576 The resolution of the incoming stre...

Page 28: ...w Define a new configuration file see p 19 rename Rename a configuration file see p 19 delete Delete a configuration file see p 19 export Export current settings to a file import Load settings from a previously exported file 7 5 Values Appearing at the Bottom of All Tabs Parameter Options default in bold Notes preset encoder factory default decoder factory default any user defined profiles The con...

Page 29: ...de is required it is recommended that MPEG 2 TS be used as the streaming format 2 When using the Z3 MVE 100 for RTP decode interlaced content 1080i 480i or 576i will not display properly One field will be shown on top of another field For interlaced content it is recommended to use MPEG 2 TS to stream or if a Z3 MVE 100 is being used for encoding activate the de interlacer and encode the content a...

Page 30: ...ddress of the PC running VLC Does the port number in Dest Port equal the value entered in the URL for VLC Does the video coming out of the source match the resolution in the encoder settings Is the PC fast enough for 1080p decode on VLC Does the PC have enough DDR to handle 1080p decode on VLC Is VLC version 1 1x or later Problem Do not see video in VLC RTP Is Dest Port set to 5004 Problem Video i...

Reviews: