


10-3
IM 2558A-01EN
Ethernet Interface
3
2
1
4
5
6
7
8
9
10
11
12
13
14
15
16
App
Index
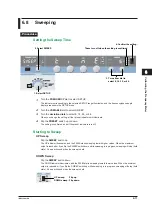
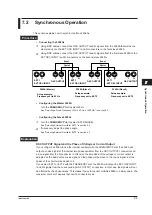
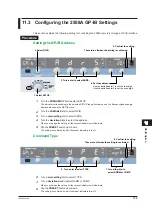
10.3 Configuring the 2558A Ethernet Settings
This section explains the following setting for remotely controlling the 2558A via the Ethernet interface:
Procedure
Turning DHCP On and Off
These turn off when the setting is confirmed.
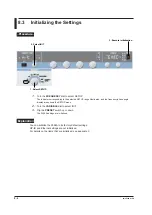
4. Turn either dial to
select ON or OFF.
5. Confirm the setting.
2. Select LAN.
1. Select SETUP.
3. Turn a dial to select DHCP.
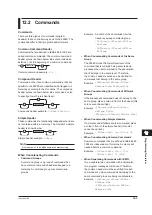
1.
Turn the
FREQUENCY
dial to select SETUP.
The indicator corresponding to the selected SETUP range illuminates, and the frequency/phase angle
display area shows the SETUP menu.
2.
Turn the
VARIABLE
dial to select LAN.
3.
Turn a
main setting
dial to select DHCP.
4.
Turn a
deviation dial
to select ON or OFF.
When you change the setting, all four preset indicators will illuminate.
5.
Flip the
PRESET
switch up or down.
The setting is confirmed, and all the preset indicators turn off.
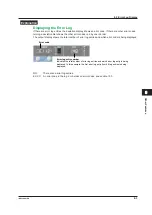
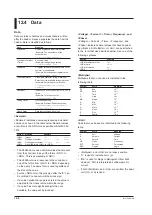
Setting the IP Address, Subnet Mask, and Default Gateway
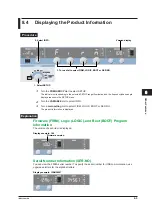
6. Turn a dial to select IP.0,
MASK.0, or GATE.0.
Turn this dial to select IP.0 to 3, MASK.0 to 3, or GATE.0 to 3.
7. Set the address.
Turn the deviation dial 1 to set the tens digit.
Turn the deviation dial 2 to set the ones digit.
These turn off when the
setting is confirmed.
8. Confirm the setting.
6.
Turn a
main setting
dial to select IP, MASK, or GATE.
Turn the right-most main setting dial to display the four octets of all items one at a time.
Turn any of the other three main setting dials to display only the first octet.


