background image

Customizing Your Phone 

55 

2.


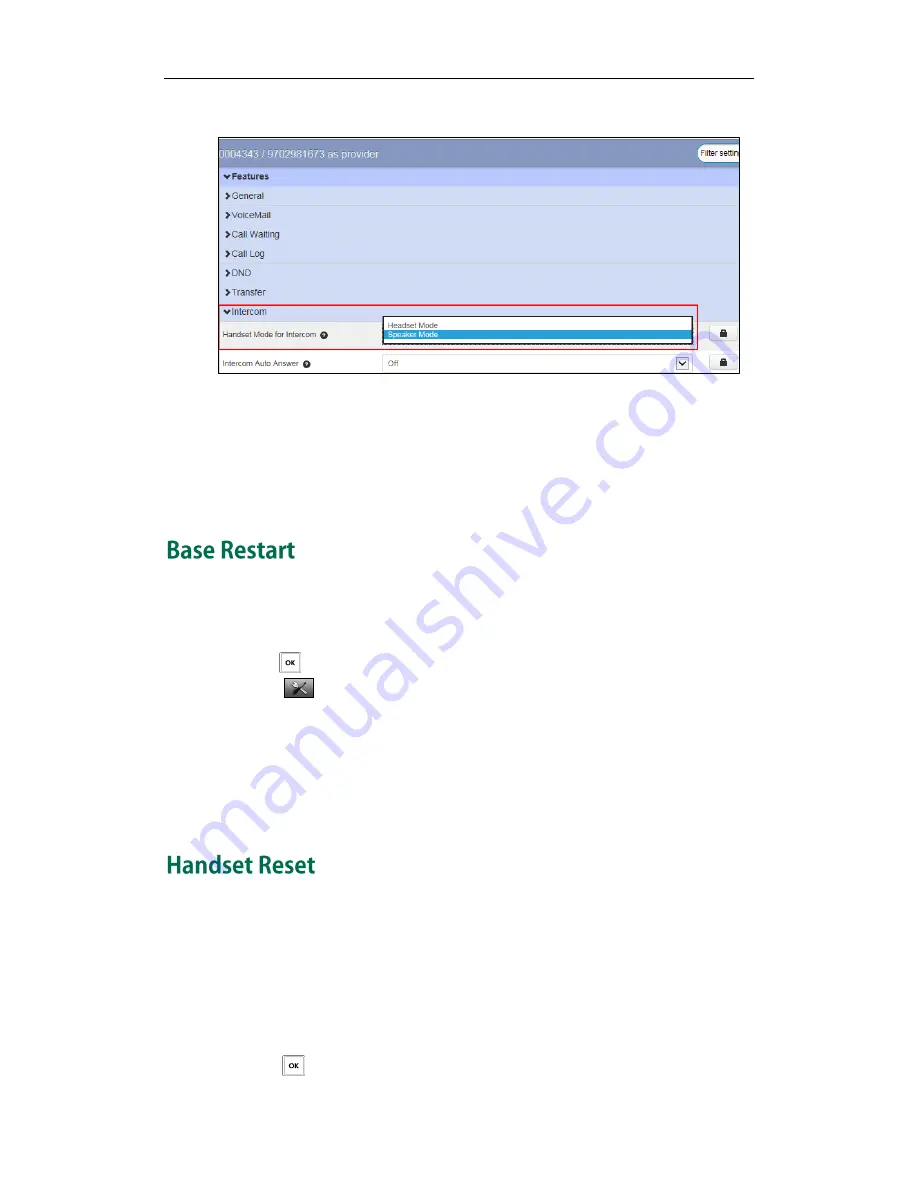
Select the desired value from the Intercom Auto Answer pull-down list. 


3.


Click Save changes to accept the change. 

4.


Perform auto provisioning on the phone to download above configurations. For 
more information on how to perform auto provisioning, refer to

 Downloading 

Configuration Files 

on page 

17


In some instances, you may need to restart the base station to refresh the settings. 

To restart the base station via the handset: 

1.


Press          to enter the main menu. 

2.


Select            ->System Settings->Base Restart. 

3.


Enter the system PIN (default: 0000). 

4.


Press the Done soft key. 

After the above steps, the registration LED and network status LED go out simultaneously. 
After a period of time, the LED indicators will illuminate solid green again when the 
base station restarts successfully. 

You can reset individual settings that you have made on the handset. Resetting handset 
will not overwrite settings of directory, call history, voice mail and the handset 
registration to the base station. Other customized settings on the handset will be reset 
to factory settings after handset reset. We recommend that you ask your system 
administrator for advice before resetting your handset. 

To reset the handset via the handset: 

1.


Press          to enter the main menu. 

Summary of Contents for Telkom W52P

Page 1: ......

Page 2: ...S IN THIS GUIDE ARE SUBJECT TO CHANGE WITHOUT NOTICE ALL STATEMENTS INFORMATION AND RECOMMENDATIONS IN THIS GUIDE ARE BELIEVED TO BE ACCURATE AND PRESENTED WITHOUT WARRANTY OF ANY KIND EXPRESS OR IMPL...

Page 3: ...ures 1 Reorient or relocate the receiving antenna 2 Increase the separation between the equipment and receiver 3 Connect the equipment into an outlet on a circuit different from that to which the rece...

Page 4: ...8826 To avoid the potential effects on the environment and human health as a result of the presence of hazardous substances in electrical and electronic equipment end users of electrical and electroni...

Page 5: ...ware under the specific terms of the GPL Please refer to the GPL for the exact terms and conditions of the license The original GPL license source code of components licensed under GPL and used in Yea...

Page 6: ...Access Profile GAP standard to support some features e g Call Encryption and Registration Management defined in the GAP It should be noted that Yealink W52P IP DECT phones are not compatible with the...

Page 7: ...rify with your system administrator that the network is ready for phone configuration Also be sure to read the Packaging Contents and Regulatory Notices sections in this guide before you set up and us...

Page 8: ...Yealink W52P IP DECT Phones Configuring Guide vi...

Page 9: ...on Description 9 Handset Description 10 Displaying Information on LCD Screen 12 Icon Instructions 13 Configuration Interfaces 15 Phone User Interface 15 CommPortal Phone Configurator 16 Downloading Co...

Page 10: ...e 32 Ring Tones 33 Advisory Tones 34 Backlight 35 Screen Saver 36 Color Schemes 36 Keypad Light 37 Notification Light 37 Time Date 38 Shortcuts 41 Contact Management 42 Local Directory 42 Blacklist 45...

Page 11: ...dialing Calls 66 Call Mute 67 Call Hold Resume 67 Call Waiting 68 Do Not Disturb DND 69 DND Key Synchronization 69 DND Sync for Shared Line 70 Call Forward 71 Call Transfer 71 Transfer on Hook 73 Conf...

Page 12: ...Yealink W52P IP DECT Phones Configuring Guide viii...

Page 13: ...the Handset If you require additional information or assistance with your new phone contact your system administrator The following components are included in your W52P W52H IP DECT phone packages W5...

Page 14: ...Yealink W52P IP DECT Phones Configuring Guide 2 W52P W52H Handset Charger Cradle Power Adapter Two Rechargeable Batteries...

Page 15: ...Power Optional To connect the AC power 1 Connect the DC plug on the power adapter to the DC5V port on the base station and connect the other end of the power adapter into an electrical power outlet 2...

Page 16: ...Connect the Ethernet cable between the Internet port on the base station and an available port on the in line power switch hub Note To insert batteries into the handset 1 Open the battery cover 2 Inse...

Page 17: ...sed We recommend you use only the batteries that came with the handset or replacement batteries approved by Yealink technology Sanyo NiMH 800 GP 850 mAh Yuasa Technologies AAA 800 Battery Capacity The...

Page 18: ...setting up the handset and charger cradle place the handset in the charger cradle The original handset included in the W52P package is pre registered to the base station After charging the handset is...

Page 19: ...Getting Started 7 25 Charged 10 Charged Almost Flat...

Page 20: ...Yealink W52P IP DECT Phones Configuring Guide 8...

Page 21: ...registered to the base station all LEDs on the base station illuminate green in sequence Hardware component instructions of the W52P base station are Item Description Paging Key Locates a misplaced ha...

Page 22: ...the network is available Power Indicator LED Indicates the power status of the base station Slow flashes green when the base station is during the firmware upgrading process Slow flashes green when th...

Page 23: ...the star symbol Switches the silent mode on or off Redirect Key Transfers a call to another party Microphone Picks up audio during earpiece and hands free calls Mute Key Toggles Mute feature on or off...

Page 24: ...rompt messages Off hook displays the dialed digits The information shown in the soft key line On hook idle displays History and Line Off hook displays various terms according to the context of the spe...

Page 25: ...d in the following table Icon Description Anonymous Call Anonymous Call Rejection Missed Call Voice Mail Keypad Lock Silent Mode Do Not Disturb Call Forward Call Hold Call Mute Unassigned Outgoing Lin...

Page 26: ...Yealink W52P IP DECT Phones Configuring Guide 14...

Page 27: ...d use IP phones via phone user interface If the administrator wants to deploy small number of phones this method can be used However if the administrator wants to deploy and maintain a mass of IP phon...

Page 28: ...rator is an online graphical user interface for the Metaview SIP provisioning server Administrators and end users can configure the features for the IP phones using a simple and intuitive interface Fo...

Page 29: ...k W52P phones support many ways to obtain the provisioning server address e g by detecting DHCP options 66 contacting Redirection Provisioning Server RPS Phone Flash For more information refer to Yeal...

Page 30: ...Power On or Auto Provision Now method to trigger the IP phone to connect to the configured provisioning server and perform the auto provisioning process For more information on these methods refer to...

Page 31: ...e 1 Press to enter the main menu 2 Select System Settings Auto Provision 3 Enter the system PIN default 0000 and press the Done soft key 4 Depending on the authentication method you choose If you are...

Page 32: ...Yealink W52P IP DECT Phones Configuring Guide 20 4 Click on Phone Auto Provision 5 Click Autoprovision Now The IP phone will perform the auto provisioning process immediately...

Page 33: ...tion Each handset can be registered to 4 different base stations To register a handset manually via the handset 1 Long press on the base station The registration LED slow flashes indicating the base s...

Page 34: ...e than one base station You can select Bestbase to search for the base station with the best signal strength To select the base station via the handset 1 Press to enter the main menu 2 Select Registra...

Page 35: ...g refer to Downloading Configuration Files on page 17 Note SIP session timers T1 T2 and T4 are SIP transaction layer timers defined in RFC 3261 These session timers are configurable on IP phones Timer...

Page 36: ...4 Timer T4 represents the time the network will take to clear messages between the SIP client and server To configure SIP session timer via CommPortal phone configurator 1 Click on Line X Session Time...

Page 37: ...splays the network settings To check the handset status via the handset 1 Press to enter the main menu 2 Select Handset The LCD screen displays the status information of the handset 3 Press or to scro...

Page 38: ...xtension the extension will act as the account label to be displayed on the idle screen If you select Custom description you can customize the label to be displayed on the idle screen in the Custom De...

Page 39: ...more information on adjusting the ringer volume using the menu refer to Ring Tones on page 33 To adjust ringer volume using the predefined shortcuts via the handset 1 Press or when the handset is idle...

Page 40: ...g call information on the LCD screen You can switch the silent mode on if you do not want to be disturbed To switch the silent mode on via the handset 1 Long press until the LCD screen prompts All Rin...

Page 41: ...ist You can access features of the submenu by entering the submenu To access features of a submenu via the handset 1 Press or to highlight the desired submenu 2 Press or the OK soft key to access feat...

Page 42: ...Yealink W52P IP DECT Phones Configuring Guide 30...

Page 43: ...light Screen Saver Color Schemes Keypad Light Notification Light Time Date Shortcuts Contact Management Call History Management Emergency Numbers Outgoing Lines Incoming Lines Speed Dial Intercom Base...

Page 44: ...ange 4 Perform auto provisioning on the phone to download above configurations For more information on how to perform auto provisioning refer to Downloading Configuration Files on page 17 The handset...

Page 45: ...set a ring tone for an incoming intercom call When receiving an incoming call the handset rings the specified ring tone To configure ring tones via the handset 1 Press to enter the main menu 2 Select...

Page 46: ...the capacity of the batteries is low and the handset requires charging To configure advisory tones via CommPortal phone configurator 1 Click on Preferences Advisory Tones 2 Mark the desired radio box...

Page 47: ...f after the handset has been idle for a period of time when it is in the charging state 3 Mark the desired radio box of the Backlight Active out of Charger field If Enabled is selected the handset wil...

Page 48: ...mately 10 seconds To configure the screen saver via CommPortal phone configurator 1 Click on Preferences Display 2 Mark the desired radio box of the Screen Saver field 3 Click Save changes to accept t...

Page 49: ...elps you distinguish keys from each other in a dark environment To configure keypad light via CommPortal phone configurator 1 Click on Preferences Display 2 Mark the desired radio box of the keypad Li...

Page 50: ...bled is selected the message key LED flashes red when the handset misses a call If Disabled is selected the message key LED won t flash when the handset misses a call 4 Click Save changes to accept th...

Page 51: ...fields respectively 5 Enter the desired interval to update time and date from the NTP server in the NTP Query Interval field 6 Mark the Enabled radio box in the Daylight Savings field 7 Do one of the...

Page 52: ...nformation on how to perform auto provisioning refer to Downloading Configuration Files on page 17 Note To configure date and time manually via the handset 1 Press to enter the main menu 2 Select Date...

Page 53: ...WW MMM DD Tue Mar 24 DD MMM YY 24 Mar 15 YYYY MM DD 2015 03 24 DD MM YYYY 24 03 2015 MM DD YY 03 24 15 DD MMM YYYY 24 Mar 2015 WWW DD MMM Tue 24 Mar There are two types of shortcut on the handset chan...

Page 54: ...the handset s local directory where names and numbers can be freely added deleted and edited You can store up to 100 contacts per handset each with a name a mobile number and an office number You can...

Page 55: ...ents the digital input method To enter a character via the handset You can press a key one or more times depending on the current input method to enter the characters displayed on the key To make a sp...

Page 56: ...l Note To edit a contact in the local directory via the handset 1 Press to enter the main menu 2 Select 3 Press or to highlight the desired entry 4 Press the Options soft key and then select Edit 5 Ed...

Page 57: ...using the keypad The contact whose name or number matches the search will appear on the LCD screen after a timeout or when the Search soft key is pressed You can dial a contact from the result list T...

Page 58: ...te The selected entry will be deleted successfully To delete all entries from the blacklist via the handset 1 Press to enter the main menu 2 Select Telephony Caller Blacklist 3 Press the Options soft...

Page 59: ...oading Configuration Files on page 17 To access your remote phone book via the handset 1 Press to enter the main menu 2 Select 3 Press or to highlight the name of your remote phone book and then press...

Page 60: ...and Accepted Calls Each call history list can store a list of entries sorted by date and time of the call starting with the latest call entry You can check the detailed information of an entry in the...

Page 61: ...ntry is deleted successfully To delete all entries of a list from the call history via the handset 1 Press the History soft key when the handset is idle The LCD screen displays 4 call history lists Al...

Page 62: ...mber in the Emergency field For multiple emergency numbers enter a comma between every two numbers 3 Click Save changes to accept the change 4 Perform auto provisioning on the phone to download above...

Page 63: ...g Line field 3 Click Save changes to accept the change Perform auto provisioning on the phone to download above configurations For more information on how to perform auto provisioning refer to Downloa...

Page 64: ...en you long press digit key 2 You can assign the important numbers of your directory including local directory and remote phone book to the speed dial keys of your handset This helps you dial a contac...

Page 65: ...al key via the handset 1 Long press the speed dial key digit key when the handset is idle The number assigned to this speed dial key is dialed out Intercom is a useful feature in an office environment...

Page 66: ...configure auto intercom via CommPortal phone configurator 1 Click on Features Intercom 2 Select the desired value from the Intercom Auto Answer pull down list 3 Click Save changes to accept the chang...

Page 67: ...nter the system PIN default 0000 4 Press the Done soft key After the above steps the registration LED and network status LED go out simultaneously After a period of time the LED indicators will illumi...

Page 68: ...ings of the base station will be reset to factory defaults The power indicator LED and network status LED on the base station slow flash in sequence during the resetting process Indicator LEDs on the...

Page 69: ...efer to Downloading Configuration Files on page 17 The configuration applies to all the handsets registered to the base station Eco mode greatly reduces the transmission power and signal output when t...

Page 70: ...te to green Note Repeater mode extends the radio coverage of the base station The repeater has the same radio coverage as the base station This feature is especially useful for users who require mobil...

Page 71: ...ypad during a call Each key pressed on the IP phone generates one sinusoidal tone of two frequencies One is generated from a high frequency group and the other from a low frequency group The DTMF keyp...

Page 72: ...ket contains 4 bytes The 4 bytes are distributed over several fields denoted as Event End bit R bit Volume and Duration If the End bit is set to 1 the packet contains the end of the DTMF event You can...

Page 73: ...er is that when you transfer a call via call jump the current call will stay connected instead of being placed on hold The following table lists the default call jump hotkeys configured by Metaswitch...

Page 74: ...t A needs to leave home In this case A can dial 96 to quickly jump the current call to a wireless number without interrupting the conversation Before A uses the mobile phone to answer the call the cal...

Page 75: ...onference Call Anonymous Call Anonymous Call Rejection Voice Mail If you require additional information or assistance with your new phone contact your system administrator You can use your handset to...

Page 76: ...CD screen displays all registered handset names and the All HS option 3 Select All HS 4 Press or the OK soft key to dial out All other subscribed handsets will ring simultaneously You can place extern...

Page 77: ...number to the SIP server the line registers to The SIP server may prompt the user to enter an activation code for call service After the user enters a valid activation code the IP phone will use this...

Page 78: ...ess or the Accept soft key The incoming call is answered and the original call is placed on hold To end a call Do one of the following Press Place the handset in the charger cradle The redial number l...

Page 79: ...other party but he or she cannot hear you For example if you do not want the other party to listen to the conservation when you talk to someone in the room you can mute the microphone temporarily To...

Page 80: ...ng call during a call If call waiting feature is disabled the new incoming call will be automatically rejected by the handset To configure call waiting feature via CommPortal phone configurator 1 Clic...

Page 81: ...field 5 Press the OK soft key to accept the change The icon on the status line indicates the DND mode is activated You can press the Line soft key when the handset is idle to check the line status Th...

Page 82: ...use this feature the DND Key synchronization feature must be enabled in advance If DND Sync for Shared Line feature is enabled for an account when you change the account s DND status its shared lines...

Page 83: ...to highlight the desired forwarding type and then press the OK soft key 5 Press or to select Enabled from the Status field 6 Enter the destination number you want to forward incoming calls to in the...

Page 84: ...select the desired contact Press or the Call soft key If both the office number and the mobile number of the contact are stored select the desired number and press or the OK soft key to dial out 3 Pr...

Page 85: ...d between user A and User B Blind transfer on hook allows the IP phone to complete the blind transfer through on hook Attended transfer on hook features allows the IP phone to complete the semi attend...

Page 86: ...wing Enter the number of the second party or select the handset you want to add to the conference Press or the Conf soft key to dial out Press the Directory soft key and then select the desired contac...

Page 87: ...he handset to place a call The LCD screen of the destination phone prompts an incoming call from anonymity You can use anonymous call rejection feature to reject incoming calls from anonymous callers...

Page 88: ...hen hang up To configure the voice mail access code via CommPortal phone configurator 1 Click on Line X VoiceMail 2 Enter the voice mail access code e g 318 in the Voice Mail Access Code field 3 Click...

Page 89: ...ce mails To listen to the voice mail via fast access via the handset 1 Long press when the handset is idle The handset automatically dials out the voice mail access code using the line you selected wh...

Page 90: ...ng Guide 78 3 Click Save changes to accept the change 4 Perform auto provisioning on the phone to download above configurations For more information on how to perform auto provisioning refer to Downlo...

Page 91: ...f your handset If your handset is not registered to the base station register it manually Refer to Handset Registration on page 21 Why does the handset prompt the message Not In Range Ensure that the...

Page 92: ...t get an IP address Try connecting the W52P to another switch port if the network indicator still slowly flashes please try a reset Why can I hear the verification tone from handset if the call is suc...

Page 93: ...a call to see if there is still noise heard during the call Can I transfer an internal call to another party The phone does not support this feature You can only transfer external calls from the phone...

Page 94: ...Yealink W52P IP DECT Phones Configuring Guide 82...

Page 95: ...te Format Input Method Date Time Audio Display Shortcut Language Registration Telephony System Settings Handset Name Advisory Tones Ring Tones Register Handset De reg Handset Select Base Auto Answer A...

Page 96: ...Acapulco US Central Time 5 30 5 Bahamas Nassau Canada Montreal Ottawa Quebec Cuba Havana US Eastern Time 4 30 Venezuela Caracas 4 Canada Halifax Saint John Chile Santiago Paraguay Asuncion UK Falkland...

Page 97: ...Russia Moscow 3 30 Iran Teheran 4 Armenia Yerevan Azerbaijan Baku Georgia Tbilisi Kazakhstan Aktau Russia Samara 4 30 Afghanistan 5 Kazakhstan Aqtobe Kyrgyzstan Bishkek Pakistan Islamabad Russia Chely...

Page 98: ...Yealink W52P IP DECT Phones Configuring Guide 86...

Page 99: ...ies supplied or authorized by Yealink The operation of non authorized parts cannot be guaranteed Do not place heavy objects on top of the handset or the base station in case of damage and deformation...

Page 100: ...for the power supply of any device other than this handset Do not open or mutilate the battery released electrolyte is corrosive and may cause damage to the your eyes or skin Use only the rechargeable...

Page 101: ...8 Call Jump 61 Call Mute 67 Call Waiting 68 Call Features 59 Call Hold Resume 67 Call Forward 71 Call Transfer 71 Conference Call 74 D Declaration of Conformity ii Displaying Information on LCD Screen...

Page 102: ...r Ethernet 4 R Redialing Calls 66 Regulatory Notices 87 Remote Phone Book 46 Returning to Idle Screen 29 Repeater Mode 58 Ring Tones 32 S Setting up the W52P W52H Handset 4 Setting up the Charger Crad...

Reviews: