background image

5.3  Process Data Communication (Cyclic Communication)

5.3.4  Data Refreshing at CPU STOP

5-8

5.3.4  Data Refreshing at CPU STOP

When the CPU module has been set in the STOP status, the 264IF-01 Module carries out the following processing.

5.3.5  Input Data Read Timing

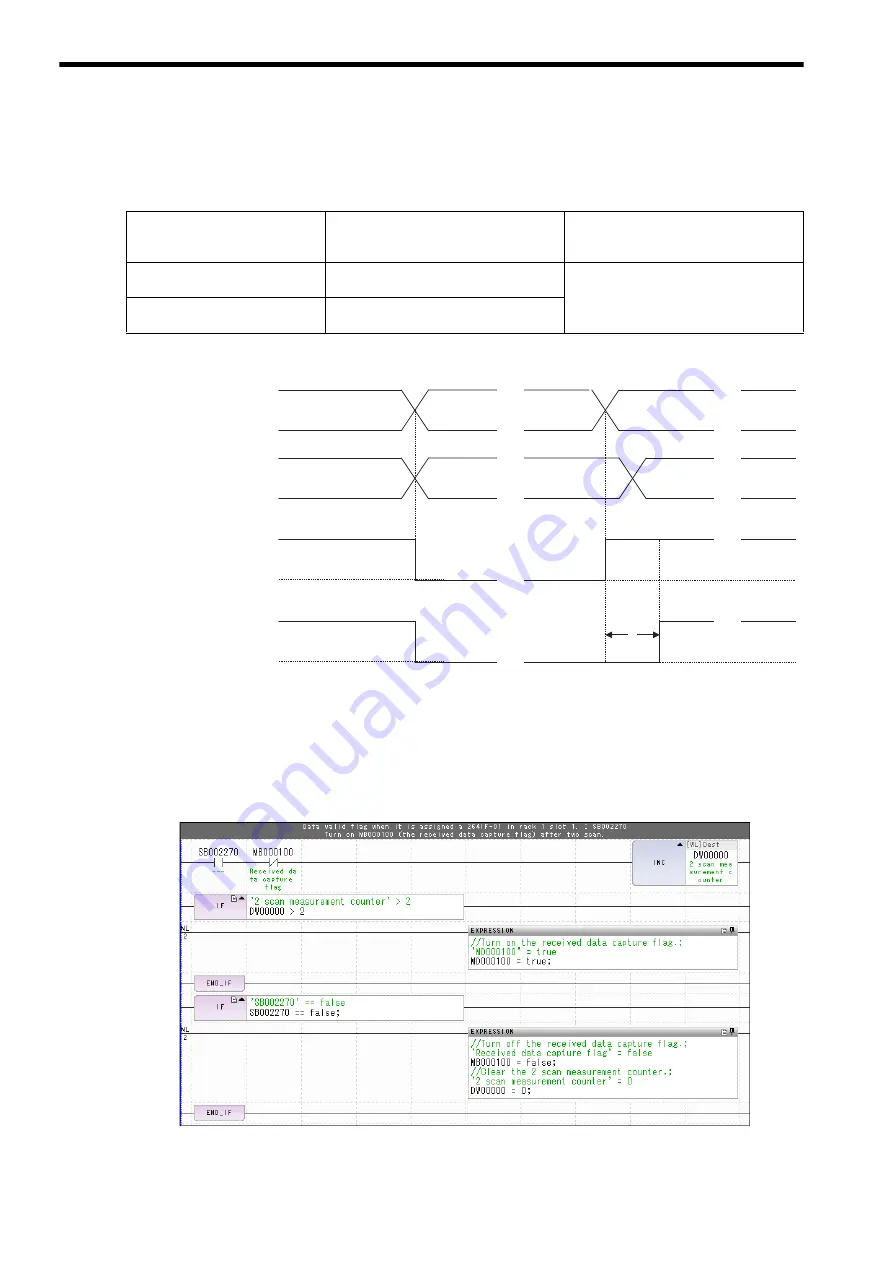
The Data Available Flag turns ON when EtherCAT communications change to the OPERATIONAL phase. The Ether-
CAT communications phase and Data Available Flag are not synchronized with the timing of reading the receive data. 
Therefore, there is a delay between when the Data Available Flag turns ON and the start of reading the receive data.
For the application to allow for the delay in reading the receive data, create a Received Data Capture Flag to provide a 
margin before reading the receive data after the Data Available Flag turns ON. Provide a margin of two scans (refer to 

 in the above figure).

A ladder programming sample for the Received Data Capture Flag is given below.

Table 5.2  Data Refreshing at CPU STOP

“Output status at CPU STOP” 

Setting in the 264IF-01 Module’s 

Detailed Definitions

Output Data

Input Data

Hold

The final data output before CPU STOP is 
continued.

There is no refreshing of input registers.
At input registers, the final data before CPU 
STOP is held.

Zero clear

Output of “0” data is continued during the 
CPU STOP status.

ON

OFF

OPERATIONAL

INIT

PRE-OPERATIONAL

SAFE-OPERATIONAL

OPERATIONAL

ON

OFF

Receive data 0 cleared.

Receive data normal.

Receive data normal.

EtherCAT communications phase 
(system register)

Status of receive data 
(input registers)

Data Available Flag status 
(system register)

Receive data read flag status 
(Created in user application 
as required.)

Summary of Contents for 264IF-01

Page 1: ...R S MANUAL EtherCAT 264IF 01 Module Mounting and Starting the Module EtherCAT Detail Definition Operation Specifications of the Module Troubleshooting Appendices MANUAL NO SIEP C880700 42C 1 2 3 4 5 6...

Page 2: ...liability is assumed with respect to the use of the information contained herein Moreover because Yaskawa is constantly striving to improve its high quality products the information contained in this...

Page 3: ...e Signals In this manual the names of reverse signals ones that are valid when low are written with a forward slash before the signal name as shown in the following example Notation Examples MP2000 Se...

Page 4: ...at can be connected to MP2000 Series Machine Controller and the communication meth ods Machine Controller MP2000 Series User s Manual Ladder Programming SIEZ C887 1 2 Describes the instructions used i...

Page 5: ...ensure that an emergency stop procedure has been provided and is working correctly There is a risk of injury Do not touch anything inside the product There is a risk of electrical shock Always keep th...

Page 6: ...is packaged and methods other than fumigation must be used Example Heat treatment where materials are kiln dried to a core temperature of 56 C for 30 minutes or more If the electronic products which i...

Page 7: ...sk of device damage Noise such as from static electricity Strong electromagnetic or magnetic fields Radiation Near power lines Consider the following items when selecting the I O signal lines external...

Page 8: ...ensure safe application The products shown in illustrations in this manual are sometimes shown without covers or protective guards Always replace the cover or protective guard as specified first and...

Page 9: ...product in a manner in which it was not originally intended 5 Causes that were not foreseeable with the scientific and technological understanding at the time of shipment from Yaskawa 6 Events for whi...

Page 10: ...perty Systems that require a high degree of reliability such as systems that supply gas water or electricity or sys tems that operate continuously 24 hours a day Other systems that require a similar h...

Page 11: ...2 6 2 2 3 Operating Environment Specifications 2 7 2 3 Device Description File 2 7 2 4 Overview 2 8 2 4 1 Appearance 2 8 2 4 2 Status Indicators LEDs 2 9 2 4 3 Switch Settings 2 9 2 5 Communication C...

Page 12: ...5 6 5 3 2 Data Refresh Timing 5 7 5 3 3 Data Synchronization 5 7 5 3 4 Data Refreshing at CPU STOP 5 8 5 3 5 Input Data Read Timing 5 8 5 4 Mailbox Communication Message Communication 5 9 5 4 1 System...

Page 13: ...1 1 1 EtherCAT 1 EtherCAT This chapter describes an outline of the EtherCAT 1 1 Outline 1 2 1 2 Features 1 2 1 3 Classification of EtherCAT Communication 1 4...

Page 14: ...ed on EtherCAT specifications Some lag occurs in the actual data refresh cycle in accordance with the communication cycle of the master device and the data refresh cycle of the slave devices Synchroni...

Page 15: ...peed Repeat Function Conceptual High speed repeat function Received packets are repeated in octet units to the next port Reads only the input data field of the local node and overwrites the data of th...

Page 16: ...data area Mapping the logical process data area at the EtherCAT master station to each of the slave nodes enables cyclic I O communications between the master and slave stations 2 Mailbox Communicatio...

Page 17: ...e Communication 2 3 2 1 3 Restrictions 2 4 2 2 Specifications 2 5 2 2 1 Hardware Specifications 2 5 2 2 2 Transmission Specifications 2 6 2 2 3 Operating Environment Specifications 2 7 2 3 Device Desc...

Page 18: ...e 264IF 01 Module is installed operates as slave station I O The MP2000 Series Machine Controller can also be used for example for servo control when connected with MECHATROLINK as a controller for mo...

Page 19: ...mmunication such as reading from writing to the user memory M registers is not possible Fig 2 3 Message Communication between Master and Slave Stations in a Line connection EtherCAT System Other compa...

Page 20: ...dule uses a standard Ethernet cable it does not allow connection for communications based on general purpose TCP IP or UDP IP because it serves only as an EtherCAT dedicated module The MPE720 engineer...

Page 21: ...le 2 2 1 Hardware Specifications Table 2 1 Hardware Specifications of the 264IF 01 Module Item Specifications Name 264IF 01 Model JAPMC CM2305 E Communication Port EtherCAT slave station 1 channel 2 p...

Page 22: ...figured Station Alias is not used Ver 1 02 of the XML file can also be used Protocol EtherCAT CoE CANOpen over EtherCAT EoE Ethernet over EtherCAT FoE Filetransfer over EtherCAT SoE Servo Drive over E...

Page 23: ...nics com index jsp Table 2 3 Operating Environment Specifications for the 264IF 01 Module Item Specifications Environmental Conditions Ambient Operating Temperature 0 to 55 C Ambient Storage Temperatu...

Page 24: ...ce The following figure shows the appearance of the 264IF 01 Module Fig 2 4 Appearance of the 264IF 01 Module Indicators RJ45 connector 100BASE TX RJ45 connector 100BASE TX 264IF 01 EtherCAT RUN ERR L...

Page 25: ...een EtherCAT communica tion status OPERATIONAL EtherCAT communication status PRE OPERATIONAL flashing 500 ms SAFE OPERATIONAL flashing 1 s EtherCAT communica tion status INIT Red L A1 Green Link up Tr...

Page 26: ...ble category 5e cross or straight cables The AUTO MDI MDI X function of the 264IF 01 Module automatically distinguishes between cross and straight cables Table 2 6 Connector CN1 2 Specifications Conne...

Page 27: ...odule mount ing and self configuration 3 1 Applicable Machine Controllers and Supported Versions 3 2 3 1 1 MP2000 Series 3 2 3 1 2 MP3000 Series 3 3 3 2 Mounting and Removing a Module on the Machine C...

Page 28: ...0 E 3 modules MP2300S JEPMC MP2300S E 1 module MP 2200 1 CPU 01 JAPMC CP2200 E 8 modules The maximum number of connectable Modules is the total for the maximum expansion to four racks 2 CPU 02 JAPMC C...

Page 29: ...r later The maximum number of connectable Modules is the total for the maximum expansion to four racks 2 CPU 202 JEPMC CP3202 E MP 3300 1 CPU 301 16 axes JAPMC MC3301 1 E 8 modules All versions Ver 7...

Page 30: ...sh Memory Save the programs written to the Machine Controller in the flash memory using the MPE720 MPE720 Ver 7 Open the project file and then select Online Transfer Save to Flash 3 Remove the Machine...

Page 31: ...guide rail correctly the frame ground bar on the bottom of the slot may get damaged 2 Connect to the Mounting Base Connector After inserting the Module completely press the Module firmly until it conn...

Page 32: ...which a 264IF 01 Module has been newly mounted Refer to 3 3 Self configuration for more information b After Replacing Modules Turn OFF the CNFG and INIT DIP switches on the Machine Controller and tur...

Page 33: ...rom the panel or rack and place them where there is sufficient space such as on a work table 2 Removing Procedures 1 Remove the Battery Cover 2 Remove the Option Panel Hold the battery cover with the...

Page 34: ...fulcrum to disconnect the Module from the Mounting Base connector The Module will come out toward the front 4 Pull Out the 264IF 01 Module Hold onto the top and bottom of the Module with your fingers...

Page 35: ...NFG DIP switch pin on the Machine Controller and then turn ing the power ON The result will depend on the setting of the INIT DIP switch pin The DIP switch is not normally used for the MP2100M For the...

Page 36: ...at is used as described below Command Result Self configuration for all Modules The Module configuration definitions are updated The definitions for any Modules for which definitions already exist are...

Page 37: ...be created This chapter describes how to set the EtherCAT detail definition on the MPE720 screen 4 1 Displaying the EtherCAT Detail Definition Window 4 2 4 1 1 Displaying the Module Configuration Win...

Page 38: ...and set the detail definition for the EtherCAT Module 4 1 1 Displaying the Module Configuration Window Use the following procedure to display the Module Configuration window 1 Start the MPE720 on the...

Page 39: ...0S Module Configuration Window Double click the 264IF 01 EtherCAT S cell on the Module Configuration window to display the EtherCAT Detail Definition window refer to the following page If the Detail D...

Page 40: ...uration window RACK The rack number of the rack in which the 264IF 01 Module is defined Slot The slot number of the slot in which the 264IF 01 Module is defined CIR The circuit number of the EtherCAT...

Page 41: ...for the input data of the EtherCAT master device The setting range is 0 to 7FFF WSIZE Set the same size as the input data size of the EtherCAT master device in word units The setting range is 0 to 19...

Page 42: ...cation status after turning the power ON Enable EtherCAT process data is communicated Disable EtherCAT process data is not communicated This is a flag that informs the user whether or not process data...

Page 43: ...initialized INIT This is the EtherCAT initial status PRE OPERATIONAL This is the status that configuration is in progress for mailbox communication SAFE OPERATIONAL This is the status that configurat...

Page 44: ...to an EtherCAT Network 5 4 5 2 Starting Method 5 5 5 2 1 Basic Sequence 5 5 5 2 2 Midstream Association 5 5 5 3 Process Data Communication Cyclic Communication 5 6 5 3 1 I O Mapping 5 6 5 3 2 Data Ref...

Page 45: ...re MPE720 The following four patterns of allocation are provided in the device description files of the 264IF 01 Module Allocation of 32 input words and 32 output words File name Yaskawa MP2000 In32 O...

Page 46: ...e is secured in the Eth erCAT transmission lines but when refreshing data between the 264IF 01 Module and the MP2000 Series Machine Controller CPU only the output size in the parameter settings is sec...

Page 47: ...open mode or direct mode at the EtherCAT master device Open Mode This is the mode in which a switching HUB is used in an EtherCAT network Slave nodes that are connected directly to a HUB must have an...

Page 48: ...ing becomes effective at the point when the 264IF 01 Module s state machine becomes OPERATIONAL From a ladder application you can get to know that communication has started by viewing the sys tem regi...

Page 49: ...n IC installed in the 264IF 01 Module This means that with the 264IF 01 Module data can be refreshed just by setting the I O size without any awareness of the map ping addresses of the data of the log...

Page 50: ...F 01 Module EtherCAT Transmission Lines 264IF 01 Module Data is refreshed in the timing of the EtherCAT communication cycle Sandwiching a communications IC operations between an MP2000 Series Machine...

Page 51: ...argin before reading the receive data after the Data Available Flag turns ON Provide a margin of two scans refer to in the above figure A ladder programming sample for the Received Data Capture Flag i...

Page 52: ...ges Allow reading data from and writing data of the EtherCAT standard system The 264IF 01 Module responds automatically to requests from the master node 5 4 2 User Messages The standard message functi...

Page 53: ...hapter describes how to troubleshoot problems and take countermeasures against them 6 1 Status Indication by LED Indicators 6 2 6 2 System I O Error Status 6 3 6 2 1 System I O Error Status by Control...

Page 54: ...ions The L A1 and L A2 indicators light according to the connection status Normal Green Operating normally The status in which the Module is performing EtherCAT communication normally The L A1 and L A...

Page 55: ...of output error occurrences Output Error Address SW00204 Address of the latest output error OWxxxx register number Reserved by System SW00205 Not used SW00206 SW00207 I O Error Status SW00208 to SW002...

Page 56: ...W00247 Error status of slot 3 of rack 1 Depends on the mounted module and error code SW00248 to SW00255 Error status of slot 4 of rack 1 Depends on the mounted module and error code SW00496 to SW00503...

Page 57: ...SW00247 Slot 3 error status SW00248 to SW00255 Reserved by the system Slot 4 error status SW00456 to SW00463 Reserved by the system Slot 30 error status Name Register No Remarks I O Error Count SW0020...

Page 58: ...odule and error code Reserved by System SW00216 to SW00223 Depends on the mounted module and error code Slot 1 Error Status SW00224 to SW00231 Depends on the mounted module and error code Slot 2 Error...

Page 59: ...W00235 SW00236 Error code Station error 1 Subslot No 1 Bit No Word Meaning 0 Non INIT 1 INIT 2 PRE OPERATIONAL 3 SAFE OPERATIONAL 4 OPERATIONAL Bit Meaning When Relevant Bit ON 0 0 Process data not ye...

Page 60: ...ocedure for a TwinCAT System A 3 B 1 Automatically Allocate the Node Number A 3 B 2 Allocate the Configured Station Alias A 8 Appendix C Device Description File A 11 Appendix D Transition in EtherCAT...

Page 61: ...EtherCAT connection system is shown in Fig A 1 Fig A 1 Example of EtherCAT Connection System For more information about TwinCAT contact Beckhoff Inc or K mecs Co Ltd Embedded PC CX 9010 264IF 01 CPU M...

Page 62: ...dure below B 1 Automatically Allocate the Node Number 1 Display the main window of TwinCAT System Manager of the master device 2 Select File New from the main menu 3 Check that Config Mode appears at...

Page 63: ...inCAT System B 1 Automatically Allocate the Node Number A 4 5 Click the Search Ethernet button The Add Route Dialog dialog box will be displayed 6 Set the IP address of the embedded PC in the Host Nam...

Page 64: ...nCAT System B 1 Automatically Allocate the Node Number A 5 App Appendices 8 Check that the target controller has been detected then click the relevant controller 9 Click the Add Route button 10 Select...

Page 65: ...e Node Number A 6 11 Select I O Configuration I O Device from the System Manager file menu and right click it Select Scan Devices from the popup menu that is displayed The 3 new I O devices found dial...

Page 66: ...are detected To allocate a detected slave device or to display the device name on the screen the device description file XML file of the relevant slave device is required Device description files are...

Page 67: ...d Station Alias first use the procedure given in Appendix B 1 and then use the following pro cedure to configure the settings This example describes the procedure to allocate 512 to the Configured Sta...

Page 68: ...ocate the Configured Station Alias A 9 App Appendices 3 Select the Check Identification in the Behavior area 4 Enter 512 in the New Value field in the Configured Station Alias area and click the Write...

Page 69: ...CAT System B 2 Allocate the Configured Station Alias A 10 5 Click the OK buttton 6 Click the OK buttton 7 Confirm that 512 is displayed in Identification Value The Configured Station Alias that was se...

Page 70: ...dix explains how to customize the data size in the device description file for the 264IF 01 Module The device description file for 32 input words 32 output words for the 264IF 01 Module is shown on th...

Page 71: ...0180000000000A002000000000000000 000000000000000000000FEFEFEFEFEFEFEFEFEFEFEFEFEFEFEFDFCFCF7F6F5F2F1F1EDEBE8E5E2DED4D1CBCECAC6F8F8F7F EFEFEFEFEFEFEFEFEFEFEFEF3F2F0E5E1DDE1DCD7DCD8D2D3CFC9ACA8A3C0BFB76...

Page 72: ...BitLen Name Output5 Name DataType UINT DataType Entry Entry Index x2003 Index SubIndex 7 SubIndex BitLen 16 BitLen Name Output6 Name DataType UINT DataType Entry Entry Index x2003 Index SubIndex 8 Sub...

Page 73: ...BitLen 16 BitLen Name Output12 Name DataType UINT DataType Entry Entry Index x2003 Index SubIndex 14 SubIndex BitLen 16 BitLen Name Output13 Name DataType UINT DataType Entry Entry Index x2003 Index S...

Page 74: ...NT DataType Entry Entry Index x2003 Index SubIndex 23 SubIndex BitLen 16 BitLen Name Output22 Name DataType UINT DataType Entry Entry Index x2003 Index SubIndex 24 SubIndex BitLen 16 BitLen Name Outpu...

Page 75: ...me Input1 Name DataType UINT DataType Entry Entry Index x2004 Index SubIndex 3 SubIndex BitLen 16 BitLen Name Input2 Name DataType UINT DataType Entry Entry Index x2004 Index SubIndex 4 SubIndex BitLe...

Page 76: ...DataType Entry Entry Index x2004 Index SubIndex 10 SubIndex BitLen 16 BitLen Name Input9 Name DataType UINT DataType Entry Entry Index x2004 Index SubIndex 11 SubIndex BitLen 16 BitLen Name Input10 Na...

Page 77: ...Type Entry Entry Index x2004 Index SubIndex 20 SubIndex BitLen 16 BitLen Name Input19 Name DataType UINT DataType Entry Entry Index x2004 Index SubIndex 21 SubIndex BitLen 16 BitLen Name Input20 Name...

Page 78: ...030FF747676FF95A5A7FFD5E5E5FFD5DADAFFCAD5D5FFE 9EAEAFFE9EAEAFFE9EAEAFFFFFFFFFFFDFDFDFFE9EAEAFFE9EAEAFFE9EAEAFFFFFFFFFFFDFDFDFF303030FF747676 FF95A5A7FFD5E5E5FFD5DADAFFAEB5B6FFCAD5D5FFE9EAEAFFFFFFFFFFF...

Page 79: ...to PRE OPERATIONAL Transition from OPERATIONAL to Safe OPERATIONAL Transition from OPERATIONAL to INIT Depending on the timing however if the transition request from the master device is received whi...

Page 80: ...6 3 input register setting 4 4 IP address 2 6 L LED indicator 6 2 M MAC address 2 6 5 4 machine controllers 3 2 mailbox communication 1 4 2 3 5 9 mapping address 5 6 message message box 4 3 message co...

Page 81: ...Index Index 2 T topology 5 4 network topology 1 2 TwinCAT System A 3 U user messages 5 9 W watchdog timeout 4 4...

Page 82: ...3 Revision Pollution Level Noise Resistance 2 4 3 Revision Switch Settings 2 4 4 Rev No 0 Deletion Offline Self diagnostic Test 3 1 Revision Applicable Machine Controllers and Supported Versions Back...

Page 83: ...yaskawa co th YASKAWA ELECTRIC CHINA CO LTD 22F Link Square 1 No 222 Hubin Road Shanghai 200021 China Phone 86 21 5385 2200 Fax 86 21 5385 3299 www yaskawa com cn YASKAWA ELECTRIC CHINA CO LTD BEIJIN...

Reviews: