background image

7800 SERIES EC7890A,B/RM7890A,B RELAY MODULE

65-0204–1

21

Table 5. Flame Signal (See Fig. 18).

Flame Detector

Flame Signal Amplifier

Minimum Acceptable

Steady dc Voltage

a

Maximum Expected

dc Voltage

Flame Rod Photocell  
C7012A,C

R7847A,B

b

1.25 Vdc

5.0 Vdc at the Keyboard  

Display Module.

C7012E,F

R7847C

c

or

C7015A

R7848A,B

b

5.0 Vdc at a 1M ohm/voltmeter.

C7027A  
C7035A  
C7044A

R7849A,B

b

C7061A

R7861

d

C7076A,D

R7886A

e

a

This minimum or a stronger signal should easily be obtained if the detector is correctly installed and positioned to properly
sense the flame. This voltage must be obtained before completing checkout.

b

The flame amplifiers are Ampli-Check® type.

c

The flame signal amplifier circuitry is tested one-half second every five seconds during burner operation and shuts down the
burner if the amplifier fails (all installations). R7847C is for use with RM7890A,B only.

d

Requires use of separate step-down transformer. See Fig. 13.

e

R7886A is for use with RM7890A,B only.

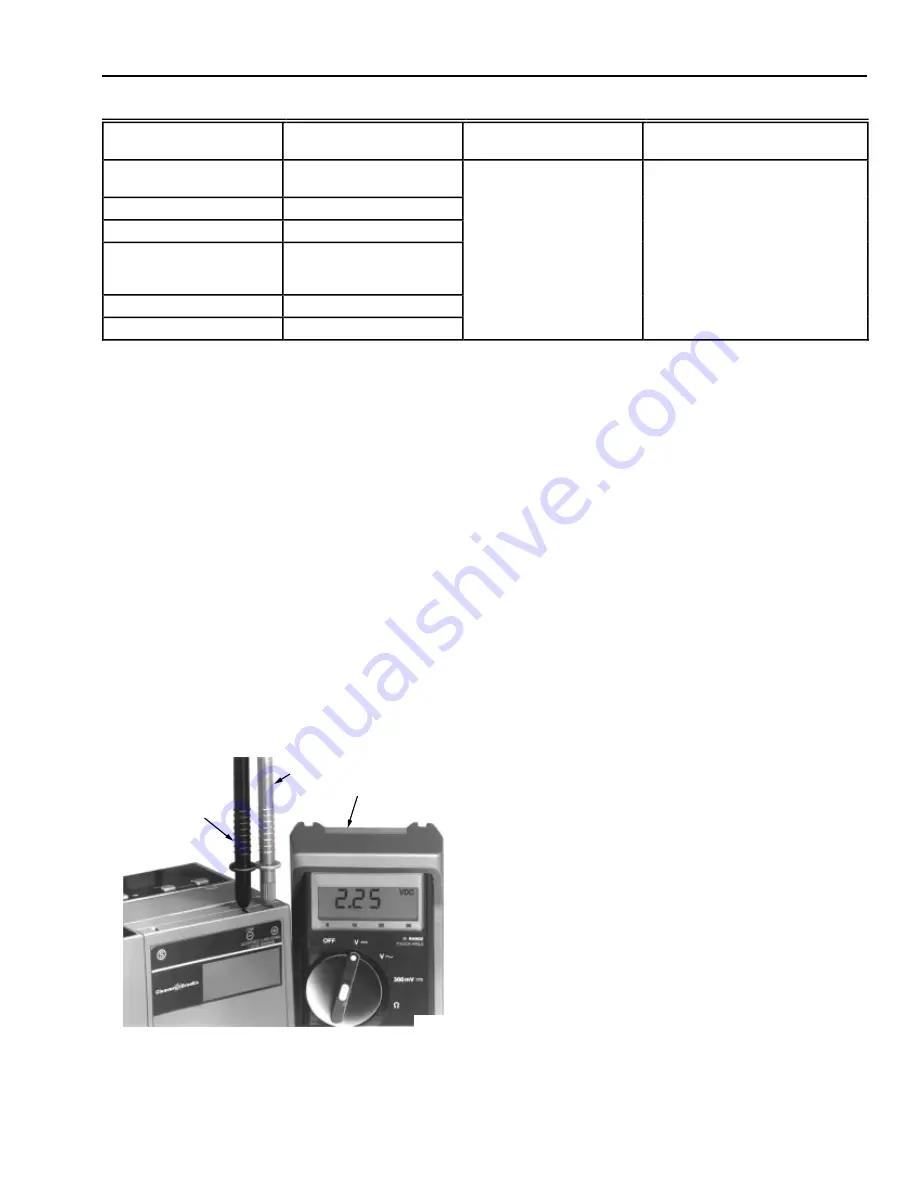
Flame Signal Measurement

Measure the flame signal at the appropriate times defined in
the following checkout tests. Read the flame signal Vdc at the
flame amplifier test jacks + and - (Com).

1

Use a 1M ohm/volt meter with a 0 to 10 Vdc capability.

2

Set the 1M ohm/volt meter to the 0 to 10 Vdc range.

3

Insert the positive (red) probe into the + jack of the
flame amplifier. Insert the negative (black) probe into
the - (Com) jack of the flame amplifier (see Fig. 18).

4

Allow a few seconds for the meter reading to stabilize.

5

If using Ampli-Check™ or shutter check amplifiers, read
the average stable voltage, disregarding the peaks and
valleys caused by the self-checking operation.

6

The meter reading must be as specified in Table 5 after
all tests are completed and all adjustments are made.

As an option, the flame signal can be checked by using the
optional Keyboard Display Module.

If the signal is unstable or less than the minimum acceptable
voltage, check the flame detector installation and circuitry.

1

Check the supply voltages at terminals 3 (L1) and L2
(N). Make sure the master switch is closed,
connections are correct, and the power supply is of the
correct voltage, frequency and is sinusoidal.

2

Check the detector wiring for defects including:

Deteriorated wire.

Incorrect connections.

Leakage paths caused by moisture, soot or
accumulated dirt.

Open circuits.

Short circuits.

Wrong type of wire.

3

For a flame rod, make sure:

Flame rod is properly located in the flame.

Ground area is large enough.

Temperature at the flame rod insulator is no
greater than 500

°

F (260

°

C).

4

For all optical detectors, clean the detector viewing
window and inside of the sight pipe as applicable.

5

With the burner running, check the temperature at the
detector. If it exceeds the detector maximum rated
temperature:

Add a heat block to stop conducted heat traveling
up the sight pipe.

Add a shield or screen to reflect radiated heat.

Add cooling (refer to sight pipe ventilation in the
detector Instructions).

6

Make sure that the flame adjustment is not too lean.

7

Make sure that the detector is properly sighting
the flame.

8

If necessary, resight or reposition the detector.

Initial Proved Pilot Lightoff Check

Perform this check on all installations that use a pilot. It
should immediately follow the preliminary inspection.

Fig. 18. Flame signal measurement.

NEGATIVE (-)
METER LEAD

POSITIVE (+)
METER LEAD

ONE
MEGOHM/VOLT
METER

M7383

Summary of Contents for 7800 Series

Page 1: ...umpers GENERAL The Yamatake Honeywell EC7890A B RM7890A B is a micro processor based integrated burner control for automatically fired gas oil or combination fuel single burner applications Except whe...

Page 2: ...onnection between the subbase and the control panel or the equipment The earth ground wire must be capable of conducting the current to blow the 20A fuse or breaker in event of an internal short circu...

Page 3: ...urface corrosion 2 Range of allowable operating frequencies is 45 to 66 Hz 3 2000 VA maximum connected load to 7890 Assembly Environmental Ratings Ambient Temperature Operating 40 F to 140 F Storage 6...

Page 4: ...er if the detection system fails h When an R7861A is used with an EC7890B the application requires the use of a step down transformer See Fig 14 Plug in Flame Signal Amplifiers Applicable Flame Detect...

Page 5: ...NAGER part no ZM7850A1001 Network Interface Unit part no Q7700B1004 Communication Interface ControlBus Module part no QS7800A1001 ControlBus 5 Wire Electrical Connector part no 203541 DATA CONTROLBUS...

Page 6: ...2 155 BURNER CONTROL THREADED MOUNTING HOLES 2 10 32 UNF 1 25 FLAME ROD TARGET CERAMIC INSULATORS IGNITION ELECTRODE Q179C ONLY BRACKET M1983 3 1 8 79 1 21 32 42 1 13 32 36 3 8 10 1 2 13 1 1 16 27 25...

Page 7: ...11 BSP P1 INTERNAL THREADS DIN APPROVED C7035A1064 HAS 1 2 14 BSP F INTERNAL THREADS MODEL AVAILABLE WITH 12 FOOT 3 66 METER LEADWIRES 2 3 INSERTION DEPTH 6 FOOT 1 83 METER LEADWIRES 2 3 M1945A 2 5 8...

Page 8: ...nal system fault occurred c Main valve terminal is not energized d No flame present and configuration jumper is selected for lockout e Pilot valve terminal is not energized SAFETY PROVISIONS Internal...

Page 9: ...tinually through STANDBY to detect any possibility of a runaway detector or a flame If a flame exists a safety shutdown occurs A standard amplifier is energized continually through STANDBY if a flame...

Page 10: ...f part 15 of FCC rules which are designed to provide reasonable protection against such interference when operated in a commercial environment Operation of this equipment in a residential area is like...

Page 11: ...must be capable of conducting the current to blow the 20A fuse or breaker in event of an internal short circuit The 7890 needs a low impedance ground connection to the equipment frame which in turn n...

Page 12: ...AY TO SWITCH THE F LEAD THE RELAY MUST HAVE GOLD CLAD OR GOLD FLASH CONTACTS AND A 120 VAC COIL POWER THE RELAY COIL FROM THE Q7800 SUBBASE TERMINAL 8 CONNECT THE RELAY CONTACTS BETWEEN THE F LEAD OF...

Page 13: ...ION TRANSFORMER MAIN VALVE 1 Q7800 2 2 3 3 5 4 L2 FOR A CONTINUOUS OR STANDING PILOT INSTALL AN EXTERNAL RELAY TO SWITCH THE F LEAD THE RELAY MUST HAVE GOLD CLAD OR GOLD FLASH CONTACTS AND A 230 VAC C...

Page 14: ...for electrical signal voltage probes 3 Make sure no subbase wiring is projecting beyond the terminal blocks Tuck in wiring against the back of the subbase so it does not interfere with the knife blad...

Page 15: ...required checkout tests Installing The Flame Detector NOTE Table 2 and Fig 13 list the flame detection systems available for use with the 7890 Make sure the correct combination of amplifier and flame...

Page 16: ...b 2a EARTH GROUND C7076A OR C7076D TERMINAL BLOCK L2 COMMON L1 HOT G F X X FLAME ROD G F X X PHOTOCELL 1 FLAME DETECTOR LEADS ARE COLOR CODED THE BLUE LEAD MUST BE CONNECTED TO THE F TERMINAL AND THE...

Page 17: ...Up Safe Start Check The 7890 verifies that a flame does not exist and proceeds into the Ignition Trial If a flame is present the 7890 will recycle to the STANDBY period If the critical loads are not i...

Page 18: ...a jumper on the subbase 3 Before continuing to the next test be sure to remove the test jumper s used in the previous tests 4 Replace all limits and interlocks not operating properly Do not bypass lim...

Page 19: ...mper s WARNING Make sure all manual fuel shutoff valves are closed MPORTANT Low fuel pressure limits if used can be open Bypass them with jumpers for the remaining Static tests if required Table 4 Sta...

Page 20: ...mum sensitivity 0 300 Vac capability 0 6000 ohm capability 0 10 Vdc capability Checkout Summary Preliminary inspection all installations Flame signal measurement all installations Initial lightoff che...

Page 21: ...the peaks and valleys caused by the self checking operation 6 The meter reading must be as specified in Table 5 after all tests are completed and all adjustments are made As an option the flame signal...

Page 22: ...on the subbase and close the master switch and return to step 4 7 When the pilot ignites measure the flame signal If the pilot flame signal is unsteady or approaching the 1 25 Vdc minimum value adjus...

Page 23: ...for flame stability and input rating If a second stage is used proceed to step 18 P Shut down the system by opening the burner switch or by lowering the setpoint of the operating controller Make sure...

Page 24: ...itches L Run the system through another cycle to check for normal operation M Return the system to normal operation Ignition Interference Test All Flame Rods Test to be sure that a false signal from a...

Page 25: ...or Ignition Spark Response Test All Ultraviolet Detectors Test to be sure that the ignition spark is not actuating the FLAME LED 1 Close the pilot and main burner manual fuel shutoff valve s 2 Start t...

Page 26: ...uence status messages indicating INITIATE STANDBY SAFE START CHECK PILOT IGN and RUN The selectable messages also provide visual indication current status and historical status of the equipment such a...

Page 27: ...line voltage is at a sufficient level for proper operating parameters STANDBY The LED indicates the burner status POWER The burner can be placed in STANDBY by opening the burner switch or if the opera...

Page 28: ...Wanchai Hong Kong Home and Building Control Honeywell Limited Honeywell Limit e 155 Gordon Baker Road North York Ontario M2H 2C9 Honeywell Latin American Division Miami Lakes Headquarters 14505 Comme...

Reviews: