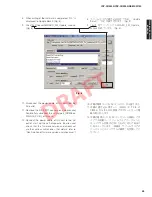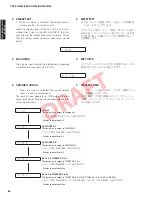
5. [Setting]をクリックし、通信速度の設定を行い
ます。(Fig. 5)
[OK]をクリックします。(Fig. 5)
[connected]をクリックします。(Fig. 5)
5. Click [Setting], and set the baud rate. (Fig. 5)
Click [OK]. (Fig. 5)
Click [connected]. (Fig. 5)
Fig. 5
4. [...]をクリックし、書き込むファームウェアを選
択します。(Fig. 4)
※ ID、および MCU Type は書き込みファイル選
択後、自動的に取り込まれます。
4. Click [...] and select the firmware name. (Fig. 4)
*
The ID and MCU Type are loaded automatically
when the file is selected.
Fig. 4
When [...] is clicked, the “Open” screen appears
[...]をクリックすると「ファイルを開く」が
表示されます
115200
51
YSP-CU4300/YSP-CU3300/NS-WSW160
Y
SP-CU430
0/Y
SP-CU330
0/
NS-WSW1
60
DRAFT

