background image

VL Version 2

40

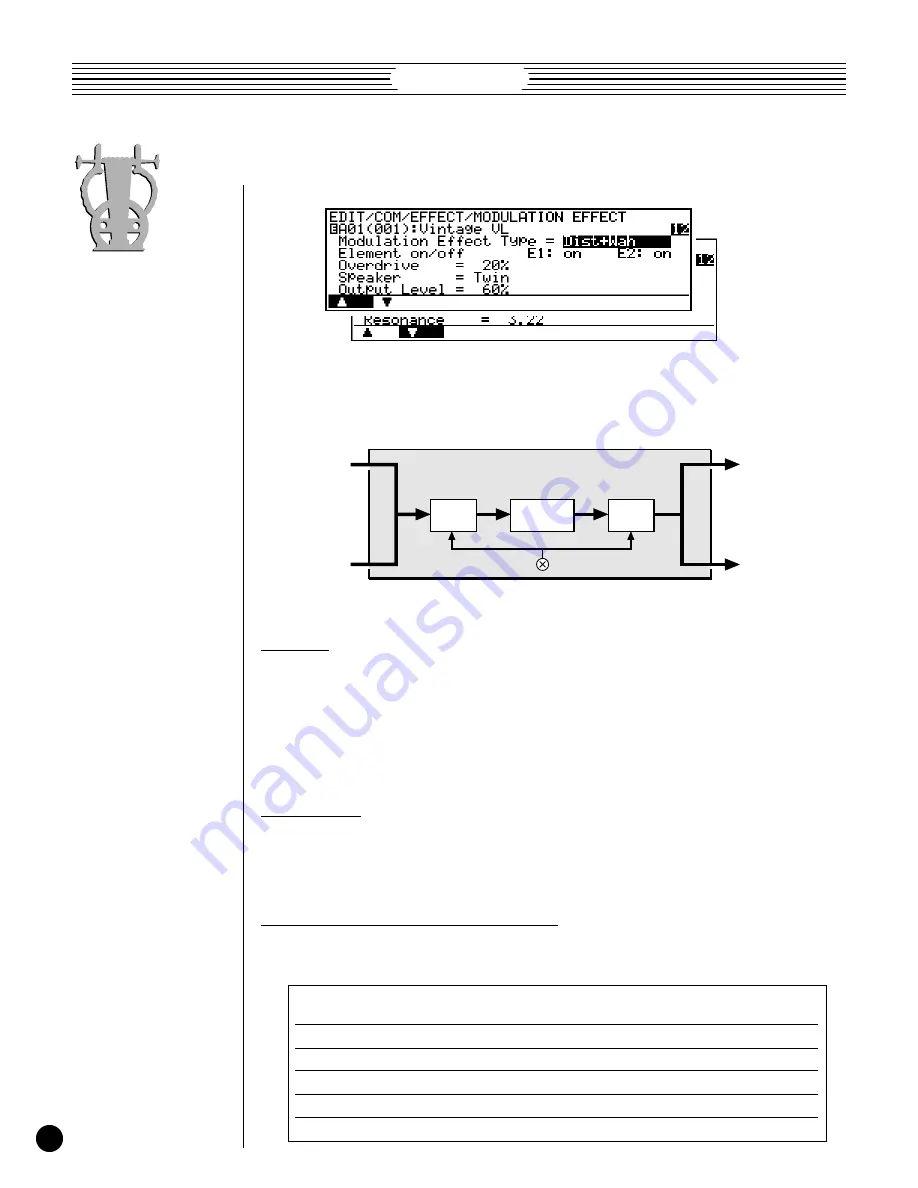
Dist+Wah

Use the 

¡

 (“

>

”) and 

 (“

<

”) buttons to switch between the two pages

of effect parameters.

 Dist+Flanger Effect Block Diagram

L Out

R Out

L In

R In

Wah

Wah

Distortion

Pre/Post

No speaker — the sound of a “direct feed” to a recording or sound
reinforcement console.

The powerful, expansive sound of stacked speaker cabinets.

A single 12" speaker unit in an open-backed enclosure.

Two 12" speaker units in a relatively small open-backed enclosure.

The small, compressed, but pleasant tone of a radio receiver.

Constricted tone with emphasis on the middle frequencies.

Flat

Stack

Combo

Twin

Radio

Megaphone

 Element on/off — E1: & E2:

¯

off, on.

In this parameter the cursor can be positioned at “

E1:

” or “

E2:

” to individually

turn the Dist+Wah effect on or off for elements 1 and 2, respectively. When “

on

” the

output of the corresponding element is fed to the input of the modulation stage, and when

off

” the modulation stage is bypassed. The “

E2:

” parameter will not appear when

editing a single-element voice.

 Overdrive

¯

0 … 100 %.

Sets the intensity of the overdrive or distortion effect. Higher values produce more

distortion.

 Speaker

¯

Flat, Stack, Combo, Twin, Radio, Megaphone.

Simulates a variety of speaker types and configurations via which the distortion

sound might be reproduced.

Summary of Contents for VL

Page 1: ......

Page 2: ...If you can not locate the appropriate retailer please contact Yamaha Corporation of America Electronic Service Division 6600 Orangethorpe Ave Buena Park CA 90620 The above statements apply ONLY to those products distributed by Yamaha Corporation of America or its subsidiaries This applies only to products distributed by YAMAHA CORPORATION OF AMERICA Dette apparat overholder det gaeldende EF direkt...

Page 3: ...ial number power requirements etc are located on this plate You should record the model number serial nunber and the date of purchase in the spaces provided below and retain this manual as a permanent record of your purchase CAUTION TO REDUCE THE RISK OF ELECTRIC SHOCK DO NOT REMOVE COVER OR BACK NO USER SERVICEABLE PARTS INSIDE REFER SERVICING TO QUALIFIED SERVICE PERSONNEL RISK OF ELECTRIC SHOCK...

Page 4: ...d ventilation is required 7 Temperature considerations Electronic products should be installed in locations that do not seriously contribute to their operating temperature Placement of this product close to heat sources such as radiators heat registers etc should be avoided 8 This product was NOT designed for use in wet damp locations and should not be used near water or exposed to rain Examples o...

Page 5: ... takes you from the sound and response of a baby grand piano to that of a full concert grand Welcome to Version 2 The company names and product names in this manual are trademarks or registered trademarks of their respective companies VL VL Version 2 VL future 93 95 MS DOS System 6 Windows 95 System 7 Copland C3 CFIII CFIIIS Specifically Version 2 applies to two main areas 1 the physical modelling...

Page 6: ... m Ver 2 MIDI Connections 6 Load the Pre programmed Voice Data 7 Power Supply 5 Audio Connections 5 Power on Procedure 6 5 2 Test Driving Version 2 Controller Connection Calibration 15 Experiment With the Controllers 18 Set the Breath Mode to Touch EG 10 Try Some Version 2 Voices 11 10 3 Load converting the Original VL Voices To VL7 Version 2 20 To Original VL 21 To VL1 Version 2 19 To VL1 m Versi...

Page 7: ...t Modifier EDIT E1 MODIFIER HARMONIC ENHANCER 50 EDIT E1 MODIFIER EQUALIZER AUXILIARY 50 EDIT E1 MODIFIER RESONATOR 51 Element Envelope EDIT E1 ENV EMBOUCHURE PITCH 52 EDIT E1 ENV VIBRATO 52 EDIT E1 ENV GROWL 52 UTILITY Mode Utility System UTIL SYSTEM KBD SETTING 53 UTIL SYSTEM TG SETTING 53 UTIL SYSTEM ASSIGNABLE CONTROLLER 54 UTIL SYSTEM CURVE 54 UTIL SYSTEM BREATH MODE 54 UTIL SYSTEM MISCELLANE...

Page 8: ...es to help you become familiar with some of the capabilities and features of Version 2 3 Load converting Original VL Voices Page 19 Loading and automatically converting original VL voices for use with Version 2 4 New Features Parameters Page 22 This section lists the new features and parameters provided by Version 2 5 Experiments Page 58 Some experiments to help you become familiar with the way co...

Page 9: ...ded posi tion before plugging the power cord in an AC outlet Make sure your VL model is rated for the AC voltage supplied in the area in which it is to be used as listed on the rear panel Connecting the instrument to the wrong AC supply can cause serious damage to the internal circuitry and may even pose a shock hazard Audio Connections Headphones Headphones are ideal for a fast easy checkout Any ...

Page 10: ... Ver 2 is programmed to receive this data and respond accordingly so it is preferable to turn the VL1 m ON before turning the controlling device ON VL1 m Ver 2 MIDI Connections The VL1 m Ver 2 can be used with just about any type of MIDI controller key board wind controller sequencer computer based MIDI software etc Use a MIDI cable to connect the MIDI OUT terminal of the controller to the MIDI IN...

Page 11: ...any other data that is in the internal memory so if you have any important voices in memory make sure they are safely saved to disk before loading the data as described in the Feature Reference manual VL1 page 166 VL1 m page 166 VL7 page 166 1 Insert the Voice Disk Insert the Version 2 voice disk into the disk drive The sliding disk shutter should go in first and the label side of the disk should ...

Page 12: ...L File Make sure the cursor is positioned at All and press When the list of files appears use the cursor and buttons to select the VL1_VER2 ALL file if you have a VL1 Ver 2 or VL1 m Ver 2 or the VL7_VER2 ALL file if you have a VL7 Ver 2 then press again 6 Load the File Loading will begin when you press the button in response to the Are You Sure prompt A bar graph on the display will indicate the p...

Page 13: ...ity on the VL1 Ver 2 or VL1 m Ver 2 using a Yamaha WX series wind controller WX7 WX11 This selection also includes many voices which can be effectively played via a keyboard with breath control Many voices are suitable for the rock and pop genres so don t overlook them for keyboard control VL7_VER2 ALL This file contains the voices initially loaded into the VL7 Version 2 when it is first shipped f...

Page 14: ...to check anyway 1 Select the Utility Mode System Page Press the U button to select the utility mode Then if it is not already se lected when the utility mode display appears press the button to select the Sys tem function page 2 Set the Breath Mode to Touch EG Use the cursor keys to move the cursor to Breath Mode and press to call the Breath Mode function page Make sure the cursor is located at th...

Page 15: ...e corresponding direction The bank will switch automatically if you cross a bank voice number boundary The data dial provides a convenient way to rapidly cover a large range of voices rotate the data dial clockwise for higher voice numbers or counter clockwise for lower voice numbers while watching the display The banks are automatically switched when necessary as the voice numbers are changed 3 S...

Page 16: ...onding con troller assignment display and note that the dynamic filter D Filter is off While most PCM synthesizers and even the original VL employ a dynamic filter to simulate timbral variations across the voice s dynamic range the Version 2 simulation is so realistic that the dynamic filter is not needed Note how the trumpet tone varies from soft to hard in response to keyboard velocity B11 C Flu...

Page 17: ...arameter you just edited changes the noise components at the flute mouthpiece The ability to choose from a range of noise types provides considerable voice shaping flexibility B05 FingrBass Here s a simple experiment which demonstrates the improved flexibility of the Version 2 effects using the B05 FingrBass voice 1 Press the E button to select the edit mode If the entry level edit display shown b...

Page 18: ...Play the voice to hear the sound of the bass voice with a subtle touch of flanger then press the button a few times to select the Dist Flanger effect type Play the voice again to hear the difference 6 Press the P button to return to the play mode when done Unlike the original VL models Version 2 allows modulation effects to be applied in series for an impressive variety of new sounds ...

Page 19: ... BC2 Breath Controller supplied with the VL1 Ver 2 or VL7 Ver 2 or an optional BC1 breath controller into the front panel breath controller jack If you will be using the VL1 m Ver 2 with a wind controller a breath controller is not necessary If you will be using the VL1 m with a keyboard however you should purchase an optional BC2 or BC1 Breath Controller and plug it into the front panel breath co...

Page 20: ... the cursor keys to move the cursor to Breath Mode and press to call the Breath Mode function page If the Mode parameter is not set to BC WX make sure the cursor is located at the Mode parameter and use the and buttons to select BC WX Press to return to the previ ous page 4 Go To the Curve Page and Select Brth Use the cursor keys to move the cursor to Curve then press to call the Curve function pa...

Page 21: ...o that you can comfortably vary your breath pressure between 0 and 127 on the graph This com pletes the gain adjustment 7 Readjust the Offset If Necessary If adjusting the gain causes the offset setting to shift readjust the offset as described in step 5 At this point you can use the Curve Type parameter to select the curve type that best suits your playing style 8 Return to the Play Mode Press th...

Page 22: ...he breath controller for breath control unplug the breath controller and try playing different voices using the foot controller the foot controller must be plugged into the FOOT CONTROLLER 2 jack Up to this point we ve described a few simple experiments that should help you to become familiar with the VL Version 2 system More detailed controller experiments are described in section 5 Experiments W...

Page 23: ...ile is loaded all original system data is left un changed The following new system parameters are added UTIL SYSTEM TG SETTING WX Lip Normal UTIL SYSTEM ASSIGNABLE CONTROLLER BC 002 Breath Cont UTIL SYSTEM ASSIGNABLE CONTROLLER FC1 004 Foot Cont UTIL SYSTEM BREATH MODE Mode BC WX VL1 m Voice to VL1 Ver 2 When an ALL file is loaded all original system data is left un changed The following new syste...

Page 24: ...YSTEM PGM CHANGE TABLE initialized UTIL SYSTEM BREATH MODE Mode BC WX To VL7 Version 2 VL1 Voice to VL7 Ver 2 Element 2 data is ignored Voices 65 through 128 are ignored When an ALL file is loaded all original system data is left unchanged The follow ing new system parameters are added UTIL SYSTEM TG SETTING WX Lip Normal UTIL SYSTEM ASSIGNABLE CONTROLLER BC 002 Breath Cont UTIL SYSTEM ASSIGNABLE ...

Page 25: ...TEM ASSIGNABLE CONTROLLER FC1 004 Foot Cont UTIL SYSTEM BREATH MODE Mode BC WX To Original VL Version 2 Voice to Original VL Version 2 voices cannot be used on the original VL instruments An Illegal file error message will appear on the display and the files cannot be loaded or converted Hardware System Exclusive Data Transfer System Exclusive data can be hardware transferred between two original ...

Page 26: ...below represents the overall Version 2 system Shaded blocks are either totally new or feature significant improvements 4 New Features Parameters Controllers Envelope Instrument Section Driver Pipe String Mixer Harmonic Enhancer Modifiers Effects Dynamic Filter Frequency Equalizer Impulse Expander New or Improved Resonator Modulation Feedback Delay Reverb NOTES Please note that although most of the...

Page 27: ...ste 36 Dist Flanger 38 Dist Wah 40 ELEMENT CONTROLLER Controller Parameter Displays 42 ELEMENT MISCELLANEOUS EDIT E1 MISC BREATH NOISE 43 EDIT E1 MISC THROAT FORMANT KSC PITCH 4 4 EDIT E1 MISC MIXING 4 4 EDIT E1 MISC EXCITATION 4 4 ELEMENT MODIFIER EDIT E1 MODIFIER HARMONIC ENHANCER 50 EDIT E1 MODIFIER EQUALIZER AUXILIARY 50 EDIT E1 MODIFIER RESONATOR 51 ELEMENT ENVELOPE EDIT E1 ENV EMBOUCHURE PIT...

Page 28: ...ement 1 and 2 MIDI receive channels appear on line 4 of the PLAY mode display When the EDIT Key Mode parameter is set to Part page 25 and the EDIT COM MISC PART SETTING Split parameter is set to Static or Dynamic page 28 the element 1 and 2 split point appears on line 4 of the PLAY mode display Feature Reference pages VL1 14 VL1 m 14 VL7 14 Continuous Sliders In the original VL models MIDI output ...

Page 29: ...ursor buttons In Version 2 the cursor and buttons perform the same function as the and buttons i e selecting the character for the current character position The cursor and buttons can also be used for this purpose Feature Reference pages VL1 31 VL1 m 31 VL7 31 Key Mode Mono Poly Unison Part In addition to the original Mono Poly and Unison settings the Key Mode parameter now has a Part setting Whe...

Page 30: ...Poly Expand off 2 32 1 32 This new parameter allows 2 or more VL units to be MIDI chained for increased polyphony The number to the left of the symbol should be set to the total polyphony to be provided by the system off 2 32 The number to the right of the symbol sets the number of the note to be sounded by the controlling VL 1 32 If this parameter is set to 3 for example the 3rd note played in a ...

Page 31: ...67 Byzantine Byzantine palace mode Mixed tetrachords white notes in C 68 Tibet 12 note Tibetan scale 69 Ch Flute Chinese flute observed in 1885 E and B are additions to the basic pentatonic scale white notes in C 70 Ch Sheng Observed Chinese sheng or mouth organ tuning white notes in C 71 Dowland John Dowland s lute tuning 17th century A well tempered 12 tone scale 72 Golden Based on the golden se...

Page 32: ... When Split is off separate MIDI receive channels can be set for elements 1 and 2 allowing them to be controlled on different channels from an external MIDI controller In this case note data received on the receive channel set in the UTILITY SYSTEM page is ignored Program change continuous slider data i e control change numbers 16 and 17 quick edit in the VL1 m effect control data polyphony contro...

Page 33: ...n mode are that you know which element will sound when the first note or a single note is played only one element sounds when a single note is played and the split point moves automaticaly to accompdate the notes played Element 1 MIDI Rcv CH Element 2 MIDI Rcv CH 1 16 These parameters appear when the Split mode is set to off allowing the MIDI receive channels for elements 1 and 2 to be set indepen...

Page 34: ...buttons to switch between the two pages of effect parameters Element on off E1 E2 off on In this parameter the cursor can be positioned at E1 or E2 to individually turn the chorus effect on or off for elements 1 and 2 respectively When on the output of the corresponding element is fed to the input of the modulation stage and when off the modulation stage is bypassed The E2 parameter will not appea...

Page 35: ...effect FB Gain 100 100 Determines the amount of effect sound feedback returned to the input of the chorus stage Higher negative or positve values produce a more pronounced effect High 0 1 1 0 Determines the amount of high frequency effect sound feedback returned to the input of the chorus stage Lower values produce more cut in the high frequency range Wet Dry Balance 0 100 Sets the balance between...

Page 36: ... fed to the input of the modulation stage and when off the modulation stage is bypassed The E2 parameter will not appear when editing a single element voice Mode Monaural Stereo When set to Stereo the phaser effect is applied independently to the left and right channel signals When Monaural the phaser effect is applied to a mix of the left and right channel signals Monaural Mode Block Diagram L In...

Page 37: ... Mode 180 0 180 0 deg Diffusion Monaural Mode off on When the Stereo mode is selected this parameter becomes Phase and sets the phase different between the left and right channel phaser signals The larger the value the greater the spread in the sound A setting of 0 produces a centered effect When the Monaural mode is selected this parameter becomes Diffusion and determines whether the effect has a...

Page 38: ...e input of the modulation stage and when off the modulation stage is bypassed The E2 parameter will not appear when editing a single element voice Mode Monaural Stereo When set to Stereo the symphonic effect is applied independently to the left and right channel signals When Monaural the symphonic effect is applied to a mix of the left and right channel signals Monaural Mode Block Diagram L In R I...

Page 39: ...Diffusion determines the amount of stereo spread The higher the value the greater the spread When set to 0 the symphonic effect is a centered monaural signal Lo Fi off 1 12 This parameter can be used to give the symphonic effect a more analog feel Higher values produce a smoother effect in the high frequency range Wet Dry Balance 0 100 Sets the balance between the direct dry and effect wet sound H...

Page 40: ...o the input of the modulation stage and when off the modulation stage is bypassed The E2 parameter will not appear when editing a single element voice Mode Monaural Stereo When set to Stereo the celeste effect is applied independently to the left and right channel signals When Monaural the celeste effect is applied to a mix of the left and right channel signals Monaural Mode Block Diagram L In R I...

Page 41: ... signal in relation to another The higher the value the more pro nounced the celeste effect FB Gain 100 100 Determines the amount of effect sound feedback returned to the input of the celeste stage Higher negative or positve values produce a more pronounced effect Lo Fi off 1 12 This parameter can be used to give the celeste effect a more analog feel Higher values produce a smoother effect in the ...

Page 42: ... E1 E2 off on In this parameter the cursor can be positioned at E1 or E2 to individually turn the Dist Flanger effect on or off for elements 1 and 2 respectively When on the output of the corresponding element is fed to the input of the modulation stage and when off the modulation stage is bypassed The E2 parameter will not appear when editing a single element voice Overdrive 0 100 Sets the intens...

Page 43: ...es extend the effect to the middle and lower frequencies Delays longer than about 5 milliseconds produce a more chorus like effect Phase 180 0 180 0 deg Sets the phase different between the left and right channel flanger signals The larger the value the greater the spread in the sound A setting of 0 produces a centered effect FB Gain 100 100 Determines the amount of effect sound feedback returned ...

Page 44: ...ith emphasis on the middle frequencies Flat Stack Combo Twin Radio Megaphone Element on off E1 E2 off on In this parameter the cursor can be positioned at E1 or E2 to individually turn the Dist Wah effect on or off for elements 1 and 2 respectively When on the output of the corresponding element is fed to the input of the modulation stage and when off the modulation stage is bypassed The E2 parame...

Page 45: ...fect is placed before the distortion effect Pre or after the distortion effect Post Cutoff Freq 26 9 Hz 11 9 kHz Sets the central cutoff frequency for the wah effect Resonance 1 0 15 6 Sets the amount of emphasis at the wah effect cutoff frequency and therefore the depth of the wah effect Higher values produce greater emphasis at the cutoff frequency Sens 0 100 Determines the amount of cutoff freq...

Page 46: ...Element Controller ELEMENT EFFECT MODIFIER ENVELOPE MISCELLANEOUS EDIT MODE COMMON CONTROLLER MISCELLANEOUS Controller Parameter Displays When a controller is off unnecessary parameters no longer appear on the display ...

Page 47: ...requency region Mid Lips 2 A variation of Mid Lips 1 Hi Lips 1 Lip reed type noise with emphasis in the high frequency region Hi Lips 2 A variation of Hi Lips 1 Jet Jet reed type noise Lo Jet Jet reed type noise with emphasis in the low frequency region Mid Jet Jet reed type noise with emphasis in the mid frequency region Hi Jet Jet reed type noise with emphasis in the high frequency region Steam ...

Page 48: ...fied by the Tap Location parameter directly in microseconds through milliseconds from 20 8 µsec to 946 µsec and then from 1 01 msec to 42 7 msec The Fixed Straight and KeyTrack Straight parameters are essentially the same as the Fixed and KeyTrack parameters except that they cover a broader range of settings for greater sonic variation The number of Tap Location key scaling breakpoints has been in...

Page 49: ...lse width Pulse Width at 50 VlSns to Lvl 0 16 Sets the sensitivity of excitation signal level to keyboard velocity Higher values produce a greater variation in excitation signal level in response to keyboard velocity VlSns to LPF 0 16 Sets the sensitivity of the excitation signal low pass filter cutoff frequency to keyboard velocity Higher values produce a greater variation in filter cutoff freque...

Page 50: ...ree separate key scaling breakpoints to be set at any notes between C 2 and G8 You can position the cursor at the appropriate breakpoint key parameter and use any of the normal data entry procedures or use the keyboard To use the keyboard for breakpoint entry position the cursor at the appropriate breakpoint key parameter press the button Kbd and then press the key at which you want to set the bre...

Page 51: ...s three separate key scaling breakpoints to be set at any notes between C 2 and G8 You can position the cursor at the appropriate breakpoint key parameter and use any of the normal data entry procedures or use the keyboard To use the keyboard for breakpoint entry position the cursor at the appropriate breakpoint key parameter press the button Kbd and then press the key at which you want to set the...

Page 52: ...akpoints to be set at any notes between C 2 and G8 You can position the cursor at the appropriate breakpoint key parameter and use any of the normal data entry procedures or use the keyboard To use the keyboard for breakpoint entry position the cursor at the appropriate breakpoint key parameter press the button Kbd and then press the key at which you want to set the breakpoint while Kbd appears in...

Page 53: ...at any notes between C 2 and G8 You can position the cursor at the appropriate breakpoint key parameter and use any of the normal data entry procedures or use the keyboard To use the keyboard for breakpoint entry position the cursor at the appropriate breakpoint key parameter press the button Kbd and then press the key at which you want to set the breakpoint while Kbd appears in inverse characters...

Page 54: ...4 to 6 breakpoints Balance Increased from 2 to 4 breakpoints Feature Reference pages VL1 110 114 VL1 m 110 114 VL7 108 112 EDIT E1 MODIFIER EQUALIZER AUXILIARY Post EQ Boost 12 0 12 0 dB In version 2 the Equalizer Auxiliary features a Post EQ Boost parameter which allows the post harmonic enhancer signal to be boosted by 12 to 12 dB Also the number of key scaling breakpoints for the following para...

Page 55: ...0 042 42 67 msec In Version 2 the Resonator Delay Time range has been increase while the size of the delay time increments has been decreased for greater precision The new delay time range is from 0 042 msec to 42 67 msec Feature Reference pages VL1 126 VL1 m 126 VL7 124 Conjunction 64 63 A Conjunction parameter has been added which can be used to adjust the frequency balance of the resonator The ...

Page 56: ...nitial Level Attack Level Attack Rate Decay Rate Time EDIT E1 ENV VIBRATO Speed Shift 0 16 The Speed Shift parameter range has been increased to allow faster varia tion At the new maximum setting of 16 the speed can be increased to a maximum of 40 times its normal setting via the controller Feature Reference pages VL1 135 VL1 m 135 VL7 133 EDIT E1 ENV GROWL Speed Shift 0 16 A Speed Shift parameter...

Page 57: ...tone In both cases pitch returns to normal when the switch is released NOTES Do not use the octave hold switches while operating the PITCH wheel Feature Reference pages VL1 153 VL7 151 UTIL SYSTEM TG SETTING WX Lip Normal Expand The keyboard based VL models the VL1 Ver 2 and VL7 Ver 2 now include the WX Lip parameter originally found only in the VL1 m This parameter can be set to Expand when using...

Page 58: ...VL modes Toward the other end of the range a setting of 9 corresponds to the original Hard setting Feature Reference pages VL1 157 VL1 m 156 VL7 155 UTIL SYSTEM BREATH MODE Version 2 makes it possible to assign pressure control to keyboard velocity or touch EG so that the all important VL pressure characteristics can be taken full advantage of even without using a breath wind controller Mode BC WX...

Page 59: ...ce the touch EG data used for pressure control TEG Time Touch EG Time determines how long velocity data is valid before aftertouch data takes over In other words when a note is initially played pressure is controlled by keyboard velocity as determined by the Vel Ofst and Vel Gain param eters described above then it is controlled by keyboard aftertouch Higher values pro duce a slower change The AT ...

Page 60: ... full compatibility with voice and system data from the original VL models When an original VL voice disk is loaded Now Converting and Loading appears on the display and the loaded data is automati cally converted for use with Version 2 Please note that this does not affect the actual sound of the voices in any way since the voice data is not modified to take advantage of the new capabilities of V...

Page 61: ...e Growl Breath noise Scream Tonguing Embouchure Vibrato Pitch Damping Absorption Harmonic enhancer Dynamic filter Amplitude Effect control Modulation wheels Breath controller Foot controllers Foot switches Aftertouch Breath attack Touch EG Excitation LFO LFO EG EG Velocity Pipe String Mixer Instrument section Modifiers Effects EG Pitch wheel Continuous sliders CONTROL SIGNAL FLOW 57 ...

Page 62: ... Ver 2 On the VL1 m Ver 2 we ll use A01 through A06 These voices have been specifically created to facilitate understanding of the way the VL system works All other voices are un changed The floppy disks supplied with the original VL models include a file named EXAMPLE ALL which contains a number of voices programmed specifically for use in the experiments described in this section Before going on...

Page 63: ...hem from the instrument Just disonnect the breath controller from the VL1 m 2 Roll the modulation wheel MW1 on the VL1 Ver 2 and VL7 Ver 2 all the way towards you 3 Make sure the P button indicator is lit If it is not press the P button to engage the PLAY mode 4 Select voice number A01 the AltoSax voice 5 On the VL1 Ver 2 and VL7 Ver 2 the MODULATION 2 wheel is initially set to produce the same ef...

Page 64: ... original voice after making one or more edits simply return to the PLAY mode and re select the same voice number without storing the voice As long as the edited voice has not been stored the same result can be achieved by selecting a different voice The EDIT RECALL function described in the Feature Reference manuals can also be used to restore a voice that has not yet been stored Multiple Functio...

Page 65: ...for the Controller parameter 16 Use the cursor buttons to highlight the Depth param eter 17 Use the data dial to set the Depth parameter to 50 Note how the graph in the display changes in response to this edit 18 Try playing the keyboard with aftertouch pressure again Now you should be able to control the scream effect in addition to the growl effect The ability to assign a single controller to mu...

Page 66: ...e The experiments described in this section provide an opportunity to discover just how controller functions like pressure and embouchure affect the sound NOTES For the following experiments it is assumed that MODULATION WHEEL 2 is set to the same control number as the breath controller the initial EXAMPLE ALL file setting If the MODULATION WHEEL 2 control change number has been changed for any re...

Page 67: ...ursor buttons to highlight the current setting of the Controller parameter 4 Press once to set the Controller parameter to Modulation Wheel 5 Try operating the modulation wheel MW1 while playing the keyboard and note how the sound changes In addition to volume pressure affects the timbre of the sound 6 Press once to turn the Controller parameter off 7 Press 0 2 E m b o u c h u r e 1 Use the cursor...

Page 68: ... of the vibrato effect a periodic variation in pitch and embouchure 6 Press the Para function button to go to the vibrato parameter page The Para function button becomes available whenever detailed parameters are available for the selected controller You can return to the main controller page by pressing the Ctrl function button in the parameter page 7 Use the cursor buttons to highlight the Speed...

Page 69: ... to go to the BREATH NOISE parameter display 0 5 T o n g u i n g 1 Use the cursor buttons to highlight the 05 Tnguing item in the element edit display 2 Press to go to the TONGUING parameter display 3 If necessary use the cursor buttons to highlight the current setting of the Controller parameter 4 Press once to set the Controller parameter to Modulation Wheel 5 Try operating the modulation wheel ...

Page 70: ...se the cursor buttons to highlight the current setting of the Controller parameter 4 Press once to set the Controller parameter to Modulation Wheel 5 Try operating the modulation wheel MW1 while playing the keyboard and note how the sound changes Growl is basically a periodic pressure variation similar to the growl effect sax players often use Growl produces variations in both volume and timbre 6 ...

Page 71: ...e Controller parameter off 12 Press 11 Dynamic Filter 1 Use the cursor buttons to highlight the 11 D Filtr item in the element edit display 2 Press to go to the DYNAMIC FILTER parameter display 3 If necessary use the cursor buttons to highlight the current setting of the Controller parameter 4 Press once to set the Controller parameter to Modulation Wheel 5 Press the Para function button to go to ...

Page 72: ...on button to go back to the DAMPING parameter display 10 Make sure that the Controller parameter is set to Modulation Wheel Since breath control is not assigned to any other function at this point you can go right ahead and try out the damping function 11 Try operating the modulation wheel MW1 while playing the keyboard and note how the sound changes Note how damping changes the decay of the sound...

Page 73: ...ct the breath controller from the VL1 m Ver 2 2 Press the P button to engage the PLAY mode 3 Select the A04 voice Violin 4 Press E to go to the EDIT mode 5 Press the E1 or EL function button to go to the element edit menu 6 Press Env to go to the envelope menu 7 Use the cursor buttons to highlight the 1 Pressure item in the menu 8 Press to go to the PRESSURE envelope param eter page 9 Use the curs...

Page 74: ...s off and the Resonator is on 9 Use the cursor buttons to highlight the on parameter in the Resonator block 10 Press to turn the Resonator off 11 Use the cursor buttons to highlight the off parameter in the Impulse Expander block 12 While playing the keyboard use the and buttons to turn the Impulse Expander on and off to hear how it affects the sound You should notice that when the Impulse Expande...

Page 75: ...ay the keyboard to hear the Flanger effect 12 Press to return to the effect menu 13 Use the cursor buttons to highlight the 3 Feedback Delay item in the menu 14 Press to go to the FEEDBACK DELAY param eter page 15 Use the cursor buttons to highlight the Return param eter 16 Use the data dial to set the Return parameter to 90 17 Play the keyboard to hear the Feedback Delay effect 18 Press to return...

Page 76: ... L R L C R Reverberation hall1 hall2 room1 room2 studio plate space reverse Voice mode only Smallest tone generator units elements Voices use 1 or 2 elements Voices are composed on common data and element data 2 notes max Mono Poly Unison Part Type Modifiers Effects Play Mode Polyphony Assign Modes Appendix 72 Memory 128 voices 3 5 2DD or 2HD floppy disk Internal Disk Keyboard 49 C scale FS type V...

Page 77: ...s Breath controller Output x 2 L and R Foot controller x 2 Foot switch x 2 MIDI IN MIDI OUT MIDI THRU Front Panel Rear Panel Output Level 2 5 2 dBm into 10 kΩ 7 5 2 dBm into 150 Ω Line Headphones Power Requirements UL CSA 120V 16W Europe 220 240V 16W General 914 W x 380 D x 105 H mm 12 5 kg Dimensions Weight Accessories Power cable BC2 Breath Controller FC7 Foot Controller Floppy disk x 2 Owners m...

Page 78: ...orus phaser symphonic celeste dist flanger dist wah Feed back delay mono L R L C R Reverberation hall1 hall2 room1 room2 studio plate space reverse Voice mode only Smallest tone generator units elements Voices use 1 or 2 elements Voices are composed on common data and element data 2 notes max Mono Poly Unison Part Type Modifiers Effects Play Mode Polyphony Assign Modes Appendix 74 Memory 128 voice...

Page 79: ...ontroller Output x 2 L and R MIDI IN MIDI OUT MIDI THRU Front Panel Rear Panel Output Level 2 5 2 dBm into 10 kΩ 2 0 2 dBm into 33 Ω Line Headphones Power Requirements UL CSA 120V 16W Europe 220 240V 16W General 480 W x 361 D x 132 H mm 7 5 kg Dimensions Weight Accessories Power cable Floppy disk x 2 Owners manuals x 5 MIDI cable Version 2 sticker Appendix 75 Appendix Specifications subject to cha...

Page 80: ...r dist wah Feed back delay mono L R L C R Reverberation hall1 hall2 room1 room2 studio plate space reverse Voice mode only Smallest tone generator unit element Voices use element Voices are composed on common data and element data 1 note Type Modifiers Effects Play Mode Polyphony Memory 64 voices 3 5 2DD or 2HD floppy disk Internal Disk Keyboard 49 C scale FS type Velocity Channel aftertouch Keys ...

Page 81: ... controller Output x 2 L and R Foot controller x 2 Foot switch x 2 MIDI IN MIDI OUT MIDI THRU Front Panel Rear Panel Output Level 2 5 2 dBm into 10 kΩ 2 0 2 dBm into 33 Ω Line Headphones Power Requirements UL CSA 120V 16W Europe 220 240V 16W General 914 W x 380 D x 105 H mm 12 3 kg Dimensions Weight Accessories Power cable BC2 Breath Controller FC7 Foot Controller Floppy disk x 2 Owners manuals x ...

Page 82: ...50 EDIT E1 MODIFIER HARMONIC ENHANCER 50 EDIT E1 MODIFIER RESONATOR 51 Effects experiments 71 Element 1 2 MIDI Receive channel 29 A A02 Jazz Sax voice trying out the 11 A04 Jazz Trumpt voice trying out the 12 Abbreviations model name 4 Absorption experiment 68 ADDITION ALL file 9 After touch breath curve 54 Aftertouch offset gain breath mode 55 Amplitude experiment 65 Assign mode 26 Attack level e...

Page 83: ...G Gain breath controller 17 Growl experiment 66 H Harmonic enhancer experiment 67 Headphones 5 High chorus 31 High dist flanger 39 I Initial edit page 25 Interval 29 K Key mode 25 L Level to driver excitation 45 Level to pipe string excitation 45 Lo fi celeste 37 Lo fi symphonic 35 LPF cutoff excitation 45 M Manual about the 4 MIDI connections VL1 m Ver 2 6 Mode breath mode 54 Mode celeste 36 Mode...

Page 84: ... voice data loading 7 Preparation experiments 58 Pressure envelope editing the 69 Pressure experiment 63 Pulse width excitation 45 R Resonance dist wah 41 S Scream experiment 65 Sens dist wah 41 Setup 5 Slider assign parameters 28 Speaker dist flanger 38 Speaker dist wah 40 Specifications VL1 Version 2 72 Specifications VL1 m Version 2 74 Specifications VL7 Version 2 76 Speed shift growl 52 Speed ...

Page 85: ...Appendix 81 Appendix ...

Page 86: ...iland Tel 2 215 3443 THE PEOPLE S REPUBLIC OF CHINA AND OTHER ASIAN COUNTRIES Yamaha Corporation International Marketing Division Nakazawa cho 10 1 Hamamatsu Japan 430 Tel 053 460 2317 AFRICA Yamaha Corporation International Marketing Division Nakazawa cho 10 1 Hamamatsu Japan 430 Tel 053 460 2312 NORTH AMERICA CANADA Yamaha Canada Music Ltd 135 Milner Avenue Scarborough Ontario M1S 3R1 Canada Tel...

Page 87: ......

Reviews: