66
Basics Section
Quick Guide
Refer
ence
Appendix
Voice Edit
●
AMP (Amplitude) [F4]
You can set the volume of each Element after the OSC
(Oscillator), PITCH and FILTER parameters have been
applied, as well as the final overall volume of the signal
sent to the outputs.
The signal of each Element is sent at the specified
volume to the next Effect section.
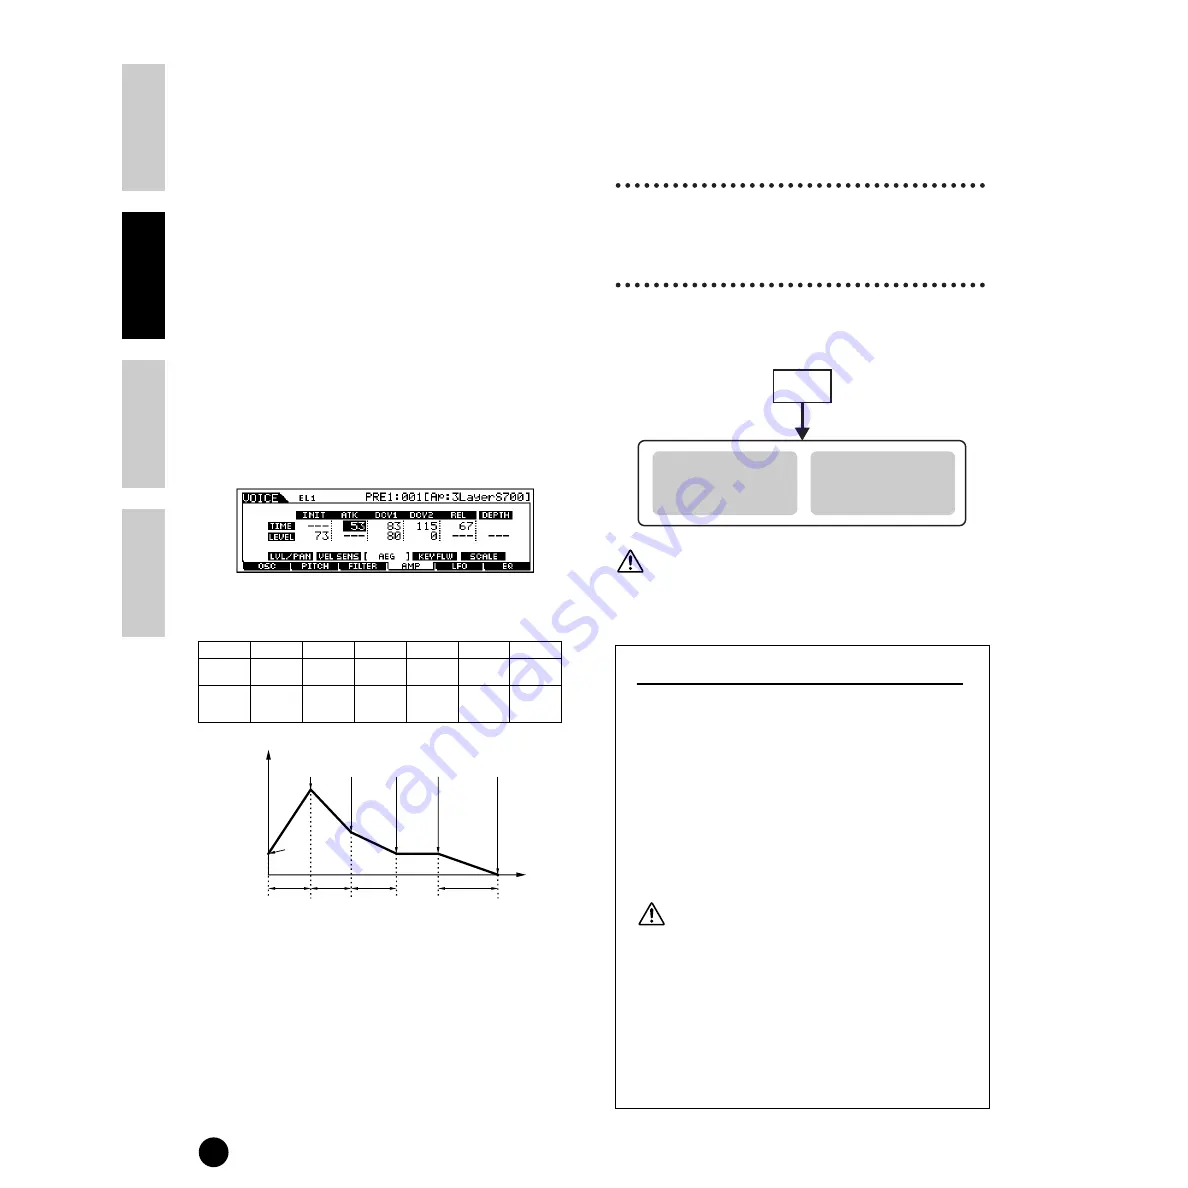
Also, by setting the AEG (Amplitude Envelope
Generator), you can control how the volume changes
over time.
AEG (Amplitude Envelope Generator) [F4]
→
→
→
→
[SF3]
Using the AEG, you can control the transition in
volume from the moment a note is pressed on the
keyboard to the point at which it is released. As
illustrated below, the Amplitude Envelope consists of
four Time (transition speed) parameters and three
Level parameters (for the amount of filtering). When
you press a note on the keyboard, the volume will
change according to these envelope settings.
Furthermore, different AEG parameters can be set for
each Element.
The full names of the available parameters are shown
in the chart below, as they appear in the display.
●
LFO (Low Frequency Oscillator) [F5]
As its name suggests, the LFO creates waveforms of a
low frequency.
These waveforms can be used to vary the pitch, filter or
amplitude of each Element to create effects such as
vibrato, wah and tremolo. LFO can be set
independently for each Element; it can also be set
globally for all Elements (Ref. #159-174).
●
EQ (Equalizer) [F6]
Adjusting the sound can serve to draw out the special
characteristics of the sound and help achieve the
proper balance among the Elements (Ref. #210-215).
5
Set the Effect Parameters
For an application example showing how to use the
effect, see page 67.
6
Storing Edited Voices
Up to 128 new/edited Normal Voices and 16 new/
edited Drum Voices can be stored to internal user
memory.
When storing a Voice, any existing data at the storage
location will be lost. You should always back up
important data to Memory card or computer.
n
For details about storing Voices, see page 73.
About Board Custom Voice Editing
You can edit Board Custom voices of the Plug-in
Board by using the Editor software included with
the board.
n
Select the Part Number of the Editor software to
“1” when using the software with the Voice mode.
Also make sure to match the basic MIDI receive
channel of the S90 (Ref. #176) to the MIDI
channel of the Editor software.
The original Board Custom voices you’ve edited can
be saved and controlled from the computer.
Make sure to save the edited data to a memory card,
since any edited data in the DRAM of the Plug-in
board will be lost when you turn off the power on
the S90 (page 82).
n
For details about how to use the Editor software
included with the Plug-in board, refer to the Online
help of the Voice Editor.
n
Editing the above parameters may or may not have
much effect on the sound, depending on the
particular Plug-in board you’ve installed.
INIT
ATK
DCY1
DCY2
REL
DEPTH
TIME
---
Attack time
Decay 1
time
Decay 2
time
Release
time
---
LEVEL
Initial level
---
Decay 1
level
Decay2
(Sustain)
level
---
0
Level
Init
Level
Attack
Level
Decay1
Level
Decay2
(Sustain)
Level
Key off
Release
Level
Attack
Time
Decay1
Time
Decay2
Time
Release
Time
Time
Voice
Store
Normal Voice
USER (US)
1-128
Drum Voice
USER DRUM (USDR)
1-16
Summary of Contents for S90
Page 136: ...136 MEMO ...


