background image

83

V

oice Mode

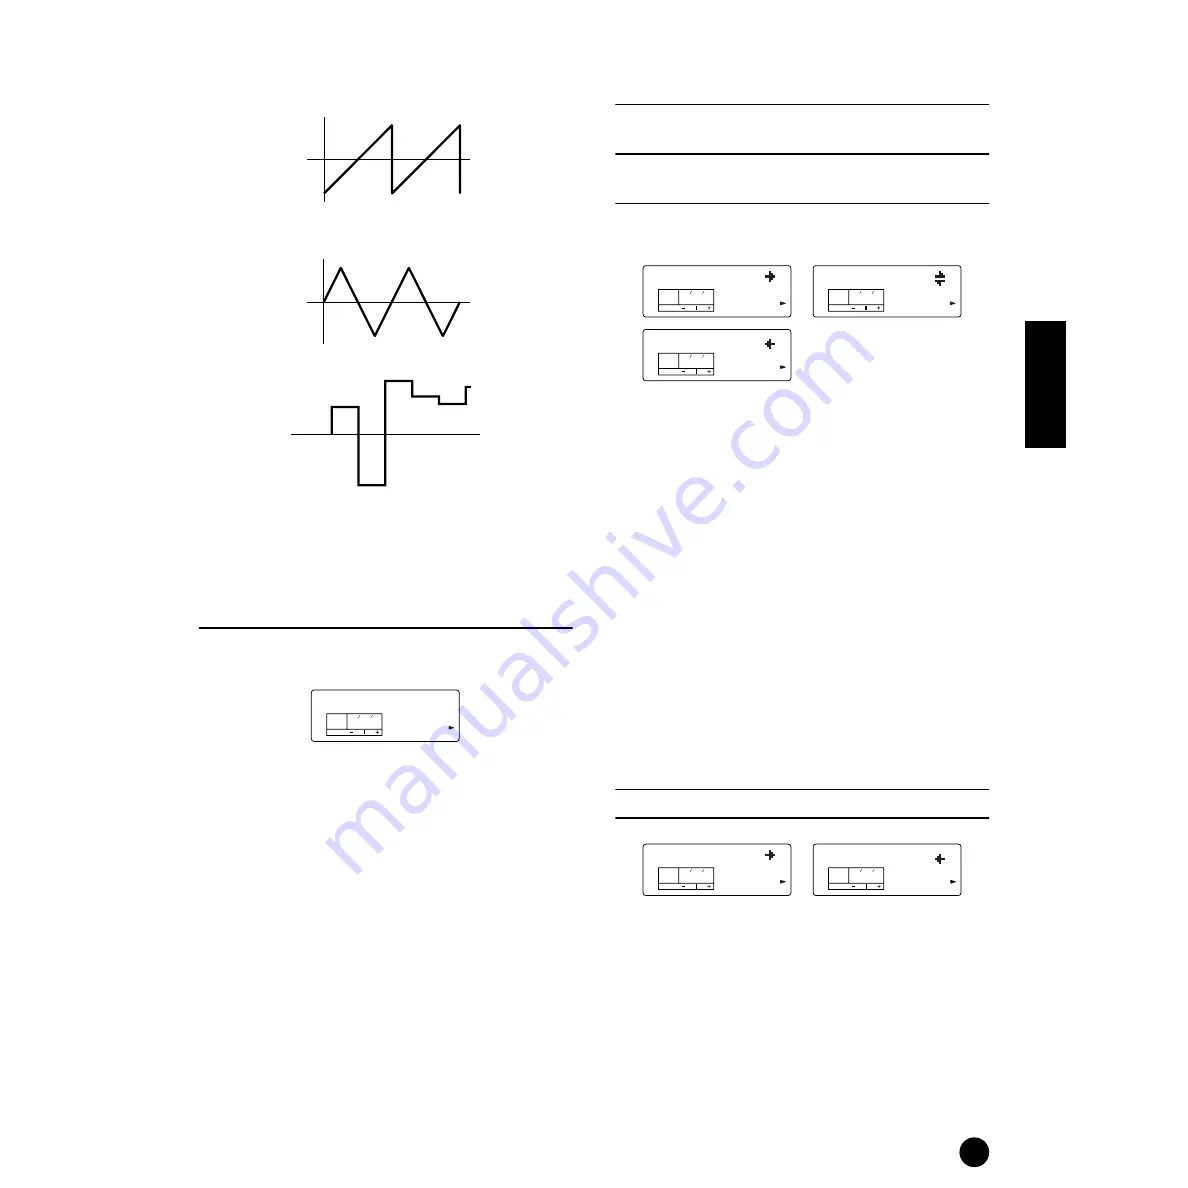
LFO Phase

Determines whether or not the LFO is reset each 
time a note is pressed.

Settings:

 off, on

33. LFO Speed

Determines the speed of the LFO waveform.  A larger 
setting produces a faster speed.

Settings: 

0~63

34-1. LFO PMod 
(LFO Pitch Modulation)

34-2. LFO FMod 
(LFO Filter Modulation)

34-3. LFO AMod 
(LFO Amplitude Modulation)

Determines the amount by which the LFO waveform 
controls the pitch/filter/amplitude.

Settings: 

0~127

LFO PMod

Determines the amount (depth) by which the LFO 
waveform varies (modulates) the pitch of the sound.  
The larger the setting, the greater the depth of 
control.

LFO FMod

Determines the amount (depth) by which the LFO 
waveform varies (modulates) the Filter Cutoff 
frequency.  The larger the setting, the greater the 
depth of control.

LFO AMod

Determines the amount (depth) by which the LFO 
waveform varies (modulates) the amplitude of the 
sound.  A larger setting means a larger modulation 
depth.

35-1. PLFODelay (Pitch LFO Delay)

35-2. 

PLFO Fade (Pitch LFO Fade Time)

Settings: 

0~127

saw

tri

S&H

LFO Speed

KEY

ELEM

PART

OCTAVE

PAGE

31

 33       E     1

LFO PMod

KEY

ELEM

PART

OCTAVE

PAGE

000

 34       E     1

LFO AMod

KEY

ELEM

PART

OCTAVE

PAGE

000

 34       E     1

LFO FMod

KEY

ELEM

PART

OCTAVE

PAGE

000

 34       E     1

PLFODelay

KEY

ELEM

PART

OCTAVE

PAGE

000

 34       E     1

PLFO Fade

KEY

ELEM

PART

OCTAVE

PAGE

000

 35       E     1

Element LFO

Summary of Contents for S03 voice editor

Page 1: ...OWNER S MANUAL ...

Page 2: ...tion or effect works when the unit is operating as designed are not covered by the manufacturer s warranty and are therefore the owners responsibility Please study this manual carefully and consult your dealer before requesting service ENVIRONMENTAL ISSUES Yamaha strives to produce products that are both user safe and environmentally friendly We sincerely believe that our products and the producti...

Page 3: ...sure to set the volumes of all components at their minimum levels and gradually raise the volume controls while playing the instrument to set the desired listening level Do not expose the instrument to excessive dust or vibrations or extreme cold or heat such as in direct sunlight near a heater or in a car during the day to prevent the possibility of panel disfiguration or damage to the internal c...

Page 4: ...oices in a desired instrument group page 35 A total of 480 Normal Voices and 20 Drum Voices all XG compatible in addition to Preset Voices and User Voices page 25 Comprehensive detailed editing features for customizing your Voices page 70 Convenient TO HOST terminal for direct easy connection to computer with just one cable page 13 Included XGworks lite sequencing software for easily creating and ...

Page 5: ... parameters in the same section Throughout the manual parameter names are prefaced by numbers such as 13 2 Resonance This for example indicates that the Resonance parameter is on display PAGE 13 in the selected mode When one display page contains two or more related parameters use the E F buttons page 30 to scroll through the available parameters These related parameters selected by the E F button...

Page 6: ... Performing Live While Playing Back a Song File 40 Splitting the Keyboard Setting Upper and Lower Ranges for the Voices 41 Layering Two Voices Parts Together 42 Using Controllers 44 Pitch Bend Wheel 44 Modulation Wheel 44 Foot Controller 45 Foot Switch 46 Voice Edit 47 Effects 53 Effects in Voice Mode 53 Effects in Multi Mode 53 Reference Section 55 Multi Mode 55 Multi Edit 55 Common Settings for ...

Page 7: ...the Voice being edited to another Element in the same Voice Page 88 Backing up your S03 data Saving S03 Settings to an External Device Page 42 Changing the sound Editing a Voice Voice Edit Page 47 Effect structure and signal flow Effects Page 53 Details on the parameters of the modes Reference Section Page 55 Saving data Storing the edited Voice to the S03 internal USER memory Voice Store Page 89 ...

Page 8: ...ns select Parts 1 to 16 In the Multi Part Edit mode press both of these buttons simultaneously to call up the Common Edit screens To return to the Part Edit screens press only one of these buttons or In the Voice Edit Mode these buttons select Elements 1 to 4 or the Drum keys In the Voice Element Edit mode press both of these buttons simultaneously to call up the Common Edit screens To return to t...

Page 9: ...active this is used to specify the DRUM PERC Voice category USER SE button Page 33 In the Multi and Voice modes this lets you select the User Memory programs You can also specify a User Memory Drum bank by simultaneously pressing both this button and the CATEGORY SEARCH DRUM button When the Category Search function page 35 is active this is used to specify the SE Voice category GM XG OTHER button ...

Page 10: ...footswitch to turn specific functions on and off 5 FOOT CONTROLLER jack Pages 14 45 For connecting an optional foot controller FC7 etc This gives you real time control over various aspects of the sound such as tone pitch and volume 6 STANDBY ON switch Page 15 Use this to turn the S03 on or off Even when the switch is in the STANDBY position electricity is still flowing to the instrument at a minim...

Page 11: ...h is in the STANDBY position electricity is still flowing to the instrument at a minimum level When not using the S03 for an extended period of time be sure to unplug the AC power adaptor from the wall AC outlet Connections Connecting to External Audio Equipment Since the S03 has no built in speakers you need to monitor its sound output via external audio equipment Alternatively you could use a pa...

Page 12: ...ontrol it from the S03 You can also use an external MIDI keyboard or sequencer to control the S03 s internal sounds This section introduces several different MIDI applications n The HOST SELECT switch on the rear panel should be set to MIDI Otherwise MIDI data will not be transmitted from the S03 s MIDI OUT connector Controlling the S03 from an External MIDI Keyboard Controlling an External MIDI K...

Page 13: ... instance you can edit the Voices of the S03 There are two ways to connect your S03 to a computer 1 Serial connection the computer s serial port to the S03 s TO HOST terminal 2 MIDI connection the computer s MIDI interface or external MIDI interface to the S03 s MIDI IN and OUT Depending on your particular computer the connections may differ See below n You may also want to change the Local On Off...

Page 14: ... a footswitch the FC4 or FC5 and foot controller the FC7 to control tone volume pitch and other parameters n Details about how to use these controllers are given on page 45 Computer with MIDI interface HOST SELECT PC 2 PC 1 MIDI Mac MIDI OUT MIDI OUT MIDI IN MIDI IN NEC PC 9821 AS NEC MultiSync S03 MIDI Interface MIDI OUT MIDI IN MIDI IN MIDI OUT Computer S03 HOST SELECT Mac PC 2 MIDI OFF USB MIDI...

Page 15: ... speakers or mixer and amplifier Likewise always switch off the power of the S03 after switching off the power of the amplified speakers or mixer and amplifier Even when the switch is in the STANDBY position electricity is still flowing to the instrument at a minimum level When not using the S03 for an extended period of time be sure to unplug the AC power adaptor from the wall AC outlet n Before ...

Page 16: ... until stopped Demo Song Selection While the Demo song is playing back you can select the particular Demo song that you wish to hear Enter the desired Demo song category from the numeric keypad to call up the song For example you can play the piano song by pressing button 7 PIANO in the numeric keypad If you don t select a particular song an ensemble OTHER song will play back automatically n When ...

Page 17: ...s can be transmitted to other external MIDI devices through the MIDI OUT connector Tone Generator This block plays back sounds according to information received from the keyboard and controllers The following example illustrates the path taken by the signal from an Element in the Voice Mode Controller Tone Generator Effect keyboard controllers Tone Generator To Effects Units AMP Amplitude FILTER P...

Page 18: ...um Voices For details about Normal and Drum Voices see page 26 Maximum Polyphony The maximum polyphony of the S03 is 64 notes However the actual note polyphony will vary depending on the number of Elements in the Voice To calculate the actual polyphony divide the total polyphony of 64 by the number of Elements in the Voice For instance if a Voice consists of two Elements the maximum note polyphony...

Page 19: ...Category Search function that lets quickly select a Voice according to its instrument type Voice Edit Mode Normal Voices and Drum Voices can be created and edited in this mode You can save up to 128 edited Normal Voices and two edited Drum Kits as User Voices in internal memory Voice Job Mode In this mode you can copy Elements and initialize Voices and perform other similar operations Jobs DEMO Mo...

Page 20: ... Offset 4 72 CONTROLLER Porta Sw Time Portamento Switch Time 5 72 PB Range Pitch Bend Range 6 72 MW FltCtl MW Filter Control 7 72 MW PMod MW Pitch Modulation Depth 8 72 MW FMod MW Filter Modulation Depth 8 72 MW AMod MW Amplitude Modulation Depth 8 72 AC1FltCtl AC1 Filter Control 9 72 AC1 FMod AC1 Filter Modulation Depth 10 72 AC1 AMod AC1 Amplitude Modulation Depth 10 72 EFFECT ReverbSend 11 72 C...

Page 21: ...88 BlkDmp Bulk Dump 3 88 DEMO Mode 16 Demo Song Play 16 Utility Mode 90 TG Tone Generator MasterTune 1 90 KEYBOARD Kbd Trans Keyboard Transpose 2 90 Vel Curve Velocity Curve 3 90 Fixed Vel Fixed Velocity 3 90 CONTROLLER MWTxCtlNo MW Transmit Control Number 4 91 FCTxCtlNo Foot Controller Transmit Control Number 4 91 FSTxCtlNo Footswitch Transmit Control Number 5 91 Ctl Reset Controller Reset 6 91 A...

Page 22: ...Reverb Return 6 56 Reverb Pan 7 57 ChoEF Chorus Effect Type 8 57 Chorus Parameters 9 57 Cho Return Chorus Return 10 57 Chorus Pan 11 57 SndCho Rev Send Chorus to Reverb 12 13 57 VarEF Variation Effect Type 13 14 57 Variation Parameters 14 15 57 VarConnect Variation Connection 15 58 Var Return Variation Return 16 58 Var Pan 17 58 Snd Var Rev Send Variation to Reverb 18 58 Snd Var Cho Send Variation...

Page 23: ...4 17 78 FltSclSns Filter Scale Sensitivity 18 78 FltSclVel Filter Scale Velocity Sensitivity 18 78 FEG R FEG Rate 19 79 FEG L FEG Level 20 79 FEGSclSens FEG Scale Sensitivity 21 79 FEGAtkVel FEG Attack Velocity 22 80 FEGOthVel FEG Other Velocity 22 80 AMP Amplitude AEG R AEG Rate 23 80 AEG L AEG Level 24 80 AEGSclSens AEG Scale Sensitivity 25 81 AEGLvlVel AEG Level Velocity Sensitivity 26 81 AEGAt...

Page 24: ... for song data playback you can have a complete ensemble of 16 independent instrument sounds You can also play Multis from the keyboard This allows you to set up layers of different Voices or special key splits in which your right and left hands can play separate Voices page 41 Two Layered Voices Song File External MIDI sequencer MIDI CH 1 16 Part 1 16 Part 1 16 Multi CH1 CH16 Different Voice for ...

Page 25: ...are stored in the internal memory PRESET USER GM XG Drum Voices XG121 128 are not of the GM XG set but are original drum kits specifically programmed for the S03 PR001 128 US001 128 Preset 128 Preset Voice User 128 User Voice 2 User Drum Voice 20 Drum Voice Controllers Controllers External MIDI sequenser Tone Generator Voice Tone Generator Multi Playing a Voice Playing a Multi Multi Play Mode Voic...

Page 26: ...s also include special sound effects In general a Voice containing up to four Elements can be played across the entire range of the keyboard However this can be changed the actual key range for the Voice is determined by the Note Limit parameters page 73 n A total of 480 XG and 128 Preset Normal Voices plus 20 Drum Voices are available as presets You can create and store your own original Voices t...

Page 27: ... in making up a Voice A total of 453 high quality preset Waves are available As shown in the following illustration when creating a Voice you can select the Wave to be used as an Element and then set its level pitch tone and other parameters Wave 1 453 Element 1 Element 2 Element 3 Element 4 C 2 G8 Voice ...

Page 28: ...ntains MIDI related settings Finally there is the Demo mode which allows you to play back the Demo songs To select these press the UTILITY button for the Utility mode the MIDI button for the MIDI mode and the DEMO button for the Demo mode Play Modes 1 Multi Play Mode Page 37 Press the MULTI button the LED lights to enter the Multi Play mode To exit to another mode simply press the respective butto...

Page 29: ...ter the MIDI mode To exit to another mode simply press the respective button for that mode If one of the Play mode lamps MULTI or VOICE is lit the corresponding Play mode is still active even while entering this mode An arrow appears in the lower left of the LCD pointing to MIDI on the panel indicating the MIDI mode 7 Demo Mode Page 16 Press the DEMO button the LED lights to enter the Demo mode To...

Page 30: ... page in the middle of the set is called up arrows point in both directions indicating you can select either the next or previous screens When the last screen is called up the arrow points to the left indicating no further screens are available For certain parameters such as Voice Name etc these buttons are used to move the cursor position in the display buttons In the Multi Edit mode these button...

Page 31: ...rs such as Voice Name etc which have more than one value to be set use the E F buttons to move the cursor position in the display then set the value accordingly INC YES and DEC NO buttons These are used to change the value of the currently selected parameter You can use the INC YES button to increment a parameter setting by one step or the DEC NO button to decrement it If you hold down either butt...

Page 32: ...o either mono or poly For other absolute parameters such as Volume the setting can be any value between zero and 127 The Volume setting has a linear one to one relationship with the actual volume as shown in the graph on the left However relative parameters do not follow the same relationship The graph on the bottom shows the role of the Velocity Offset parameter The value you have set here known ...

Page 33: ...Voices are divided into several different banks MUSIC SYNTHESIZER PHONES L OUTPUT R DC IN ON STANDBY CONTROLLER SWITCH TO HOST HOST SELECT IN OUT THRU MIDI VOLUME UTILITY UTILITY MIDI MODE PART ELEMENT KEY DATA EDIT MULTI PART COMMON ELEMENT VOICE VOICE MIX TONE EFFECT CONTROLLER GENERAL OSC MIX PITCH AMP EFFECT LFO FILTER TG MULTI UTILITY EDIT COMPARE JOB STORE MIDI VOICE DEMO MUTE DRUM CATEGORY ...

Page 34: ...ress the ENTER button to specify the Voice Memory then press the INC YES button to increment the Voice Number and press DEC NO to decrement it Selecting with the numeric keypad and ENTER button First specify the Voice number with the numeric keypad then press the ENTER button to actually set it For example to select voice number 100 press buttons 1 0 and 0 in order The indicated number flashes Fin...

Page 35: ... Press the CATEGORY SEARCH button in Voice Mode Its LED will light and Category Search will be enabled The Memory buttons and the numeric keypad are used for selecting categories n Press the EXIT button to disable Category Search n The category names are printed under each button To switch between the ME and CO categories press the OTHER button n Refer to the Category List on page 71 for more info...

Page 36: ...yboard will actually play note C5 i e the note you play is shifted up two octaves To return to the standard octave range 0 press the OCTAVE UP and DOWN buttons simultaneously n If you set the octave beyond the limits of the Voice s note range notes played outside of the range will sound one octave higher or lower than normal n The OCTAVE UP and DOWN buttons may not function if the Note Shift param...

Page 37: ...ment the Multi Number Press the DEC NO button to decrement the Multi Number n This is selected in the same way as in selecting Voices using the numeric keypad and the ENTER button Refer to the instructions on selecting Voice numbers page 34 MUSIC SYNTHESIZER PHONES L OUTPUT R DC IN ON STANDBY CONTROLLER SWITCH TO HOST HOST SELECT IN OUT THRU MIDI VOLUME UTILITY UTILITY MIDI MODE PART ELEMENT KEY D...

Page 38: ... MIDI channels correspondingly Therefore you can play back a song file on an external sequencer and have different Voices playing on different tracks simultaneously In the following example we will create a Multi suited to playing back a song file consisting of three Parts piano bass and drums The piano track is assigned to MIDI channel 2 the bass track to channel 3 and the drums to channel 10 n Y...

Page 39: ...ils see page 56 6 Continue using the and buttons and switch to the Rcv Ch MIDI Receive Channel screen PAGE 6 Set the parameter to 2 7 Use the and buttons and switch to the Mono Poly screen PAGE 8 Set the parameter to poly polyphonic n For Parts that do not require polyphony the Mode parameter can be set to mono monophonic 8 Use the and buttons and switch to the Part Mode screen PAGE 9 Set the para...

Page 40: ... computer sequencer and the piano bass and drum Parts will be played back according to each track s MIDI channel Performing Live While Playing Back a Song File While playing back the song file with the piano bass and drum Parts assigned earlier you can set up the Multi so that you can also play another Part live This is the same as the Multi created earlier page 38 but with the addition of another...

Page 41: ...trings Voice for the lower range Part n For details about Voice selection see page 59 5 Use the and buttons to call up the Volume screen PAGE 2 then set the volume for the piano Part as well as its Pan position Chorus and Reverb Send levels if necessary For details see page 56 6 Use the and buttons to call up the NtLmt screen PAGE 4 and specify a key range for the lower and upper Parts Switch betw...

Page 42: ...ected for Part 1 and a piano Voice is selected for Part2 and the two are played together in unison This Multi can be easily created and set so that both Parts 1 and 2 are layered together across the entire range of the keyboard For both Part 1 and Part 2 set the Note Limit Low parameter to C 2 and the Note Limit High parameter to G8 n In the Edit mode the selected Part s Voice is played back Savin...

Page 43: ...orded data the appropriate S03 Multi settings are sent as System Exclusive messages page 99 from XGworks lite n For best results try to keep the playback tempo at the same setting as was used for recording n When you assign the User Voice to the selected Multi s Part record the User Voice as the same manner Select the AllUS All User Voices in the BlkDmp screen PAGE 3 in the Voice Job mode then tra...

Page 44: ...or filter setting of the Voice The Modulation Wheel can be used to control the parameters below MW Variation Control Depth MW Filter Control MW Pitch Modulation Depth MW Filter Modulation Depth MW Amplitude Modulation Depth Controllers and External MIDI Control Various control functions can be assigned to the Modulation Wheel and the Assignable Controller page 66 Besides these other functions the ...

Page 45: ...umber for the Foot Controller Using the Foot Controller to Control Parameters In live performance you can use the Foot Controller onstage to keep your hands free to play the keyboard yet still be able to control various functions necessary for your songs or performance In the following example we ll show you how to set up the Foot Controller to function the same as and substitute for the Modulatio...

Page 46: ...s or Multis with your feet without having to take your hands from the keyboard For example if you arrange the Voices Multis in memory in consecutive order as you ll use them you can easily advance through them one by one by pressing the Foot Switch while you perform The following instruction steps show you how to do this 1 Press the UTILITY button to enter the Utility mode 2 Use the and buttons to...

Page 47: ... Voice Edit Mode To enter the Voice Edit mode press the EDIT button while in the Voice Play mode 3 4 2 1 5 Enter the Voice Edit mode In Voice Play mode select the Voice you wish to edit Store the edited Voice Set the common parameters Set the parameters common to all Elements in the Voice volume pitch tone etc You can also set parameters related to the Controllers Effects and so on Set the element...

Page 48: ...for an Element 1 to 4 press the and buttons to switch to other screens The S03 has a huge variety of available parameters As you change the display pages an arrow mark on the right side of the display points to the parameter chart printed on the panel indicating the parameter type and what aspect of the instrument it s related to Use the INC YES and DEC NO buttons to set each parameter value Some ...

Page 49: ...ion Effects 4 Set the Element Parameters OSC MIX Oscillator Mix In PAGES 1 to 6 you can set the various parameters controlling the waveforms on which the Voice is based You can select the Wave used for the Element the volume and note range of each Element and so on Element Sw Element Switch Determines whether each Element sounds or not Wave Selection Select the Wave for each Element Level Pan Set ...

Page 50: ...nt sounds for higher note velocities PITCH In PAGES 7 to 12 you can set the basic pitch parameters for each Element You can detune Elements apply Pitch Scaling and so on Also by setting the PEG Pitch Envelope Generator you can control how the pitch changes over time PEG Pitch Envelope Generator Using the PEG you can control the transition in pitch from the moment a note is pressed on the keyboard ...

Page 51: ...illator PITCH and FILTER parameters have been applied as well as the final overall volume of the signal sent to the outputs The signal of each Element is sent at the specified volume to the next Effect section Also by setting the AEG Amplitude Envelope Generator you can control how the volume changes over time n The final volume for all Elements is set in the Total Vol Total Volume parameter Commo...

Page 52: ...litude of each Element to create effects such as vibrato wah and tremolo However the actual available LFO parameters will vary according to the type of Element The LFO is capable of producing a wide variety of effects in various ways By modulating the pitch over an adjustable amount it creates vibrato By modulating the filter over an adjustable range of frequencies it creates wah wah and dynamic f...

Page 53: ...t types are available in the Variation section These range from conventional effects such as Reverb for enhancing the sound to wilder effects such as Distortion for actively changing the sound or creating new sounds n For details about each Effect Type refer to the Effect Type List in the separate Data List System and Insertion Effects The S03 effects sections can be designated as either System or...

Page 54: ...an outboard effect on a single instrument channel Voice Depending on the selected effect type the Dry Wet parameter may not be available For details refer to the Effect Parameter List in the separate Data List booklet Multi Depending on the selected effect type the Dry Wet parameter may not be available For details refer to the Effect Parameter List in the separate Data List booklet The default va...

Page 55: ...tly edited settings Switching Parts On Off In the Multi Edit mode a Part can be switched on off when you press the MUTE button The Part indicator which is muted will flash This lets you mute other Parts in the Multi so that you can listen to the changes to the Part that you are editing Multi Store The edited settings for the current Multi will be lost if you select another Multi or mode To avoid l...

Page 56: ...tion transmitted via MIDI Settings 24 2 octaves 24 2 octaves n This parameter has no effect for Parts set to the Drum mode page 61 4 RevEF Reverb Effect Type Select the Reverb Effect Type here then set the effect s parameters in the following PAGES Settings Details are given in the Effect Type list in the separate Data List 5 Reverb Parameters Set the various Reverb effect parameters Settings The ...

Page 57: ...C Center R63 Right n You can also enter the settings below using the numeric keypad 1 63 L63 L01 64 C Center 65 127 R01 R63 12 SndCho Rev Send Chorus to Reverb Set the send level of the signal sent from the Chorus Effect to the Reverb Effect Settings 0 127 13 VarEF Variation Effect Type Select the Variation Effect Type here then set the effect s parameters in the following PAGES Settings Details a...

Page 58: ...gnal sent from the Variation Effect to the Reverb Effect Settings 0 127 n This can be set only when Variation Connection above is set to SYS When Variation Connection is set to INS appears in the display and the setting cannot be changed 19 SndVar Cho Send Variation to Chorus Set the send level of the signal sent from the Variation Effect to the Chorus Effect Settings 0 127 n This can be set only ...

Page 59: ...art page 20 or the Parameter Table page 22 Voice Selection PAGE 1 Part Mix PAGES 2 to 5 Part General PAGES 6 to 9 Part Tone PAGES 10 to 14 Part Controller PAGES 15 to 21 Part Effect PAGES 22 to 24 1 Voice Selection You can assign a Voice to each Part Use the and buttons to select the Part then select its Voice The display will vary as follows according to the Memory selected n Specify the particul...

Page 60: ... 4 2 NtLmt H Note Limit High Set the lowest and highest notes of the keyboard range for each Part Each Part will only sound for notes played within its specified range Settings C 2 G8 n You can set the lowest and highest notes in the range by pressing notes on the keyboard while holding down the ENTER button n For more information and some example settings see page 41 5 1 VelLmt L Velocity Limit L...

Page 61: ... Settings mono poly n When the Part Mode is set to drum appears in the display and the parameter cannot be set 9 Part Mode This determines whether the Part uses Normal Voices or Drum Voices Settings norm Normal Voice With this setting Normal Voices can be assigned to the Part drum Drum Voice With this setting Drum Voices can be assigned to the Part drumS1 2 Drum Setup 1 2 Used to play commercially...

Page 62: ...ustrated below the velocity will be increased by the specified amount Changes to velocity curve according to VelDepth with offset set to 64 VelSnsDpt 064 KEY ELEM PART OCTAVE PAGE 10 1 VelSnsOfs KEY ELEM PART OCTAVE PAGE 10 1 064 Offset 64 Received Velocity Actual Velocity for tone generator Depth 64 Offset 64 Depth 32 Offset 64 Depth 0 Offset 64 Depth 127 Offset 64 Offset 96 Offset 32 Offset 127 ...

Page 63: ...ed to zero n These three parameters affect both the AEG and the FEG Settings 64 63 Attack Tm Determines the transition time from the moment a key on the keyboard is pressed to the point at which the level of the Voice reaches its peak Positive values will lengthen the transition time and negative values will shorten it Decay Tm Determines the transition time from the point at which the level of th...

Page 64: ...made in PEG Release Level above from when you release your finger from the key 14 1 Vib Rate Vibrato Rate 14 2 Vib Depth Vibrato Depth 14 3 Vib Delay Vibrato Delay Settings 64 63 Vib Rate Determines the speed of pitch modulation Vib Depth Determines the depth or degree of pitch modulation n This Parameter is not available for Drum Parts Vib Delay Determines the amount of time that elapses from whe...

Page 65: ...over the pitch filter and amplitude modulation of the Voice Settings 0 127 MW PMod Set the amount by which the pitch modulation changes when the Modulation wheel is used The larger the setting the greater the depth of control The vibrato effect becomes deeper MW FMod Set the amount by which the filter Cutoff frequency changes when the Modulation wheel is used The larger the setting the greater the...

Page 66: ...le Controller 1 is used Settings 64 63 21 1 AC1 FMod AC1 Filter Modulation Depth 21 2 AC1 AMod AC1 Amplitude Modulation Depth These parameters let you set the depth of control the Control Change messages via Assignable Controller 1 have over the filter and amplitude of the Part Voice Settings 0 127 AC1 FMod Set the amount by which the filter Cutoff frequency changes when Assignable Controller 1 is...

Page 67: ...eing edited or copy Parts n Before entering the Multi Job mode and using the Initialize or Copy function you must select the Multi you wish to use the particular operation on page 37 n For details about how to enter the Multi Job mode see page 28 Performing a Job 1In the Multi Play mode select the Multi Number you wish to perform the Job on 2Press the JOB button to enter the Multi Job mode 3Use th...

Page 68: ...Depth AC1 Variation Control Depth n When you copy the Variation effect data of a Drum Voice the 2 Band EQ effect settings are copied 3 CpyCtl Copy Controller This let you copy the Controller settings for the Voice assigned to the Part Settings 1 16 A All Parts n The following parameters can be copied MW Filter Control MW Pitch Modulation Depth MW Filter Modulation Depth MW Amplitude Modulation Dep...

Page 69: ...diting a Multi The Multi Store screen appears 2Use DEC NO and INC YES buttons to select the destination Multi Number 3When you press the ENTER button you will be prompted for confirmation 4Press the INC YES button to confirm The message Excuting will be displayed while the Job is being processed When it has been completed a Completed message appears and operation returns to the Multi Play mode n Y...

Page 70: ...g 2Press the EDIT button again to disable the Compare function and restore your recently edited settings Switching Elements On Off In Voice Edit Mode an Element can be switched on off when you press the MUTE button This lets you mute other Elements in the Voice so that you can listen to the changes to the Element that you are editing Voice Store The edited settings for the current Voice will be lo...

Page 71: ...xt character 5Repeat Steps 3 and 4 until all the characters have been set for your Voice Name Available numbers and letters 2 1 Total Vol Total Volume 2 2 Total Lvl Total Level Set the output level of the Voice Total Volume determines the overall volume including the applied effect Total Level determines the level of the Voice that is sent to the effect Settings 0 127 3 Mono Poly Select monophonic...

Page 72: ...Variation Effect Control Depth 17 AC1 VarCtl AC1 Variation Effect Control Depth The parameters and settings are the same as those for the Multis For details see pages 58 and 59 Voice Mode Multi Mode Parameters NormalVoice Multi Part Owner s Common Edit LCD parameter name Edit PAGE Manual PAGE Page 4 1 VelSnsDpt Velocity Sensitivity Depth 10 1 62 4 2 VelSnsOfs Velocity Sensitivity Offset 10 2 62 5 ...

Page 73: ... cannot be set 3 Level Set the output level of each Element Settings 0 255 4 Pan Set the Stereo Pan position for each wave Settings Scale L63 Left C Center R63 Right Scale Set the amount by which the sound is panned left and right according to the position of the note on the keyboard n You can also enter the settings below using the numeric keypad 0 Scale 1 63 L63 L01 64 C Center 65 127 R01 R63 5 ...

Page 74: ...caling for each Element according to the position of the note on the keyboard The PchSclCN parameter below is used as the basic pitch for this parameter The higher the value the lower the pitch becomes when playing low notes and the higher the pitch becomes when playing high notes Settings 0 5 10 20 50 100 At 100 adjacent notes are pitched one semitone 100 cents apart PchSclCN Set the basic pitch ...

Page 75: ...from the moment you press a note on the keyboard to the moment you release it The Initial Level and Attack Rate settings determines from what pitch the note starts when it is played and the time it takes to reach the Attack Level pitch setting The Decay 1 and 2 Rates control how long it takes for the pitch to reach the Decay 1 and 2 Levels respectively Finally the Release Rate and Release Level pa...

Page 76: ...istics for other notes will vary in proportion to the EG Rate settings Settings C 2 G8 n You can also set this parameter by pressing the respective note on the keyboard while holding down the ENTER button 12 1 PEGRtVel PEG Rate Velocity 12 2 PEGLvlVel PEG Level Velocity This determines how the Pitch Envelope Generator PEG responds to note velocity Settings 7 7 PEGRtVel Set the velocity sensitivity...

Page 77: ...y ResoVel Set the sensitivity of the selected Resonance parameter to note velocity A positive setting will produce large Resonance changes for notes played harder and smaller changes for notes played more softly 15 FltSclFlag Filter Scale Flag You can set the Filter Scaling type Filter Scaling controls the filter cutoff frequency according to the positions of the notes on the keyboard There are fo...

Page 78: ...ter the sound change FEG Level becomes Filter Scaling Settings By way of example you could set the Levels Offsets and Break Points BP1 to BP4 as follows Here the current Cutoff setting is 64 The Offsets are 4 at BP1 set to note E1 10 at BP2 set to note B2 17 at BP3 set to note G4 and 4 at BP4 set to A5 That is the Cutoff frequencies at each Break Point are 60 74 81 and 68 respectively For other no...

Page 79: ...y 1 and 2 Levels the time it takes between those changes is determined by the Attack Rate and Decay 1 and 2 Rates When the note is released the change in tone is determined by the Release Rate Level settings In the illustration the letters a d indicate the respective Rate R settings for Attack Release The greater the value for each Rate the faster the filter goes to the next set Level in other wor...

Page 80: ...oard to the moment it is released see illustration below You can set different values for each Element Settings 0 255 Amplitude Envelope Generator Settings There are four Rate settings which control how fast the volume changes from one Level to the next and three Level settings which control the actual volume When you play a key the volume goes to the Initial Level at the speed set in Attack Rate ...

Page 81: ...ing to the positions of the notes on the keyboard There are four Break Points used to divide and assign different settings across the keyboard The Levels Offsets at each of Break Point are set in the Level Offset display PAGE 30 n Details about Amplitude Scaling are given later in the section Amplitude Scaling Settings below n The Levels of the Elements themselves are set in the Level PAGE 3 displ...

Page 82: ...e slower the change for lower notes and the faster the change for higher notes Settings 0 15 31 KeyonDelay Determines the time delay between the moment you press a note on the keyboard and the point at which the sound is played You can set different delay times for each Element Settings 0 15 32 1 LFO Wave 32 2 LFO Phase LFO Phase Initialize There are various settings for the LFO The LFO is used to...

Page 83: ...he setting the greater the depth of control LFO FMod Determines the amount depth by which the LFO waveform varies modulates the Filter Cutoff frequency The larger the setting the greater the depth of control LFO AMod Determines the amount depth by which the LFO waveform varies modulates the amplitude of the sound A larger setting means a larger modulation depth 35 1 PLFODelay Pitch LFO Delay 35 2 ...

Page 84: ...e Edit mode the Drum Voice Edit screen in which you were previously editing appears n An overview of the Drum Voices is given on page 26 Drum Common Edit and Drum Key Edit Each Drum Voice consists of multiple Voices assigned to notes across the keyboard C 1 G5 page 26 You can use Drum Common Edit for settings that apply to all Drum Keys in the Drum Voice For the settings of individual Voices Drum ...

Page 85: ...pan position moves randomly each time a key is played L63 Left C Center R63 Right n The numeric keypad can also be used to enter the value as shown below 0 Rnd 1 63 L63 L01 64 C Center 65 127 R01 R63 3 Alt Group Alternate Group Determines the Alternate Group to which the Wave is assigned In a real drum kit some drum sounds cannot physically be played simultaneously such as open and closed hi hats ...

Page 86: ...ttack This determines the Attack Rate speed of the EG Envelope Generator or how long it takes for the sound of the selected drum sound to reach full volume when a note is played Depending on the sound and the Attack Rate set some sounds may decay before the EG has a chance to bring the sound up In other words setting this value too high slow attack may result in an unnatural sound or no sound at a...

Page 87: ... perform 4Use the DEC NO and INC YES buttons to select the parameter for which you wish to perform the Job n This step is not applicable for the Bulk Dump Job n Use the buttons to set the destination Element or Drum Key when using Copy Element CpyElm or Copy Drum Key CpyKey 5When you press the ENTER button you will be prompted for confirmation 6Press the INC YES button to confirm A Completed messa...

Page 88: ...pyKey Copy Drum Key This lets you copy Element Drum Key parameter settings of the Voice being edited to another Element Drum Key in the same Voice 1 Source Element Drum Key Select the source Element Drum Key the data to be copied of the Voice Settings Normal Voice elm1 elm4 Drum Voice C 1 G5 Drum Key C 1 G5 2 Destination Element Drum Key Set the Element Drum Key of the Voice that is to be the dest...

Page 89: ...utton after editing a Voice The Voice Store screen appears 2Use DEC NO and INC YES buttons to select the destination Voice Number 3When you press the ENTER button you will be prompted for confirmation 4Press the INC YES button to confirm The message Excuting will be displayed while the Job is being processed When it has been completed a Completed message appears and operation returns to the Voice ...

Page 90: ... transmitted via MIDI Settings 11 11 3 1 Vel Curve Velocity Curve 3 2 Fixed Vel Fixed Velocity Vel Curve Set the Velocity Curve determining how the strength of the notes played will affect the sound output The Vel Curve parameter is only available if Fixed Velocity below is set to off Settings norm Normal The velocity is in proportion to playing strength how hard you play the keyboard soft1 A soft...

Page 91: ...ntrol Numbers and Control Change messages see the separate Data List 5 FSTxCtlNo Footswitch Transmit Control Number This determines the MIDI Control Change numbers assigned to the Footswitch Settings 0 95 0 32 off 96 PCInc Program Change INC 97 PCDec Program Change DEC n For details about Control Numbers and Control Change messages see the separate Data List n The default factory setting for this ...

Page 92: ...tings the corresponding factory defaults will be overwritten and lost Use the procedure below to restore the factory default settings When you restore the factory default settings all the current settings for the all the Multis and User Voices will be overwritten with the factory defaults Make sure you are not overwriting any important data You should back up any important data to your computer or...

Page 93: ... the tone generator is receiving performance data from both the keyboard directly and the computer Use the setting suggestions below as a guideline specific instructions may differ depending on your computer and the software used When MIDI Echo is enabled on the software computer set the S03 Local Switch to off n When transmitting or receiving System Exclusive data such as with the Bulk Dump funct...

Page 94: ...6 1 TxPgmChng Transmit Program Change On Off 6 2 TxBankSel Transmit Bank Select On Off Determines whether Program Change Bank Select messages executed from the S03 s panel are transmitted via MIDI or not Set this to on when you want to change programs on a connected MIDI device Settings off disable on enable 7 Thru Port You can connect the S03 to a computer via a dedicated serial cable on the TO H...

Page 95: ...4 5 6 7 8 9 10 11 12 13 14 15 16 17 18 19 20 21 22 23 24 25 26 27 28 29 30 31 32 33 34 35 36 37 38 39 40 41 42 43 44 45 46 47 48 49 50 51 52 53 54 55 56 57 58 59 60 61 62 63 00 01 02 03 04 05 06 07 08 09 0A 0B 0C 0D 0E 0F 10 11 12 13 14 15 16 17 18 19 1A 1B 1C 1D 1E 1F 20 21 22 23 24 25 26 27 28 29 2A 2B 2C 2D 2E 2F 30 31 32 33 34 35 36 37 38 39 3A 3B 3C 3D 3E 3F 0000 0000 0000 0001 0000 0010 0000...

Page 96: ...to Time Control 005 Messages which control the duration of portamento or a continuous pitch glide between successively played notes When the parameter Portamento Switch page 96 is set to on the value set here can adjust the speed of pitch change Setting the value to 127 produces maximum portamento time and 0 results in minimum portamento time Data Entry MSB Control 006 Data Entry LSB Control 038 M...

Page 97: ...093 Messages which adjust the send level for the Chorus effect Effect4 Depth Variation Effect Send Level Control 094 Messages which adjust the send level for the Variation effect If Variation effect uses System effect this message sets the send level for the Variation effect If it uses Insertion effect this setting is invalid Data Increment Control 096 Decrement Control 097 for RPN Messages which ...

Page 98: ...ll Sounds Off message is received and sets the corresponding channel to Poly Mode Program Change Messages which determine which voice to select for each Part With a combination of Bank Select you can select not only basic voice numbers but also variation voice bank numbers Channel Aftertouch Messages which let you control the sounds by the pressure you apply to the keys after the initial striking ...

Page 99: ...ed XG System On When this data is received the S03 will switch to XG mode and all the parameters will be initialized accordingly and XG compatible messages such as NRPN and Bank Select messages can be received Since approximately 50ms is required to execute this message be sure to leave an appropriate interval before the subsequent message The S03 responds to this message only when it is set to th...

Page 100: ...iceNum Bulk data cannot be transmitted received because the device number does not match or is set to off Sure Final confirmation Host MIDI HOST SELECT switch has been set to MIDI Host PC2 HOST SELECT switch has been set to PC2 Host Mac HOST SELECT switch has been set to Mac Host off HOST SELECT switch has been set to off BatteryLo The memory backup battery is low memory cannot be backed up Store ...

Page 101: ...he S03 Increase the volume with the VOLUME slider and if a foot controller is connected press it down to the maximum 4 If still no sound is output after step 3 above the problem may be in the global settings of the S03 UTILITY MIDI the settings of any connected MIDI device and or the connecting MIDI cable No sound Relevant Volume Settings Is the volume set appropriately Pages 8 and 15 With the S03...

Page 102: ...meters been set appropriately Cable and Connection Problems Has the audio equipment been connected correctly Page 11 Is the MIDI cable intact and connected properly The sound is distorted Have the effects been set appropriately Pages 56 and 72 Has the volume been set too high Pages 8 and 15 The sound is too soft Has MIDI volume or MIDI expression page 96 been set too low Has the filter cutoff freq...

Page 103: ...nd Scale of Pan setting parameter made to the Voice have no effect Depending on the selected Voice or the settings of related parameters changes to these parameters may have little or no audible effect Cannot find the Drum Voice Drum Voices are selected differently than Normal Voices Page 34 Edits made to the Drum Voice have no effect Has the Part Mode parameter been set correctly Page 61 Editing ...

Page 104: ...operly outputting sound when you play the keyboard 1 Disable keyboard control over the tone generator by setting Local Sw PAGE 2 in the MIDI mode to off In this condition playing the keyboard does not produce any sound Page 93 2 Directly connect the MIDI cable in question one end to the MIDI IN terminal of the S03 the other to the MIDI OUT This sets up an external MIDI loop routing the keyboard of...

Page 105: ...S TERMINALS PHONES Stereo Phone OUTPUT Phone L MONO R DC IN FOOT CONTROLLER FOOT SWITCH TO HOST MIDI IN OUT THRU DISPLAY LCD Back Lit POWER SUPPLY Yamaha AC adaptor PA 3B included May not be included in your area Please check with your Yamaha dealer POWER CONSUMPTION 7W 120V 7 5W 230V MAXIMUM OUTPUT LEVEL OUTPUT 9 2dbm 10k ohms PHONES 0 2dbm 33 ohms DIMENSIONS 976 W x 285 D x 87 H mm WEIGHT 6kg Sp...

Page 106: ...diting Individual Parts 55 Common Effect Basics 49 Common Effect Multi 56 Common Effect Voice 71 Common General Basics 49 Common General Multi 56 Common General Voice 71 Compare Function Multi Mode 55 Compare Function Voice Mode 70 Connecting Controllers 14 Connecting External MIDI Equipment 12 Connecting to a Personal Computer 13 Connecting to External Audio Equipment 11 Connections 11 Connectors...

Page 107: ...smit Channel 94 MODE buttons 8 MODULATION wheel The Controls Connectors 8 Modulation Wheel Using Controllers 44 Mono Poly Multi 61 Mono Poly Voice 71 Moving the Cursor Position 32 Multi Edit Reference 55 Multi Edit Mode About the Modes 19 Multi Edit Mode Selecting a Mode 28 Multi Job 67 Multi Job Mode About the Modes 19 Multi Job Mode Selecting a Mode 29 Multi Mode About the Modes 19 Multi Mode Re...

Page 108: ...94 To call up the GM XG Drum memory 34 To call up the User Drum memory USDR1 USDR2 34 To call up the XG SFX Kit memory 34 TO HOST terminal 10 Tone Generator Overview of the S03 17 Tone Generator Utility 90 Total Level 71 Total Lvl Total Level 71 Total Vol Total Volume Multi 56 Total Vol Total Volume Normal Voice 71 Total Volume Multi 56 Total Volume Normal Voice 71 Trans Ch MIDI Transmit Channel 9...

Page 109: ...MEMO ...

Page 110: ...a AB J A Wettergrens Gata 1 Box 30053 S 400 43 Göteborg Sweden Tel 031 89 34 00 DENMARK YS Copenhagen Liaison Office Generatorvej 8B DK 2730 Herlev Denmark Tel 44 92 49 00 FINLAND F Musiikki Oy Kluuvikatu 6 P O Box 260 SF 00101 Helsinki Finland Tel 09 618511 NORWAY Norsk filial av Yamaha Scandinavia AB Grini Næringspark 1 N 1345 Østerås Norway Tel 67 16 77 70 ICELAND Skifan HF Skeifan 17 P O Box 8...

Page 111: ...oduct use only high quality shielded cables Cable s supplied with this product MUST be used Follow all installation instructions Failure to follow instructions could void your FCC authorization to use this product in the USA 3 NOTE This product has been tested and found to comply with the requirements listed in FCC Regulations Part 15 for Class B digital devices Compliance with these requirements ...

Page 112: ...brary English versions only http www2 yamaha co jp manual english M D G Pro Audio Digital Musical Instrument Division Yamaha Corporation 2001 Yamaha Corporation V654540 101MWCP3 3 01A0 Printed in Japan This document is printed on chlorine free ECF paper with soy ink ...

Reviews: