206
Chapter 17—Remote Control
01V96—Owner’s Manual
2 Press the DISPLAY ACCESS [DIO/SETUP] button repeatedly until the
DIO/Setup | Remote page appears, then set the TARGET parameter to USER
DEFINED.
You can now use the MIDI Remote function. Refer to the previous section for more infor-
mation on using the MIDI Remote function.
3 Move the cursor to the desired bank button (BANK parameter buttons 1–4),
then press [ENTER].
4 Press the [SEL] buttons for the desired channels.
Currently-assigned MIDI messages appear in the ON and FADER sections.
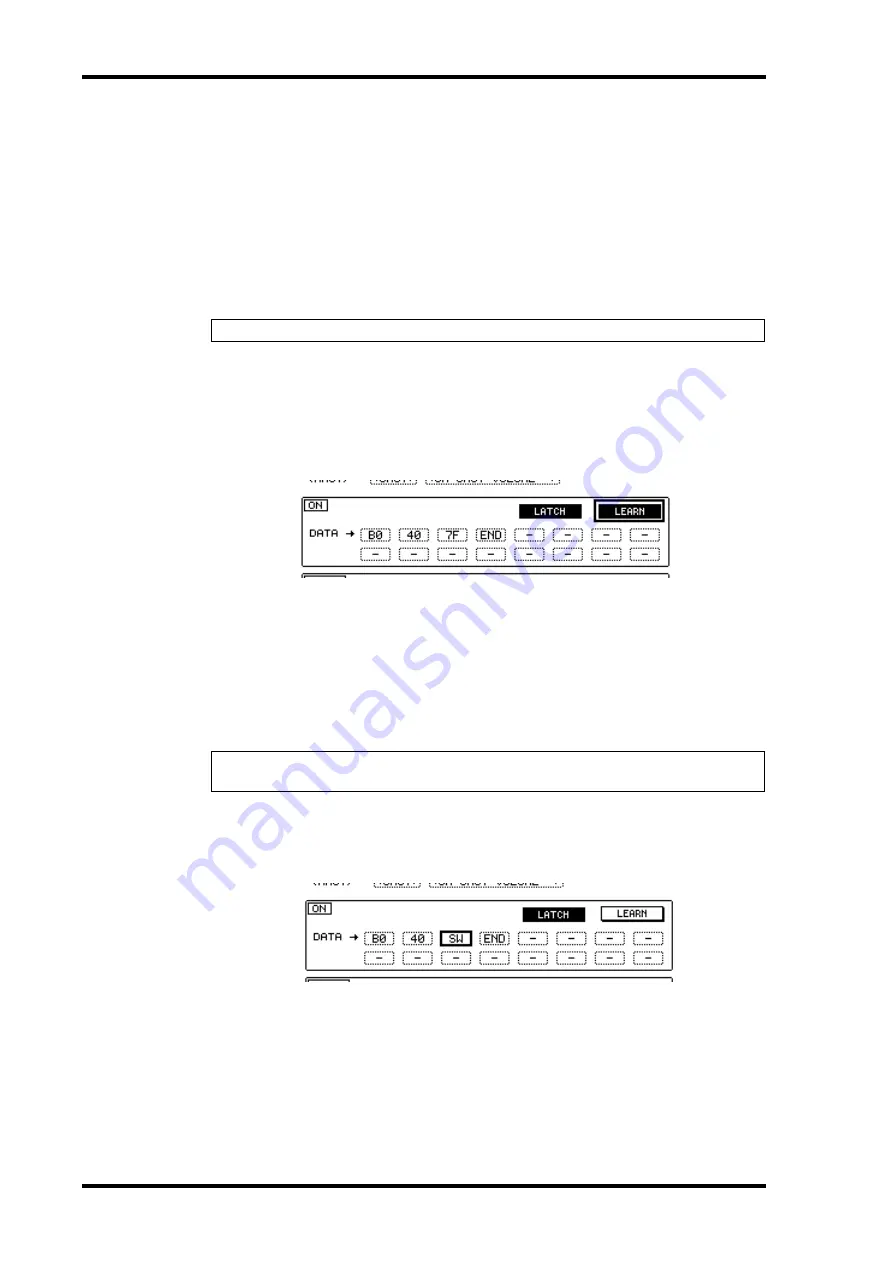
5 Move the cursor to the LEARN button in the ON section, then press [ENTER].
MIDI messages received at the MIDI IN port of the 01V96 will be assigned to the DATA
parameter boxes in the ON section.
6 Press and hold down the MIDI keyboard foot switch.
The MIDI Hold On message is assigned in the DATA parameter box.
MIDI messages are described below:
•
00–7F
............................. MIDI messages are expressed in hexadecimal.
•
END
............................... This message indicates the end of MIDI messages. Subsequent
messages assigned in the DATA parameter boxes will be
ignored.
•
–
...................................... This message indicates that no messages are assigned to the
DATA parameter boxes.
7 While continuing to hold down the foot switch, turn off the LEARN button.
8 Move the cursor to the third parameter box (“7F” in this example), then
rotate the Parameter wheel to change the value to SW.
“SW” is a variable that changes depending on the [ON] button’s on/off status. You can use
the following variables in MIDI messages.
•
SW
.................................. This variable is selectable only in the DATA parameter boxes of
the ON section. When the [ON] buttons are turned on, “7F”
(127 in decimal) is output. When the [ON] buttons are turned
off, “00” (0 in decimal) is output.
•
FAD
................................ This variable is selectable only in the DATA parameter boxes of
the FADER section. When you operate the faders, continuously
Tip:
You can also choose the desired channels using the ID, SHORT, and LONG parameters.
Tip:
When you click the LEARN button to assign MIDI messages, the 01V96 automatically
recognizes the end of the messages and assigns END and “–.”
Summary of Contents for 01V96
Page 1: ...E Owner s Manual Keep This Manual For Future Reference ...
Page 46: ...46 Chapter 4 Connections and Setup 01V96 Owner s Manual ...
Page 96: ...96 Chapter 7 Input Channels 01V96 Owner s Manual ...
Page 108: ...108 Chapter 8 Bus Outs 01V96 Owner s Manual ...
Page 130: ...130 Chapter 10 Input Output Patching 01V96 Owner s Manual ...
Page 160: ...160 Chapter 14 Internal Effects 01V96 Owner s Manual ...
Page 170: ...170 Chapter 15 Scene Memories 01V96 Owner s Manual ...
Page 184: ...184 Chapter 16 Libraries 01V96 Owner s Manual ...
Page 224: ...224 Chapter 18 MIDI 01V96 Owner s Manual ...
Page 329: ...Index 329 01V96 Owner s Manual ...


