background image


X100 Series Main User Manual

         59

IN

ST

A

LL

 &

 C

O

N

N

EC


SE

TU

P

CO

N

FIG

U

RE

RE

CO

RD

IN

G

 S

O

FT

W

A

RE

CO

N

FIG

U

RE

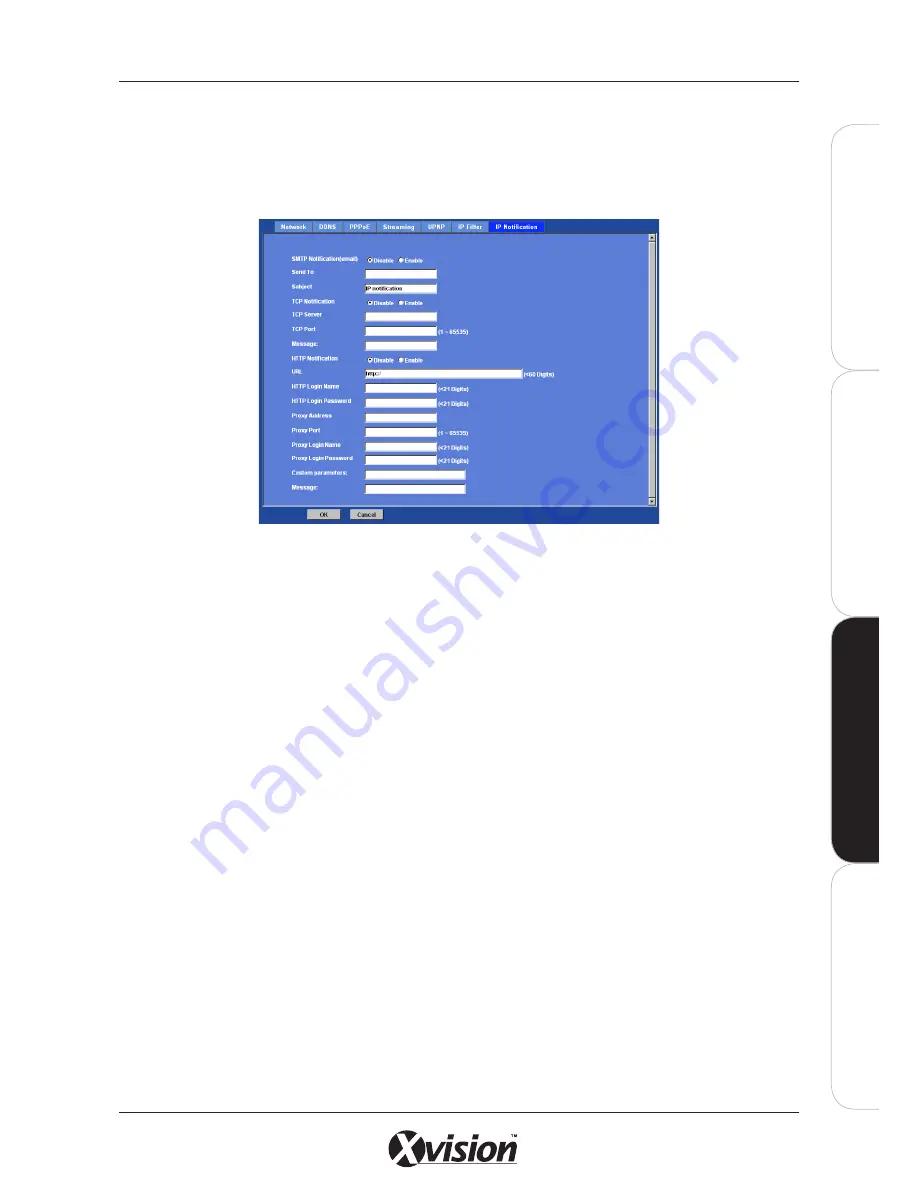
IP NOTIFICATION TAB

If the IP address of the camera changes, the IP Notification function allows the camera to send out an 
email to alert someone if the function is enabled. 

SMTP Notification

 (e-mail): 

Enable or disable the SMTP service using the toggle buttons. 

 - If enabled, the ‘Send to’ and ‘Subject’ fields need to be filled. 
 - Send To: Type the receiver’s e-mail address. This address is used for reply mail. 
 - Subject: Type the subject/title of the E-mail.  

TCP Notification

Enable or disable the TCP service using the toggle buttons. 

 - If enabled, then the ‘TCP Server’, ‘TCP Port’, and ‘Message’ fields need to be filled. 
 - TCP Server: Type the server name or the IP address of the TCP server. 
 - TCP Port: Set port number of TCP server. 
 - Message: The message will be sent to FTP server. 

HTTP Notification

Enable or disable the HTTP service using the toggle buttons. 

 - If enabled, then the fields below need to be filled. 
 - URL: Type the server name or the IP address of the HTTP server. 
 - HTTP Login name: Type the user name for the HTTP server. 
 - HTTP Login Password: Type the password for the HTTP server. 
 - Proxy Address: Type the server name or the IP address of the HTTP Proxy. 
 - Proxy Port: Set port number of Proxy. 
 - Proxy Login name: Type the user name for the HTTP Proxy. 
 - Proxy Login Password: Type the password for the HTTP Proxy. 
 - Custom parameter: Set specific parameters for the HTTP Server. 
 - Message: The message will be sent to HTTP server.

Summary of Contents for X100 Series

Page 1: ...User Manual X100 SERIES ...

Page 2: ... Dome Camera 18 1 5 X100B IP Bullet Camera 23 1 6 X100T IP Body Camera 26 1 7 X10⁴S Vandal Resistant IP Speed Dome 30 1 8 X100VS Video Server Codec 33 SETUP 36 2 1 Setting up your Network 36 2 2 Search and Setup using IPWizard II 37 2 3 Search and Setup using Windows UPnP 42 2 4 Setup behind a NAT Router 43 2 5 Access your Camera using your Web Browser 44 CONFIGURE 45 3 1 Web Browser Interface 45 ...

Page 3: ...etup 100 4 5 1 System Tab 100 4 5 2 Camera Tab 102 4 5 3 User Tab 104 4 5 4 Address Book Tab 105 4 5 5 Notification Tab 106 4 6 Schedule Setup 108 4 6 1 Daily Tab 109 4 6 2 Weekly Tab 109 4 6 3 Special Day Tab 110 4 6 4 Adjusting Time Schedules 111 4 6 5 Record Setup 112 4 7 Start Stop Monitor 114 4 8 E Map 116 4 9 Two Way Audio 117 4 10 PTZ Control 118 4 11 Alarm Setting 119 4 11 1 Setting Adding...

Page 4: ...0 4 22 Uninstall 141 APPENDICES 142 A Connection Configuration 142 B Enabling UPnP Settings 143 C Configure Port Forwarding Manually 145 D DynDNS org DDNS Service 147 E 3GPP 151 F PING IP Address 152 G Troubleshooting and FAQs 153 SPECIFICATIONS 158 X100C Wireless IP Cube Camera 158 X104P Wireless Pan Tilt Zoom IP Camera 160 X100D IP Dome Camera 162 X100V Vandal Resistant IP Dome Camera 164 X100B ...

Page 5: ...04P Choice of compressions and multiple streams for optimum performance in any environment Up to 30 fps in VGA mode 15 fps in Megapixel mode Digital Zoom for detailed viewing Remote Viewing from anywhere in the world using any standard PC or Mac web browser Supports 3G Mobile Viewing on all popular Smart Phones Intelligent Motion Detection with Automatic Email Alerts Local Alarm Notifications when...

Page 6: ...g angle Power Over Ethernet Designed for Wall or Ceiling Mounting Suitable for indoor or outdoor use X100B IP BULLET CAMERA IR LEDs for 20m Night Vision 4 0mm Lens for 50 viewing angle Power Over Ethernet Designed for Wall or Ceiling Mounting Suitable for indoor or outdoor use X100T IP BODY CAMERA C CS Mount Lens with Auto Iris Support Supplied with a 4 0mm lens as standard for 50 viewing angle Op...

Page 7: ...el System Requirements for Viewing and Recording Software Estimated Total Display and Recording FPS QVGA 120 120 to 360 360 to 540 540 to 960 960 VGA 30 30 to 90 90 to 135 135 to 240 240 SXGA 8 8 to 23 23 to 34 34 to 60 60 CPU Intel P4 2 4GHz Intel P4 3 2GHz Intel Pentium D 950 3 4GHz Intel Core 2 Duo E8600 3 3GHz Intel Core 2 Quad Q9650 3 0GHz RAM 512 MB 1 GB 2 GB Display 1024 x 678 resolution or...

Page 8: ...ty unless the camera is designed for outdoor use Ensure the camera is well ventilated It should not be placed near heated devices such as radiators or heat elements The camera should be installed on a firm and solid surface Wall or Ceiling mounting the camera should be done with care to ensure the camera weight can be supported safely Do not cut the camera cables this will void the warranty Only u...

Page 9: ... WIRELESS IP CUBE CAMERA CONNECTIONS FRONT VIEW Microphone Focus Ring Reset Button SD Card Slot Network Port Audio Output Socket 12V DC Power Socket Wireless Antenna Connector Night Vision LEDs Network Type LED Green Orange Green LED indicates Wired connection is active Orange LED indicates Wireless connection is active Insert SD Card for on board recording Ensure only the 12V DC Power Adaptor sup...

Page 10: ... configure using your PC See SETUP on page 36 For Wireless Connection Attach the Wireless Antenna to the camera Configure your camera s IP settings using a Wired connection before you start See SETUP on page 36 For Audio Connect the 3 5mm microphone Audio Out Socket to an audio output device such as a speaker with an amplifier for voice alerting or for enabling the 2 Way Audio function Resetting y...

Page 11: ...tware CD Lens Lens Mechanism Camera Body Camera Base Microphone Network Type LEDs Green Orange Green LED indicates Wired connection is active Orange LED indicates Wireless connection is active The body of the camera can pan left to right 355 The Lens Mechanism can tilt up down 100 Focus Ring Night Vision LEDs Network Port 12V DC Power Socket Ensure only the 12V DC Power Adaptor supplied with the c...

Page 12: ...e camera to the bracket 4 Connect the 12V DC Power Adaptor and LAN cable to camera 5 The camera is now ready for you to setup and configure using your PC See SETUP on page 36 Lens Adjustment Make any lens focus adjustments after you have connected the camera and have setup live viewing via your PC To adjust the lens open the Dome Cover by turning it anti clockwise and rotate the Focus Ring For Wir...

Page 13: ...P camera sometimes restarting the device will make the system revert back to a normal state To reset hold the button for at least 5 seconds The camera will restore factory settings reboot Note Restoring the factory default setting will lose all the previous settings including the IP address You will need to run the IPWizard II program to re configure the camera to enable it to work properly again ...

Page 14: ... clockwise to remove Reset Button Network Port Status LEDs INTERNAL CONNECTIONS To access the internal connections turn the dome base anti clockwise to uncover the dome housing Green LED indicates connection is active Orange LED indicates power is ON Remove when inserting cables through the side of the dome Terminal Block VCC12 GND DIGITAL_IN ALARM_OUT AUDIO_IN AUDIO_OUT AUDIO_GND Power Cable with...

Page 15: ...ble and 12V DC Cable if using Power over Ethernet 12V DC Power is not required 3 Feed the cables through the hole 4 Use the screws and wall plugs supplied to fix the mounting base 5 Insert the cables through the side cable exit or from the rear of the camera Holes for fixing base to wall or ceiling Holes for fixing base to wall or ceiling Push cables through the side cable exit Push cables through...

Page 16: ...o setup and configure using your PC See SETUP on page 36 Note Incorrect wiring may cause damage to the camera Please ensure and terminal connections are fitted correctly VCC12 GND DIGITAL_IN ALARM_OUT AUDIO_IN AUDIO_OUT AUDIO_GND Power Cable Power Adaptor to Mains Power INSTALL CONNECT CAMERA DIRECTION ADJUSTMENT Focus Ring Camera bracket For Horizontal Adjustment Using an Optional Lens The X100D ...

Page 17: ...Screw the new lens onto the board mount and set the required focus by turning the lens 4 Replace the dome cover once all adjustments have been made For Audio Connect an external Microphone for monitoring audio Connect an audio output device such as a speaker with an amplifier for voice alerting or for enabling the 2 Way Audio function See table below for details on connection Audio and Alarm Conne...

Page 18: ...ns use the Allen Key to open the screws and uncover the dome housing Dome Cover Green LED indicates Wired connection is active Orange LED indicates power is ON Power Cable with terminal connections Side Exit Fitting Stopper User s Manual Software CD Terminal Block VCC12 GND DIGITAL_IN ALARM_OUT AUDIO_IN AUDIO_OUT AUDIO_GND INSTALL CONNECT Tamper Resistant Screw Fittings Dome Housing Top Cable Exit...

Page 19: ... mark up screw positions and make a hole in the wall or ceiling to insert the LAN cable and 12V DC Cable if using Power over Ethernet 12V DC Power is not required 4 Feed the cables through the hole 5 Use the screws and wall plugs supplied to fix the mounting base 6 Insert the cables through the top or side cable exit INSTALL CONNECT Position hole so cables can be pushed through the top or side cab...

Page 20: ...ise for FAR adjustment until you get the desired view Next make the Focal Adjustment by rotating the screw anti clockwise for TELE adjustment and Clockwise for WIDE adjustment until you get the desired view After adjustment tighten both screws to set the Zoom and Focus Rings INSTALL CONNECT Camera bracket CAMERA DIRECTION ADJUSTMENT For Horizontal Adjustment Camera s Tilt bracket For Vertical Angl...

Page 21: ...to Iris lens See AUTO IRIS on page 61 For Audio Connect an external Microphone for monitoring audio Connect an audio output device such as a speaker with an amplifier for voice alerting or for enabling the 2 Way Audio function See table below for details on connection Audio and Alarm Connections Grouping Terminal Name Connect to POWER VCC12 Positive Power Cable GND Negative Power Cable ALARM SENSO...

Page 22: ... at least 5 seconds The camera will restore factory settings reboot Auto Iris Lens Remember to calibrate the Auto Iris lens once the camera has been set up and configured on the network See AUTO IRIS on page 61 INSTALL CONNECT Note Failure to calibrate the Auto Iris lens will result in the picture becoming dark over time Note Restoring the factory default setting will lose all the previous setting...

Page 23: ...ware CD IDENTIFY PARTS 1 5 X100B IP BULLET CAMERA CONNECTIONS ON TRAILING LEAD Audio Output Socket Microphone In Socket Alarm I O connections Network Port with Status LEDs Green LED indicates Wired connection is active Orange LED indicates power is ON 12V DC Power Socket Reset Button Ensure only the 12V DC Power Adaptor supplied with the camera is used SIDE VIEW Sun Rain Shield Bracket Trailing Le...

Page 24: ...e LAN cable and 12V DC Power Adaptor to camera if using Power over Ethernet 12V DC Power Adaptor is not required 6 The camera is now ready for you to setup and configure your camera using your PC See SETUP on page 36 For Audio Connect the 3 5mm microphone Audio In Socket to an external Microphone for audio monitoring Connect the 3 5mm microphone Audio Out Socket to an audio output device such as a...

Page 25: ...85 Grey Not used Resetting your camera The Reset Button is used to restore the factory default settings If you are experiencing problems with the IP camera sometimes restarting the device will make the system revert back to a normal state To reset hold the button for at least 5 seconds The camera will restore factory settings reboot Note Restoring the factory default setting will lose all the prev...

Page 26: ...s Ring Alarm I O connections Network Port with Network Type LEDs Green LED indicates Wired connection is active Orange LED indicates power is ON 12V DC Power Socket Ensure only the 12V DC Power Adaptor supplied with the camera is used SIDE VIEW Auto Iris Lens Connection 1 2 3 4 5 6 AUDIO OUT 12V DC DI DO LAN RST Reset Button Audio Output Socket CS Mount Lens Adaptor 12V DC Power Adaptor User s Man...

Page 27: ...V DC Power is not required 2 Feed the cables through the hole 3 Use the screws and wall plugs supplied to fix the bracket on a wall or ceiling as shown 4 Adjust the camera direction and angle of view as required using the bracket Make any lens focus adjustments using the manual Focus Ring after you have connected the camera and have setup live viewing via your PC Focus Ring To Power To Network Foc...

Page 28: ...from the camera body 2 Screw the new lens onto the camera and set the required focus by turning the lens focus ring If you are replacing the lens with a VARIFOCAL lens the zoom and focus should be adjusted using the separate zoom and focus rings If you are replacing the lens with a AUTO IRIS lens ensure the Auto Iris Lens cable is connected to the corresponding connection on the camera s side 3 Wh...

Page 29: ...28 viewing angle Calibration required see page 61 For Audio Connect the 3 5mm microphone Audio Out Socket to an audio output device such as a speaker with an amplifier for voice alerting or for enabling the 2 Way Audio function Alarm and RS485 Connections Grouping Pin Connect to ALARM SENSOR Optional 1 12V DC Power 60mA Max 2 Alarm Sensor Input 3 GND 4 Alarm Output RS485 5 RS485 Not used 6 RS485 N...

Page 30: ...ocket Alarm I O connections Note An optional Wall mount bracket is available for mounting the camera against a wall Network Port with Status LEDs Green LED indicates Wired connection is active Orange LED indicates power is ON 12V DC Power Socket Reset Button Ensure only the 12V DC Power Adaptor supplied with the camera is used SIDE VIEW Ceiling Mount Trailing Lead Allen Key 12V DC Power Adaptor Us...

Page 31: ...is not required 5 The camera is now ready for you to setup and configure your camera using your PC See SETUP on page 36 Screw Dome Housing to Ceiling Mount using the Allen Key provided Hole to feed trailing lead through the ceiling Hole to feed trailing lead through the wall Fitting the optional Wall Bracket 1 Make a hole in the wall where the camera is to be installed and use the screws and wall ...

Page 32: ...Grouping Cable Name Colour Connect to ALARM SENSOR Optional DI Green White Alarm Sensor Input DO Orange White Alarm Output 12V DC Brown White Alarm Output Power 12V DC 50mA Max GND Blue White Alarm Sensor Ground RS485 RS485 Purple White Not Used RS485 Grey Not Used Resetting your camera The Reset Button is used to restore the factory default settings If you are experiencing problems with the IP ca...

Page 33: ... STATUS Microphone In Socket Status LED Green LED indicates Wired connection is active The LED will flash when a user accesses the unit Reset Button 12V DC Power Socket Ensure only the 12V DC Power Adaptor supplied with the camera is used Audio Video Output Cable FRONT VIEW 12V DC OUT DI DO RS485 LAN BNC Video Input Network Port 12V DC Out Power Socket VIDEO IN Alarm I O connections Power Cable fo...

Page 34: ...l Microphone Connect the 3 5 microphone Audio In Socket to an external Microphone or your camera s Audio Output for audio monitoring Connect an A V device Use the Audio Video Output Cable to connect Audio Video Out to a Monitor DVR or similar device The white connection is for Audio the yellow connection is for Video The Audio output can be used to connect to a speaker with an amplifier for voice ...

Page 35: ...upported are Pelco D Pelco P Resetting your camera The Reset Button is used to restore the factory default settings If you are experiencing problems with the IP camera sometimes restarting the device will make the system revert back to a normal state To reset hold the button for at least 5 seconds The camera will restore factory settings reboot Note Restoring the factory default setting will lose ...

Page 36: ...orities for setting operating and managing the functions of the IP Camera Security passwords can be set to enable other users to access and control the system More than one user s PC can VIEW monitored images of one network camera INTERNET X100 IP Camera Hub Switch or Router PC or Laptop SEARCH AND SETUP When you have installed your IP camera you have 2 easy ways to locate it on the network By usi...

Page 37: ...h the software USING THE IPWIZARD II TO SEARCH FOR YOUR IP CAMERA 3 Launch the software Click SEARCH The software will search the network for any active IP devices 4 All active devices will be listed in the interface window Find your camera and click VIEW The camera image will appear in the lower right hand window Double click on the active device in the list to view your camera live in Internet E...

Page 38: ...ally It is often used in networks to identify a device or location constantly As default your IP camera will be given a Static IP address 192 168 0 100 If another network device has the same IP address then it must be turned off until a new IP address is assigned during configuration DHCP IP Using Dynamic Host Configuration Protocol IP means your camera s IP address may be updated or changed from ...

Page 39: ...SS SETTINGS for X100C and X104P Wireless IP Cameras All other IP cameras in the X100 Series are WIRED ONLY and these settings cannot be applied to them go to Step 10 on page 41 to continue with WIRED setup 7 Click WIRELESS to change your wireless connection settings You will need your Wireless Network and Security settings for this To go exit or go back to the previous window without saving any ch...

Page 40: ...rm your settings by clicking OK To change any details click CANCEL and edit the information in the WIRELESS menu 9 The IPWizard II will begin configuring the camera to your specifications then prompt you to unplug the Ethernet cable to activate the wireless settings Follow the on screen instructions to TEST your wireless settings ...

Page 41: ...eady to access your IP Camera s web configuration page where you can adjust the camera settings SETUP See the following pages for alternative methods to search and setup your camera instead of using IP Wizard II Search and Setup by Windows UPnP see page 42 Setup behind a NAT Router see page 43 After you have setup your camera access it using your web browser see page 44 ...

Page 42: ...eras and video server are UPnP enabled devices If your PC Windows XP or Vista operating system is UPnP enabled the IP Camera will be very easy to locate on the network USING UPnP TO SEARCH FOR YOUR IP CAMERA 1 Go to your Desktop My Network Places 2 Click the IP Camera Your default browser will connect to the Camera automatically Note UPnP search and setup is only available on Windows Vista and XP ...

Page 43: ...ic IP also the port forwarding or Virtual Server function of the router needs to be setup However if your NAT router supports UPnP feature it can be very easy to achieve NAT traversal automatically To do this enable the NAT traversal feature which will attempt to automatically configure the router to allow access to the camera INSTALLING THE IP CAMERA WITH A UPnP ROUTER 1 Enable UPnP option of you...

Page 44: ...ollowing default details User Name admin Password Leave the PASSWORD field blank Depending on your browser s security settings the Web page may prompt a Security Warning window If so select YES to install and run the ActiveX control on your PC otherwise the system will load the ActiveX silently After the ActiveX control has installed and is running the camera image will be displayed as shown SETUP...

Page 45: ... this mode Shows information of the connected camera such as encoder format image resolution frame per second and bitrate Video Profile Language Select Viewer Data Client Setting Button PTZ Control X104P X104S only Main Settings Button Streaming Protocol Select streaming protocol depending on the networking environment Press to Enter Full Screen Mode or Enable Audio For Pan Tilt Zoom functions see...

Page 46: ...shown RECORD Press the RECORD button to start recording The video file will be saved as ASF format on your PC Press Stop to stop recording Select BROWSER to save the file in a selected folder click OK to continue The files will be named in the format Video_yyyymmddhhmmss avi The ASF files can be played back using a standard Windows Media Player but it will need DixectX 9 0 or later version to be i...

Page 47: ...ck OK to continue Saved images can be opened in your default image application VOICE The VOICE function allows you to control the speaker and microphone levels of the camera There are two control bars for speaker and microphone volume respectively Adjust these control bars to change the audio MUTE will mute the speaker output STATISTICS A window will be popup to show the statistical information of...

Page 48: ...48 X100 Series Main User Manual INSTALL CONNECT SETUP CONFIGURE RECORDING SOFTWARE CONFIGURE ABOUT Click ABOUT to show camera information ...

Page 49: ...ure Network settings such as DHCP DDNS 3GPP PPPoE and UPnP Page 50 Camera Adjust IP camera parameters Page 60 System Configure System Information Date Time Maintenance and view System Log files Page 64 Video Configure bit rate and frame rate of video profiles Page 68 Audio Configure Audio Settings Page 71 User Setup User Names Passwords and Login Privileges Page 72 E Mail Setup E Mail configuratio...

Page 50: ... IP address Subnet Mask and Gateway If you do not select Obtain an IP address automatically then you need to enter these network parameters manually Obtain DNS Domain Name System from DHCP Check this box when a DHCP server is installed on the network and provides a DNS service Primary DNS and Secondary DNS If you do not select Obtain DNS from DHCP then you need to enter these parameters manually H...

Page 51: ...g a wired connection ensures greater secrecy while making changes You will need your Wireless Network and Security settings for this These settings should always be made in the camera first and secondly in the wireless access point This ensures that the device is always accessible when making changes WIRELESS SETTINGS CAN BE CONFIGURED USING EASY INSTALLATION OR MANUALLY Setting Easy Installation ...

Page 52: ...TO WIRED IF CABLE CONNECTED OTHERWISE WIRELESS Note that wired connection will take priority Type Select a WLAN mode either from INFRASTRUCTURE or AD HOC mode SSID Service Set Identifier This is the name of the wireless network the camera is configured for The field accepts up to 32 alphanumeric characters The name must be exactly the same as that used in the wireless access point or the connectio...

Page 53: ...t is DDNS Dynamic Domain Name Server Your Internet Service Provider ISP provides you at least one IP address which you use to connect to the Internet The address you get may be static meaning it never changes or dynamic meaning it s likely to change periodically Just how often it changes depends on your ISP A Dynamic IP address complicates remote access since you may not know what your current WAN...

Page 54: ...t up a web or a FTP server then the Dynamic Domain Name Server is necessary However if your camera is behind a NAT router you will not need to enable this feature because your NAT router should take care of this job The following options and fields are available in the DDNS Tab you will need your registered DDNS details to complete this DDNS Enable or disable the DDNS service using the toggle butt...

Page 55: ...r ISP The IP camera s PPPoE information should be setup in a LAN environment to setup before connecting to the xDSL modem Once setup power on the camera again and it will dial the ISP and connect to the WAN through the xDSL modem The procedures are Connect to a LAN by DHCP or Fixed IP Access the device enter Setting Network PPPoE as below PPPoE Enable or disable the PPPoE service using the toggle ...

Page 56: ...000 to 50999 User can specify a number between 1024 and 65535 UPnP TAB What is UPnP UPnP is short for Universal Plug and Play which is a networking architecture that provides compatibility among networking equipment software and other peripherals The X100 IP range of cameras and video server are UPnP enabled devices If your operating system is UPnP enabled the device will automatically be detected...

Page 57: ...amera will attempt to configure port mapping in a NAT router on your network using UPnP Note that UPnP must be enabled in the NAT router first Port Range The port range will open in NAT router External IP address Shows the IP address and port for WAN access through Internet If NAT traversal is configured successfully you can use this IP address and port to access the camera The external IP address...

Page 58: ...ed security you can allow or denying access to the camera by inputting different user s IP addresses in this window The camera will filter the IP addresses that try to access it remotely IP Filter Enable or disable the IP Filter service using the toggle buttons IP Filter Policy Choose the filter policy you would like to activate either to DENY or ALLOW the chosen IP addresses IP Filter List Input ...

Page 59: ...rver TCP Port and Message fields need to be filled TCP Server Type the server name or the IP address of the TCP server TCP Port Set port number of TCP server Message The message will be sent to FTP server HTTP Notification Enable or disable the HTTP service using the toggle buttons If enabled then the fields below need to be filled URL Type the server name or the IP address of the HTTP server HTTP...

Page 60: ...ximum Exposure Time You can limit the maximum exposure time of the image sensor The larger value means a longer exposure time The Exposure Time setting should be set to 1 30 in normal use If low light use is required then it can be reduced the more it is reduced the brighter the image will be however since the camera uses Digital Slow Shutter technology the picture will suffer from motion blur if ...

Page 61: ...se the toggle bars to adjust the threshold of the setting using the current value as a benchmark AUTO The camera will judge the darkness to switch automatically into Day or Night mode NIGHT DAY MODE Set the Day or Night mode manually if required SCHEDULE Set the schedule for Day or Night mode switching DELAY TIME In Auto mode set the delay time between mode shifts to avoid wear and tear of machine...

Page 62: ...ngs saved to the IP camera To ADD any preset positions to the IP camera go back to the Live View interface and go to PTZ CONTROL see page 86 Any saved preset will be shown in the main window area Select any preset to modify its Preset Number Name or to enable a Home Position Up to 128 preset positions can be allocated Modify here once Preset has been selected Preset Number Name details will be sho...

Page 63: ...our will be displayed in the main window above Select a tour by highlighting it in the main window then begin to assign preset positions to it using the window on the right hand side Running Enable or disable the Tour selected using the toggle buttons Preset Use this menu to set the sequence of the tour A maximum of 16 points can be assigned per tour The selected preset position is added in the Se...

Page 64: ... the IPWizard II once the device is named Software Version This information shows the software version of the device Network LED Enable or disable the Network LED using the toggle buttons Power LED Wireless LED Enable or disable the Power LED using the toggle buttons Log The system log information of the camera is shown here It includes Time and Date information along with details of remote access...

Page 65: ... Click this option to set time and date manually Synchronize with NTP Click this option if you want to synchronize the device s date and time with those of time server called NTP server Network Time Protocol NTP Server Type the host name or IP address or domain name of the NTP server NTP Sync Interval Select an time between 1 and 23 hours at which you want to adjust the camera s time to the NTP se...

Page 66: ... this button If necessary it will then be possible to return to the previous settings if settings are changed or there is unexpected camera errors Restore Setting Click the BROWSE button to locate the saved backup file and then click the RESTORE SETTING button The settings will be restored to the previous configuration Firmware Upgrade The device supports upgrading of new firmware the software tha...

Page 67: ...ick on the RESTART button to restart the camera without changing any of the network settings It means the IP address of the device will not change after a firmware upgrade Click OK to confirm changed settings Click Cancel to cancel any changes WARNING The download firmware procedure cannot be interrupted If the power and or network connection are broken during the download procedure it might possi...

Page 68: ...lect either Megapixel or VGA mode to operate the camera The camera will take time to reboot when switching to Megapixel or VGA mode Text Overlay Setting Information can be embedded over the camera image including the date time and or text Video Profile You can choose either VGA MULTI PROFILE or MEGA MULTI PROFILE mode VGA Multi profile mode can offer H 264 MPEG4 and JPEG streams up to VGA resoluti...

Page 69: ...uality level to set the video quality rather than bit rate The quality level is between 1 and 100 The higher the value the better quality but it will consume a higher bandwidth Max Frame Rate Define the targeted Frame Rate of this profile For example set the frame rate to 15 fps then the image will be updated to 15 frames per second Set a reasonable Max Frame Rate versus video quality under the li...

Page 70: ... into and view the same area in the image and do not want to set up the Digital Zoom function every time Once setup the ROI profiles will be available to select from the main viewing screen s Video Profile drop down menu as shown To Set up the ROI profiles Simply move the 2 windowed areas shown over the main camera image to selected areas in the picture Once they have been moved click SAVE and the...

Page 71: ... DUPLEX 2 Way Audio mode using the toggle buttons Input Gain Adjust the Gain of the input audio stream Output Gain Adjust the Gain of output audio stream Click OK to confirm changed settings Click Cancel to cancel any changes Note The Audio Input connection depending on camera must be connected to an external microphone for Audio recording The Audio Out connection must be connected to a speaker fo...

Page 72: ...NONYMOUS to allow anyone viewing the video once connected Select ONLY USERS IN DATABASE to only allow certain users to view the video after they have logged in Add Modify and Delete remove User Accounts Manage the accounts that control the viewing rights of users using the center window to add or modify details Note The Administrator can access every function in the IP camera Standard Users only c...

Page 73: ...er of the SMTP service SMTP Authentication Enable or disable the type of Authentication required when you send an email using the toggle buttons Select DISABLE if no authentication is required when an email is sent Select ENABLE if authentication is required when an email is sent Authentication User Name Password Type the User Name and Password for the SMTP server if SMTP Authentication is Enable ...

Page 74: ...on window to the required size over the image To delete a window select the area and click DELETE It will be removed from the drop down list Included or Excluded Window The windows can be specified as INCLUDED or EXCLUDED type Included windows target specific areas within the video image Excluded windows define areas within a window that should be ignored areas outside Include windows are automati...

Page 75: ...Sensitivity Define the SENSITIVITY VALUE of the selected motion detection area A higher value will be more sensitive making small movements to trigger an alarm The small window on the right will highlight the level of any movement detected within the selected area Click SAVE to confirm settings ...

Page 76: ...SD Memory Card slot Setup related parameters used to manage the SD card here Enable Automatic Disk Cleanup Select ENABLE AUTOMATIC DISK CLEANUP to automatically delete recording files when the SD Memory card has saved recordings more than a set number of days or when recorded fils have taken up a percentage of the HD space on the card Input the parameters of these in the fields below LOCK DISK Sel...

Page 77: ...ding to SD Memory Card This page shows the recorded files saved to the SD Memory Card Use this menu to play or delete the selected file Play or Remove Select the file from the list Click PLAY to play file on your default media player Click REMOVE to delete the file from the list Date Recording List Files will be displayed here Recordings will be ordered in Time and Date order ...

Page 78: ...the server name or the IP address of the FTP server Use the TEST button to check whether the FTP server account is working or not FTP Login name Password Port Path Type the Login Name Password Port number and working directory Path of the FTP server FTP Passive Mode Enable or disable the FTP PASSIVE mode when connecting to FTP server using the toggle buttons Disabling this function will mean FTP A...

Page 79: ...red You will need to specify a Name for each TCP setting TCP Server Type the server name or the IP address of the TCP server Use the TEST button to check whether the TCP server account is working or not TCP Port Set Port number of TCP server Add Modify Delete Click ADD to add the completed TCP setting to the list To change any settings select the TCP name and click MODIFY To delete an FTP setting ...

Page 80: ... the TEST button to check whether the HTTP server account is working or not HTTP Login Name Password Port Path Type the Login Name Password Port number and working directory Path of the HTTP server Proxy Address Type the server name or the IP address of the HTTP Proxy Proxy Login Name Password Port Type the Login Name Password and port number of the HTTP Proxy Add Modify Delete Click ADD to add th...

Page 81: ... server Name Specify one or multiple SAMBA servers as required You will need to specify a Name for each HTTP setting SAMBA Sever Type the server name or the IP address of the SAMBA server Use the TEST button to check whether the SAMBA server account is working or not SAMBA Login Name Password Path Type the Login Name Password and working directory Path of the SAMBA server ...

Page 82: ...r EVENT TRIGGER or SCHEDULE TRIGGER Set the Interval time if SCHEDULE TRIGGER is selected Enable Time Define the time periods the Event Schedule should run at Select by DAY START TIME and DURATION Trigger by Enable MOTION DETECTION by ticking the box and defining the Motion Area to be used Motion Detection Areas can be set using the OBJECT DETECTION Menu Action Enable or disable the alarm action t...

Page 83: ...ile to an Email server by any motion triggered event Friday 18 00 to Saturday 06 00 1 Type Select EVENT trigger 2 Enable time Start from Friday 18 00 duration for 12 hours so it will stop on Saturday 06 00 3 Trigger by MOTION AREA Add Motion Detection Area in Object Detection menu 4 Action SEND E MAIL Set parameters in E Mail menu To address You need to input the receiver s email address Subject Y...

Page 84: ...o Friday 1 Type Select SCHEDULE trigger with interval time of 10 minutes 2 Enable time Select Monday to Friday and set start time from 18 00 duration for 6 hours 3 Trigger by DOES NOT NEED TO BE DEFINED because it will be triggered every 10 minutes 4 Action VOICE ALERT Note For the Voice Alert function to work the IP camera s Audio Out socket should be connected to a speaker ...

Page 85: ...pe Select the type of recorded file the IP camera will record in for event or scheduled recordings Select either AVI or JPEG file format Record File Prefix Define the prefix of the recorded File Name This can be useful if there are multiple cameras in the system and recordings need to be defined by the camera name or location JPEG Picture Numbers Define the picture numbers of JPEGs to be emailed o...

Page 86: ... 3 A pop up window will appear prompting you to type in a name for the new position Give it a name that relates to the position e g Delivery Door or Main Car Park then click OK The Preset will be saved to the drop down Preset Menu Tour Select Use the drop menu to select a Preset Tour see page 63 for details click GO to start and STOP to stop the tour Note The PTZ Control function is only available...

Page 87: ...ea needs to be scanned continuously Zoom Use the ActiveX Button to set the zoom of the camera See page 46 to 48 for details Note The Auto Pan function will start from wherever the camera is positioned maintaining the tilt angle so ensure the vertical adjustment of the camera has been set using the keypad before you begin Note All functions including Auto Pan will continue to work as normal even wh...

Page 88: ...ser s Manual Software CD INSTALLING THE SOFTWARE 1 Run the X64SW Lite exe installation file The Installation Wizard will start 2 Select your preferred language for the system and click OK 3 The License Agreement window will be listed as below Click I Agree to continue 4 Select XVISION X64SW LITE then click the Next button Xvision X64SW Lite Xvision X64SW Lite Xvision X64SW Lite This X64SW Lite is ...

Page 89: ...nue 6 The Installation Wizard will finish installation Click the CLOSE button to complete START SOFTWARE 7 On the PC go to START ALL PROGRAMS Xvision X64SW Lite Xvision X64SW Lite 8 Key in the User Name and Password to login to the software The default User Name is admin without a password Xvision X64SW Lite C Program Files Xvision_X64SW_Lite Xvision X64SW Lite Setup Xvision X64SW Lite Setup Xvisi...

Page 90: ...for details See overleaf for details The System Status can be setup in the Settings Menu It shows 1 System Date Time Day 2 Scheduled Alarm Monitoring status if available 3 Hard disk available There are 3 colour types Green Normal Yellow Recycling in progress Red No free space available All the IP cameras connected to the system will be shown live here Assign the preferred layout by clicking these ...

Page 91: ...em default is set to NC status normal close The status of DI Alarm Input is shown below The status of DO Alarm Output is shown below You can click on the toggle bar to change the DO status If after you clicked the DO icon the status doesn t set correctly check the Network Status or Camera Status FUNCTION BUTTONS DI O Alarm Input Output Status DI is open DI is closed DO is open DO is closed System ...

Page 92: ...are and login ADD CAMERA S USING SEARCH 2 Click on the SYSTEM SETUP button and go to SYSTEM SETUP 3 Select the CAMERA Tab and click on the SEARCH button 4 A window will pop up listing all of the IP cameras detected on the network Select the IP camera s to add to the system by ticking the boxes and click OK 4 3 QUICK START X100 CAM1 192 168 0 56 00 0E AE A0 01 67 80 X100 CAM2 192 168 0 187 00 0E AE...

Page 93: ...RECORDING 7 Click the SCHEDULE SETUP button Select the type of Schedule Recording you require using the tabs at the top Daily mode Setup each camera s recording time and type every day Weekly mode Setup each camera s recording time and type on each weekday Special day mode Setup each camera s recording time and type on a specified day Select the Video Codec Resolution Network Protocol and RTSP for...

Page 94: ...e a selected schedule click the DELETE button ABOUT RECORDING MODES Round the Clock Select Round the Clock if you require uninterrupted recording Select OK then adjust the time periods you wish to record by adjusting the Start and End Time of the selected schedule Note If the Special Day schedule is set and the system time matches the Special Day setting the software will prioritize the recording ...

Page 95: ... blank areas will not be monitored for motion Adjust the Sensitivity Level and Detection Interval as required Record Setting refers to the number of seconds recording required before and after motion is detected Tick the box if you require an email to be sent on motion detection DI Alarm Input Detection Select DI Detection if you only require recording to be triggered by an ALARM SENSOR between th...

Page 96: ...ART MONITOR SCHEDULE or START MONITOR ALARM PLAYBACK 10 Click the PLAYBACK button to launch the Playback panel Click the SEARCH button The System Status area in the Main Interface will indicate the type of monitoring that is in operation Playback Function Buttons Click these buttons to view full or split screen Control playback speed using the dial buttons Playback Control buttons Press to Exit Pl...

Page 97: ...ecorded file s and status in playback list Select the camera s to playback and drag the mouse cursor on the playback time period you wish to view Click OK to confirm The system allows a maximum of 16 cameras to be played back at once Recording will be colour coded by Recording mode Blue Round the clock recorded file Green Motion detection recorded file Red DI triggered recorded file 13 Click on th...

Page 98: ...ng options can be executed using the right click button when viewing live images in the Main Interface screen 4 4 LIVE VIEWING OPTIONS Right click to Remove the camera from the screen Activates Zoom function See overleaf for details Activates Quad mode Select the camera you want to view by right clicking and selecting the required camera Activates Snapshot function See overleaf for details Sets th...

Page 99: ... up window Snapshot Activate the Snapshot function in Playback mode by right clicking on the image you wish to snapshot and ticking Snapshot A pop up window will open with an image Snapshot taken Use the functions in the window to edit print and or save the image Bright Adjusts brightness level 50 Maximum brightness 50 Maximum darkness Contrast Adjusts image contrast 50 Maximum strong with Contras...

Page 100: ...NIMIZED AT STARTED Auto minimized Main Interface when system booted up AUTO LOGIN Auto login Main Interface when system booted up You must configure your login details to activate this function 4 5 SYSTEM SETUP HDD Status Select to display the HDD Status as available size left or percentage used Storage Config See overleaf for details Set the N of NxN division When you click NxN division button th...

Page 101: ...he set MB the system will recycle the oldest recorded files Click EDIT when you have changed the value System Status Select the status of information to display on System Status window A ticked category means this information will be displayed on Main Interface status window Otherwise it will display nothing HIDE WHEN MINIMIZED means when the Main Interface is minimized the icon will move to the b...

Page 102: ...User name and Password to access the camera images ADD button If you manually enter the IP cameras s details click the ADD button to assign it to the system X100 CAM1 Xvision Configure detail button Click to access the web page of the selected camera Live preview image of the selected camera Search button See overleaf for details Detect button Will detect the IP details of a camera if the camera i...

Page 103: ... to the system Multiple IP cameras can be selected at once and then later configured individually after they have been added to the Camera List SELECT ALL button Auto select all the cameras in the list CANCEL ALL button Auto deselects all cameras in the list OK button Click to confirm the selection of IP cameras to add to the system CANCEL button Cancels all actions and closes the pop up window wi...

Page 104: ...er Name to select it then you can make any changes using the User Config window Users can be assigned to different groups which allow different levels of access to system functions There are 2 default users ADMIN This is the main administrators account which has access to all functions LOGOUT This is a special account for when the system is under Logout mode It has limited functions The system has...

Page 105: ...account click on the user name of the list first and then modify the data of this account Click the EDIT button to save the changes made To delete a User Name from the Account List click on the DELETE button To clear all the fields for a selected User click on the CLEAR button 4 5 4 ADDRESS BOOK TAB The Address Book is useful for keeping a record of User s contact details in case of an emergency C...

Page 106: ...FROM Enter the from field for the Email ACCOUNT AUTHENTICATION Check this box if the SMTP server needs authentication SECURE CONNECTION SSL Check this box if the SMTP server requires SSL authentication SEND TEST Click button to send a test email FTP Config See overleaf for details Send to List Select the contact mail accounts for sending Schedule Record Notification Emails SMTP Config See below fo...

Page 107: ...TEMP FOLDER Select a default folder for storing snapshot pictures these pictures will delete automatically when the system is shutdown FTP Config Configure the FTP Server details for the system to upload images when an Event is triggered FTP SERVER Enter the FTP site s IP address PORT Enter the FTP server s port USER NAME Enter the account to login FTP server PASSWORD Enter the password for login ...

Page 108: ...dule that works on a timely basis this mode can be useful if your monitoring needs require continuous or triggered recording during different hours in the day i e if your are going away from home or the office on a specific day 4 6 SCHEDULE SETUP Recording Schedule List Lists all the scheduled recording times of selected camera Schedule Mode Select the schedule mode using this area Daily or Weekly...

Page 109: ...d end times to your own requirements 4 6 2 WEEKLY TAB When the WEEKLY TAB or WEEKLY MODE is selected the list tree will display all of the cameras in the system Click on WEEKDAY within the camera name which you want to modify The scheduled configuration of this camera will display on the right hand side of the list tree window The system defaults the schedule to 00 00 to 23 59 round the clock reco...

Page 110: ...he right hand side of the list tree window The system defaults the schedule to 00 00 to 23 59 round the clock recording mode You can edit the start and end times of each camera to your own requirements To Add or Remove a Special Day schedule Choose a day from the Special Day Config area and click the ADD button If you want to remove a special day from system click the DAY on the list tree then cli...

Page 111: ... the Record Setup Window will popup automatically To Modify a time schedule Select the Camera s Name daily mode or Weekday weekly mode from the tree list Click on the time schedule from the Recording Schedule List as shown above OR click on the time slice within the Recording Schedule window Adjust the start and end times using the up and down arrows on the START TIME and END TIME fields or by dra...

Page 112: ... until the set period reaches the Post Alarm time set DI DETECTION The system will record only when the DI alarm is triggered and continually until the set period reaches the Post Alarm time set DI Record Setting See overleaf for details Record Mode Select the type of recording mode for the scheduled time See below for details Record Setting When set to MOTION DETECTION or DI DETECTION recording m...

Page 113: ...ing a rectangular area over the image These areas will be removed SENSITIVITY Set the sensitivity level of Motion Detection 5 is the highest level motion detection sensitivity 1 is the lowest level of motion detection sensitivity MOTION INTERVAL Set this value to define the interval of motion detection If set to a longer value the system will use less CPU computing power to check motion detection ...

Page 114: ...n to open a drop down menu giving the following options The ACTIVE ticked monitoring modes will be highlighted in yellow text within the System Status window on the Main Interface 4 7 START STOP MONITOR Alarm Event Report See overleaf for details Tick to enable Scheduled Monitoring Tick to enable Alarm Monitoring Tick to enable BOTH Schedule and Alarm Monitoring Note If START MONITOR ALL is ticked...

Page 115: ...to record because of detected motion or an Alarm triggered event ALARM TIME Indicates the time and date the Event was triggered EVENT TYPE Indicates the type of Event that triggered the alarm i e Motion Detection or Alarm Sensor REMARK Indicates the camera name that captured the event CANCEL EVENT Select an event and click the CANCEL EVENT button to stop alarm actions and reset the event status CA...

Page 116: ...pear with live images of the camera selected Move a camera Either drag the camera icon to its new position OR preview the camera by double clicking the icon click the MOVE button then use the mouse to click on the new position on the map Rotate a camera Either press and hold the mouse button on the camera icon then rotate it to its new position OR preview the camera by double clicking the icon cli...

Page 117: ...DIO button change the status of the Two Way Audio function 4 9 TWO WAY AUDIO Stop Two Way Audio Click to disable function Start Two Way Audio Click to enable function Note The Two Way Audio function depends on the camera s capability The button will only be enabled when the selected camera features a two way audio function ...

Page 118: ...e speed and move the slider left to decrease the speed The Speed Control level works with directional control zoom and auto pan movements Directional Controls Click the arrow button to move in the direction shown Press and hold any button to continue the action for a longer period of time Preset control Select a Preset from the drop down menu and the selected camera will move to preset position im...

Page 119: ...p 3 Select the Event that you want to add then click the OK button OR simply double click on the Event to assign it to the selected camera Action List Lists the required Actions assigned to each camera Event Live preview image of the selected camera Event List Lists the cameras in the system with the type of monitoring assigned to trigger an event see below for details X100 CAM1 192 168 0 56 Motio...

Page 120: ...nce an event is triggered the alarm will stay ON until it is manual cancelled from the Event Report dialog Shown below ALARM STOP AFTER SECOND Once an event is triggered the alarm will automatically stop after a set number of seconds Event Detect Period Click the option you require ALWAYS DETECT When an Alarm Monitor is activated the detection job will always execute DETECT BY SCHEDULE When an Ala...

Page 121: ... area will be highlighted in red Areas not covered will be left as normal Sensitivity Set the motion detection sensitivity level between 1 and 5 Level 5 will give the highest motion detection sensitivity Level 1 will give the lowest motion detection sensitivity Detect Interval Set this value to define the interval of motion detection If set to a longer value the system will use less CPU computing ...

Page 122: ... EVENT ACTIONS On an event being triggered either by Motion Detection or by an Alarm being activated ACTIONS can be set to notify you or others using the system Add an Event Select an event which you want to add an action to click the ADD button to open the ALARM ACTION window Select an action that you want to add and click the OK button OR simply double click the action to add it Repeat this proc...

Page 123: ...ered The default selected channel will be the same channel as the Event detection channel Send Alarm Mail This action will send an Email to indicate an Event has been triggered Select the mail account s that the notice Email should be sent to To set Mail Accounts go to System Setup Address Book Tab Play Alarm Sound This action will play a sound to indicate an Event has been triggered Select a WAV ...

Page 124: ...Digital Output i e light siren etc to indicate an Event has been triggered Select a Digital Output to use by ticking the box On selecting an output select OPEN or CLOSE to define which status should be used Upload to FTP This action will upload images to a server when an Event has been triggered To set the FTP Server go to System Setup Notification Tab ...

Page 125: ...ion to launch the Log Viewer panel The pop up window will appear 4 12 1 SYSTEM LOG TAB Use this tab to search within SYSTEM logs LOG TYPE Select Log Type TIME Select the Log time period the search should cover SEARCH Click Search to list Logs EXPORT Click Export to export search result to TXT file Click to Search Result Click to Export Log List Log List Search results will be displayed here Search...

Page 126: ...ct TOTAL to search within all devices or choose one to search the Event log LOG TYPE Select Log Type INPUT Select event triggered by which input source Digital Input Event TIME Select the Log time period the search should cover SEARCH Click Search to list Logs EXPORT Click Export to export search result to TXT file 4 12 3 ERROR LOG TAB Use this tab to search within ERROR logs ...

Page 127: ...STALL CONNECT SETUP CONFIGURE RECORDING SOFTWARE RECORDING SOFTWARE LOG TYPE Select Log Type TIME Select the Log time period the search should cover SEARCH Click Search to list Logs EXPORT Click Export to export search result to TXT file ...

Page 128: ... button to select how the playback screen should appear In FULL SCREEN MODE press ESC to exit Exit button Click to Exit Playback mode Minimise button Click to minimise the Playback screen Speed Control Turn the button to control Playback Speed when playing video files for example 4X 4x Normal Speed 1 2X Half of normal Speed Playback bar Indicates the length and playback position of the video file ...

Page 129: ...les 3 Click the SEARCH button and wait for the system to list the results in the main window 4 Review the recorded files shown in the search results Time periods will be colour coded to indicate the type of recording that occurred BLUE sections Round the clock recorded file s GREEN sections Motion detection recorded file s RED sections Alarm recorded file s Select Round the Clock Motion Detection ...

Page 130: ... highlight in BLUE on the Results List 6 Select the cameras to playback by ticking the boxes on the left hand side Select a maximum of 16 cameras to playback 7 Click OK to finish searching and start playback on the main screen s 8 Use the Control buttons to PLAY PAUSE REWIND FORWARD and STOP playback In PAUSE mode you can use the and Next Previous Frame buttons to jump frame by frame You can also ...

Page 131: ...eriod by entering a START and END TIME 3 Select a camera from the drop down menu 4 Use the SAVE TO button to browse and select a destination folder where the file will save to 5 Click the OK button to convert the file The file name will be in the format CHXXXYYYYMMDDHHmmssnnn avi XXX camera ID YYYY Year MM Month DD Day HH Hour mm Minutes ss Seconds nnn Million seconds i e CH00220090914140253150 av...

Page 132: ...Click the AUDIO CONTROL button on the Playback Interface to open a popup menu as shown below Use the drop drown menu to select the Audio Mode you require from the selection MUTE No audio data will play LIVE AUDIO Plays the live audio stream PLAYBACK AUDIO Plays the playback audio stream 4 16 AUDIO MODES ...

Page 133: ...wn below Use the drop drown menu to select the Playback Settings you require from the selection The ticked settings will activate the categories on the displayed image while the recorded file is being playing back DATE Displays the date of recorded file on the image TIME Displays the time of recorded file on the image CAMERA NAME Displays the camera name on the image 4 17 PLAYBACK SETTINGS ...

Page 134: ...o save the file s The file name will be in the format CamXXX_NNNNNN_YYYYMMDDHHmmssnnn jpg XXX Camera ID NNNN Camera Name IP address YYYY Year MM Month DD Day HH Hour mm Minutes ss Seconds nnn Million seconds i e Cam002_X100B 192 168 0 143_20090908111559901 jpg is a file exported from Camera 2 X100B with IP address 192 168 0 143 recorded on 8th September 2009 11 15 59 901 11 15 am 4 18 SNAPSHOT FUN...

Page 135: ... and wait for the system to list the results in the main window 4 Review the recorded files shown in the search results Time periods will be colour coded to indicate the type of recording that occurred BLUE sections Round the clock recorded file s GREEN sections Motion detection recorded file s RED sections Alarm recorded file s Select Round the Clock Motion Detection and or Alarm Record 4 19 BACK...

Page 136: ...ighlight in BLUE on the Results List 6 Select the cameras to playback by ticking the boxes on the left hand side Select a maximum of 16 cameras to playback 7 Use the SAVE TO button to browse and select a destination folder where the file s will save to 8 Click the OK button to save the file s To playback backed up files All saved files will be located in the backup folder Search and playback files...

Page 137: ...CK FUNCTIONS A range of playback options can be executed using the right click button when playing back images in the Playback screen 4 20 SPLIT SCREEN OPTIONS You can shift sub screens by dragging the playback window to an empty space in the Split Screen Activates Zoom function See overleaf for details Activates Smart Search function See overleaf for details Activates Snapshot function See overle...

Page 138: ...p up window Snapshot Activate the Snapshot function in Playback mode by right clicking on the image you wish to snapshot and ticking Snapshot A pop up window will open with an image Snapshot taken Use the functions in the window to edit print and or save the image Bright Adjusts brightness level 50 Maximum brightness 50 Maximum darkness Contrast Adjusts image contrast 50 Maximum strong with Contra...

Page 139: ...ction coverage ADD BUTTON Click this button to enable areas to be added to the motion detection area After clicking the button select areas by dragging a rectangular area over the image Selected areas will be added DELETE BUTTON Click this button to disable areas and remove them from the motion detection area After clicking the button deselect areas by dragging a rectangular area over the image Th...

Page 140: ...rs which store recorded files click the ADD button and include them all in the Repair Path list DELETE Click to remove a path from the list 3 Once you have listed all the active Record folders in your system click OK to start the Repair Database function Click the red cross on the top right to cancel the Repair Database function When the Database Repair is complete the following message box will p...

Page 141: ...To uninstall the Software 1 On your PC go to START ALL PROGRAMS Xvision X64SW Lite Uninstall 2 Confirm the Software is to be removed by clicking UNINSTALL 3 Go to CONTROL PANEL ADD REMOVE PROGRAMS Select Xvision X64SW Lite Select Remove The Software will be removed from the Program Folder 4 22 UNINSTALL ...

Page 142: ...t IP cameras to a network CONNECTION VIA A HUB SWITCH OR ROUTER or CROSSOVER CONNECTION CONNECTION VIA HUB SWITCH OR ROUTER CROSSOVER CONNECTION APPENDIX A CONNECTION CONFIGURATION APPENDICES INTERNET X100 IP Camera Hub Switch or Router PC or Laptop X100 IP Camera PC or Laptop Cat5 Straight Through Cable LAN cable crossover ...

Page 143: ...ollowing steps to enable UPnP settings only if your operating system of PC is running Windows XP 1 On your PC go to Start Settings Control Panel 2 Click Add or Remove Programs 3 Click Add Remove Windows Components 4 Select NETWORKING SERVICES then click DETAILS APPENDIX B ENABLING UPnP SETTINGS ...

Page 144: ...4 X100 Series Main User Manual INSTALL CONNECT SETUP CONFIGURE RECORDING SOFTWARE 5 Select UNIVERSAL PLUG AND PLAY then click OK 6 Click NEXT 7 Wait while Windows configures the components 8 Click FINISH ...

Page 145: ...able or DSL service you will most likely have a dynamically assigned WAN IP Address Dynamic means that your router s WAN IP address can change from time to time depending on your ISP A dynamic WAN IP Address identifies your router on the public network and allows it to access the Internet To find out what your router s WAN IP Address is go to the Status screen on your router and locate the WAN inf...

Page 146: ...NABLED Enter a unique name for each entry Select BOTH under Protocol Type TCP and UDP Enter your camera s local IP Address e g 192 168 0 100 for example in the Private IP field If you are using the default camera port settings enter 80 into the Public and Private Port section click APPLY Scheduling should be set to ALWAYS so that the camera images can be accessed at any time A check mark appearing...

Page 147: ...IP Network If users can obtain valid IP addresses you can save the effort of applying the DDNS service as the IP address in this environment is FIXED and users can manually input the IP address or domain name of demo site directly into a web browser Environment of Dynamic IP Network If users are under dynamic IP network environment Dial up xDSL they should apply for a domain name in advance apply ...

Page 148: ...eating an account 5 Check your E mail inbox There will be an e mail with a subject Your DynDNS Account Information Click the hyperlink address to confirm and activate the DDNS service 6 Close the window then go to http www dyndns org again Input your User Name and Password to login administration interface of DDNS server ...

Page 149: ...Go to SERVICES 8 Click on DYNAMIC DNS 9 Click on the GET STARTED link 10 Create a host name Input the host name Pick a domain that is easy to remember Click OFFLINE HOSTNAME from the SERVICE TYPE list Click CREATE HOST to submit the domain name information and finish the DDNS application ...

Page 150: ... page of the IP Camera and setup the necessary DDNS and PPPoE information after the applying for the DDNS service Check pages 53 and 55 of this user manual for more information on DDNS and PPPoE configuration After saving the changes restart the device Then external users should be able to browse the IP camera by typing in the domain name on a web browser ...

Page 151: ...ly Dialing procedure 1 Choose a verified player PacketVideo or RealPlayer currently 2 Use the following URL rtsp host mpeg4 media 3gp Host is the host name or IP address of the camera Compatible 3G mobile phone Please contact your dealer to get the approved list of compatible 3G phones APPENDIX E 3GPP Note To use the 3GPP function we strongly recommend you install the IP camera with a public and f...

Page 152: ... installed or if the IP address conflicts with any other devices over the network If you want to check the IP address of the IP camera utilise the PING command as follows 1 Start a DOS window 2 Type ping x x x x where x x x x is the IP address of the device The reply as shown below will provide a summary APPENDIX F PING IP ADDRESS Note If you want to detect if any other device conflicts with the I...

Page 153: ...are logged on INSTALLATION Issue Answer The Status LED does not light up Check and confirm that the DC power adaptor included in packaged is used Secure the power connector and re power it on again If the problem is not solved the device might be faulty Contact your dealer for further help What network cabling is required for the device The device uses Category 5 UTP cable allowing 10 and or 100 B...

Page 154: ...IP camera Make sure that your Internet Explorer is version 6 0 or later If you are experiencing problems try upgrading to the latest version of Microsoft s Internet Explorer from the Microsoft website The IPWizard II program fails to save the network parameters The network may have issues Confirm the parameters and connections of the IP camera UPnP NAT TRAVERSAL Issue Answer The IP camera does not...

Page 155: ... Refer to your router s manual for details Packet Filtering of the router may prohibit access from an external network Refer to your router s manual for details Access the IP Camera from the Internet with the global IP address of the router and port number of Network Camera Some routers reject the global IP address to access the Network Camera on the same LAN Access with the private IP address and...

Page 156: ...heck the bandwidth of Internet connection If the Internet bandwidth is lower than target bit rate the video streaming will not work correctly Ethernet switching hub can smooth the frame rate There is a blank screen or very slow video when audio is enabled Your connection to the IP camera does not have enough bandwidth to support a higher frame rate for the streamed image size Try reducing the vide...

Page 157: ... may be incorrect Adjust the image related parameters such as brightness contrast hue and sharpness The Image flickers The wrong power line frequency makes the images flicker Make sure the 50 or 60Hz format of your device If the object is dark the image will flicker Make the lighting around the IP camera brighter The images are low quality or noisy The video images might be noisy if the device is ...

Page 158: ...BaseT 100BaseTX Audio Out Socket Dimensions WHD 85 x 107 x 50mm Warranty 2 Years VIDEO Video Encoder H 264 MPEG4 and Motion JPEG simultaneously Tri encoders Video Profiles 11 Independent Streams 2 Region Of Interest Streams H 264 SXGA VGA QVGA QQVGA MPEG4 VGA QVGA QQVGA MJPEG SXGA VGA QVGA QQVGA Frame Rate Megapixel mode Up to 15 fps for all 11 profiles VGA mode Up to 30 fps for all 9 profiles Ima...

Page 159: ...er Over Ethernet No SYSTEM INTEGRATION Application Programming Interface Open API for software integration SDK Alarm Triggers Intelligent Motion Detection Motion Detection 10 zone video motion detection Alarm Events File upload via FTP SAMBA or email Notification via email HTTP and TCP External output activation Go to PTZ preset position Audio alerting output Video Buffer Pre and Post alarm buffer...

Page 160: ...tenna RJ45 Socket 10BaseT 100BaseTX Audio Out Socket Dimensions WHD 106 x 108 x 106mm Warranty 2 Years VIDEO Video Encoder H 264 MPEG4 and Motion JPEG simultaneously Tri encoders Video Profiles 11 Independent Streams 2 Region Of Interest Streams H 264 SXGA VGA QVGA QQVGA MPEG4 VGA QVGA QQVGA MJPEG SXGA VGA QVGA QQVGA Frame Rate Megapixel mode Up to 15 fps for all 11 profiles VGA mode Up to 30 fps ...

Page 161: ...er Over Ethernet No SYSTEM INTEGRATION Application Programming Interface Open API for software integration SDK Alarm Triggers Intelligent Motion Detection Motion Detection 10 zone video motion detection Alarm Events File upload via FTP SAMBA or email Notification via email HTTP and TCP External output activation Go to PTZ preset position Audio alerting output Video Buffer Pre and Post alarm buffer...

Page 162: ...0BaseT 100BaseTX Audio Output Alarm Output Dimensions WHD 135 x 108 x 135mm Warranty 2 Years VIDEO Video Encoder H 264 MPEG4 and Motion JPEG simultaneously Tri encoders Video Profiles 11 Independent Streams 2 Region Of Interest Streams H 264 SXGA VGA QVGA QQVGA MPEG4 VGA QVGA QQVGA MJPEG SXGA VGA QVGA QQVGA Frame Rate Megapixel mode Up to 15 fps for all 11 profiles VGA mode Up to 30 fps for all 9 ...

Page 163: ...et Yes SYSTEM INTEGRATION Application Programming Interface Open API for software integration SDK Alarm Triggers Intelligent Motion Detection and External Input Motion Detection 10 zone video motion detection Alarm Events File upload via FTP SAMBA or email Notification via email HTTP and TCP External output activation Go to PTZ preset position Audio alerting output Video Buffer Pre and Post alarm ...

Page 164: ...J45 Socket 10BaseT 100BaseTX Audio Output Alarm Output Dimensions WHD 144 x 105 x 144mm Warranty 2 Years VIDEO Video Encoder H 264 MPEG4 and Motion JPEG simultaneously Tri encoders Video Profiles 11 Independent Streams 2 Region Of Interest Streams H 264 SXGA VGA QVGA QQVGA MPEG4 VGA QVGA QQVGA MJPEG SXGA VGA QVGA QQVGA Frame Rate Megapixel mode Up to 15 fps for all 11 profiles VGA mode Up to 30 fp...

Page 165: ...et Yes SYSTEM INTEGRATION Application Programming Interface Open API for software integration SDK Alarm Triggers Intelligent Motion Detection and External Input Motion Detection 10 zone video motion detection Alarm Events File upload via FTP SAMBA or email Notification via email HTTP and TCP External output activation Go to PTZ preset position Audio alerting output Video Buffer Pre and Post alarm ...

Page 166: ... RJ45 Socket 10BaseT 100BaseTX Audio Output Alarm Output Dimensions WHD 90 x 90 x 580mA Warranty 2 Years VIDEO Video Encoder H 264 MPEG4 and Motion JPEG simultaneously Tri encoders Video Profiles 11 Independent Streams 2 Region Of Interest Streams H 264 SXGA VGA QVGA QQVGA MPEG4 VGA QVGA QQVGA MJPEG SXGA VGA QVGA QQVGA Frame Rate Megapixel mode Up to 15 fps for all 11 profiles VGA mode Up to 30 fp...

Page 167: ...et Yes SYSTEM INTEGRATION Application Programming Interface Open API for software integration SDK Alarm Triggers Intelligent Motion Detection and External Input Motion Detection 10 zone video motion detection Alarm Events File upload via FTP SAMBA or email Notification via email HTTP and TCP External output activation Go to PTZ preset position Audio alerting output Video Buffer Pre and Post alarm ...

Page 168: ...Outputs RJ45 Socket 10BaseT 100BaseTX Audio Output Alarm Output Dimensions WHD 63 x 56 x 123mm Warranty 2 Years VIDEO Video Encoder H 264 MPEG4 and Motion JPEG simultaneously Tri encoders Video Profiles 11 Independent Streams 2 Region Of Interest Streams H 264 SXGA VGA QVGA QQVGA MPEG4 VGA QVGA QQVGA MJPEG SXGA VGA QVGA QQVGA Frame Rate Megapixel mode Up to 15 fps for all 11 profiles VGA mode Up t...

Page 169: ...Yes SYSTEM INTEGRATION Application Programming Interface Open API for software integration SDK Alarm Triggers Intelligent Motion Detection and External Input Motion Detection 10 zone video motion detection Alarm Events File upload via FTP SAMBA or email Notification via email HTTP and TCP External output activation Go to PTZ preset position Audio alerting output Video Buffer Pre and Post alarm buf...

Page 170: ...et 10BaseT 100BaseTX Audio Output Alarm Output Dimensions WHD 129 x 185 x 129mm Warranty 2 Years VIDEO Video Encoder H 264 MPEG4 and Motion JPEG simultaneously Tri encoders Video Profiles 11 Independent Streams 2 Region Of Interest Streams H 264 SXGA VGA QVGA QQVGA MPEG4 VGA QVGA QQVGA MJPEG SXGA VGA QVGA QQVGA Frame Rate Megapixel mode Up to 15 fps for all 11 profiles VGA mode Up to 30 fps for al...

Page 171: ...et Yes SYSTEM INTEGRATION Application Programming Interface Open API for software integration SDK Alarm Triggers Intelligent Motion Detection and External Input Motion Detection 10 zone video motion detection Alarm Events File upload via FTP SAMBA or email Notification via email HTTP and TCP External output activation Go to PTZ preset position Audio alerting output Video Buffer Pre and Post alarm ...

Page 172: ...y Tri encoders Video Profiles 11 Independent Streams 2 Region Of Interest Streams H 264 SXGA VGA QVGA QQVGA MPEG4 VGA QVGA QQVGA MJPEG SXGA VGA QVGA QQVGA Frame Rate Megapixel mode Up to 15 fps for all 11 profiles VGA mode Up to 30 fps for all 9 profiles Image Setting De noise Brightness Sharpness Contrast Colour and Text Time date overlay Streaming Simultaneously multi profile streaming Streaming...

Page 173: ...e integration SDK Alarm Triggers Intelligent Motion Detection and External Input Motion Detection 10 zone video motion detection Alarm Events File upload via FTP SAMBA or email Notification via email HTTP and TCP External output activation Go to PTZ preset position Audio alerting output Video Buffer Pre and Post alarm buffering VIEWING SYSTEM OS OS Windows XP Vista 7 or Mac OSX Browser Internet Ex...

Page 174: ...t Xvision we provide quality products that perform to the highest standards while being simple to install and use If you have any difficulties setting up or using your product please visit our support pages at www xvision com for assistance and for details of online and telephone support in your region ...

Page 175: ...NTY This product is supplied with a 1 Year warranty The Warranty excludes products that have been misused including accidental damage and damage caused by normal wear and tear In the unlikely event that you encounter a problem with this product it should be returned to the place of purchase ...

Page 176: ...V1 2 2010 10 ...

Reviews: