background image

Advanced Features and Troubleshooting Manual

13

Control Panel Menus

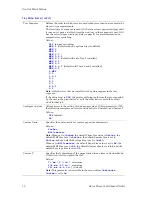
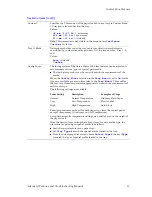
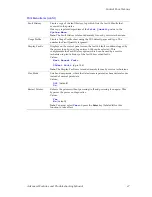
Custom Y

Specifies the Y dimension of the paper loaded in any trays in Custom Mode. 

Y direction is front-to-back in the tray.
Values:
    

98 mm (3.87 in.)

minimum


508 mm (20 in.)

maximum


279 mm (11 in.)

(default)

Note:

 This parameter is not visible in the menu unless 

Configure

Custom

 is set to 

On

.

Tray 

N

 Mode

Determines whether or not the tray’s auto size detection mechanism is 

overridden by custom size settings


(where 

is the tray number - Tray 1, 2, 

or 3).
Values:

Auto

(default)

Custom

Config Fuser

The fusing system of the Xerox Phaser 5400 laser printer can be adjusted to 

accommodate various types of special print media:

The fusing temperature can be varied to match the requirements of the 

media.

When the 

Config Fuser

 selection in the 

Tray Menu

is set to 

On

, media 

types are available as a menu item (also in the 

Tray Menu

). This enables 

the user to set fuser temperatures appropriately to match the requirements of 

each media type.
The following settings are available:

Fuser Setting

Description

Examples of Usage

Normal

Normal Temperature

Ordinary Plain Paper

Low

Low Temperature

Plastic Label

High

High Temperature

Card Stock

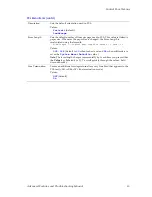
Fuser temperatures can be set for each paper type from the control panel, 

except Transparency (it is always on Low Temperature).
For optimum results, temperature settings are usually based on the weight of 

the paper stock.
Once the desired fuser settings have been stored for each media type, the 

procedure for printing on special media is as follows:

Load the special media into a paper tray.

Set 

Tray Type

 to match the special media loaded in the tray.

From the driver properties screen, choose 

Select Paper

, then set 

Type

to match the type of special media loaded in the tray.

Tray Menu Items (cont'd.)

Summary of Contents for PHASER 5400

Page 1: ...P H A S E R 5 4 0 0 L A S E R P R I N T E R Advanced Features and Troubleshooting Manual ...

Page 2: ......

Page 3: ...Xerox Phaser 5400 Laser Printer Advanced Features and Troubleshooting Manual September 2001 ...

Page 4: ...wlett Packard Corporation Hoefler Text was designed by the Hoefler Type Foundry ITC Avant Guard Gothic ITC Bookman ITC Lubalin Graph ITC Mona Lisa ITC Symbol ITC Zapf Chancery and ITC Zapf Dingbats are registered trademarks of International Typeface Corporation Bernhard Modern Clarendon Coronet Helvetica New Century Schoolbook Optima Palatino Stempel Garamond Times and Univers are trademarks of Li...

Page 5: ...he printer online take the printer offline 4 Using the keys for menus 4 Using the keys when a paper mismatch condition exists 5 Control Panel Menus 6 Using the control panel menus 6 Control panel menu indicators 8 Control panel locks 8 Job Menu 9 Password Menu 10 Tray Menu 11 PCL Menu 14 System Menu 16 Parallel Menu 19 USB Menu 20 Ethernet Menu 21 Novell Menu 24 Print Menu 26 Reset Menu 28 ...

Page 6: ...Automatic tray switching 41 Setting up automatic tray switching 41 Tray sequence rules 42 Paper size and type 43 Tray sequence examples 44 Managing Printer Usage 46 Using CentreWare DP 46 CentreWare MC Microsoft Management Console 46 CentreWare Internet Services 46 Setup 47 CentreWare Web 47 PCL emulation printer driver 48 PostScript printer drivers 48 Driver features 48 Fonts 50 Base printer font...

Page 7: ...al communications 59 Setting a Subnet Mask at the control panel 62 Setting Default Gateway at the control panel 62 Setting up AppSocket 63 Printing a Configuration Sheet 63 Resetting the printer 64 Novell NetWare setup 65 NetWare 3 1X 4 X 5 0 print server setup 65 Novell NetWare troubleshooting 66 Windows troubleshooting 70 Requirements 70 Windows all versions quick check 70 Windows 95 98 Me troub...

Page 8: ...t for the job does not print 84 Problem PostScript commands are printed instead of the PostScript job 84 Problem A PostScript or PCL job fails to print 84 Problem You experience frequent media jams 85 Problem Labels are printed on the wrong side 85 Problem Two sided printing problems 85 Diagnostic LED flash sequences 86 Control Panel Messages 87 Appendix A Xerox Phaser 5400 Laser Printer Specifica...

Page 9: ...eatures and Troubleshooting Manual vii Appendix C Unique Printer Commands 101 Paper size selection 101 Paper type selection 102 Input tray selection 103 Output selection 104 Additional PJL commands 104 Index 107 ...

Page 10: ...viii Xerox Phaser 5400 Laser Printer ...

Page 11: ...rranty repair at Customer s site without charge as provided below Service is available within the customary on site service area in the United States and Canada for products purchased in the United States and Canada Inside the European Economic Area service is available within the customary on site service area for products purchased in the EEA Outside the US Canada EEA service is available within...

Page 12: ...THER WARRANTIES EXPRESS OR IMPLIED XEROX AND ITS VENDORS DISCLAIM ANY IMPLIED WARRANTIES OF MERCHANTABILITY OR FITNESS FOR A PARTICULAR PURPOSE OR ANY SIMILAR STANDARD IMPOSED BY APPLICABLE LEGISLATION XEROX RESPONSIBILITY TO REPAIR REPLACE OR OFFER A REFUND FOR DEFECTIVE PRODUCTS AND CUSTOMER REPLACEABLE CONSUMABLES IS THE SOLE AND EXCLUSIVE REMEDY PROVIDED TO THE CUSTOMER FOR BREACH OF THESE WAR...

Page 13: ...ower receptacle If any of the following conditions occur switch off the printer power immediately disconnect the power cord and call an authorized service representative The power cord is damaged or frayed Liquid is spilled into the printer The printer is exposed to water Any part of the printer is damaged Maintenance Safety Do not attempt any maintenance procedure that is not specifically describ...

Page 14: ...ate strength for the weight of the machine The base printer weight without any packaging materials is 27 kg 60 lbs The printer is heavy and must be lifted by two people The illustration below shows the proper technique for lifting the printer Exercise care in moving or relocating the printer it is back heavy and could tip backward Follow the recommended procedure when moving the printer from one l...

Page 15: ...r Use caution to avoid personal injury Use caution Refer to the manual s for information Warning If the product loses the ground connection usage of knobs and controls and other conductive parts can cause an electrical shock Electrical product may be hazardous if misused Warning For your protection do not defeat any interlocks ...

Page 16: ......

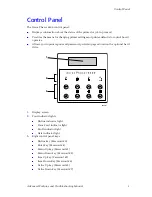
Page 17: ...w it operates Allows you to print reports and password protected pages stored on the optional hard drive 1 Display screen 2 Four indicator lights Online indicator light Form Feed indicator light Fault indicator light Data indicator light 3 Eight control panel keys Online key Password 0 Enter key Password 4 Menu Up key Password 1 Menu Down key Password 5 Item Up key Password 2 Item Down Key Passwor...

Page 18: ...inue processing the job a timeout period expired Fault indicator Light is off Normal operation Light is on amber The printer stopped because operator intervention is needed such as closing an open door or clearing a media jam Read the message shown on the control panel display screen Refer to the Control Panel Messages section starting on page 87 for information on the problem and corrective actio...

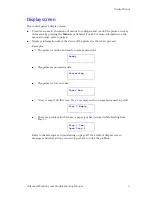
Page 19: ... status of the printer or the job in process Examples The printer is online and ready to accept print jobs The printer is processing data The printer is low on toner A tray is empty in this case Tray 2 is empty and no longer being used to print There is a problem in this case a paper jam has occurred while feeding from Tray 3 Refer to the Messages section starting on page 87 for a table of display...

Page 20: ... printer online When printer is offline and in the menu system press the On Line key to exit the menu system and bring the printer online Using the keys for menus 1 Press the Menu keys labeled 1 or 5 to enter the menu system and scroll through the menus 2 Press the Item keys labeled 2 or 6 to scroll through the menu items for the selected menu 3 If the menu item has a value Use the Value keys labe...

Page 21: ...ismatch condition exists 1 Press the Value keys labeled 3 or 7 to scroll through the trays to see what alternate paper is available that may be used instead of the requested paper 2 Press the Enter key labeled 4 to use the tray shown on the display screen to be used for printing Print Anyway ...

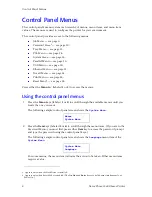
Page 22: ...Using the control panel menus 1 Press the Menu keys labeled 1 or 5 to scroll through the available menus until you locate the one you want The following sample control panel screen shows the System Menu 2 Press the Item keys labeled 2 or 6 to scroll through the menu items If you are in the Password Menu you must first press either Item key to access the password prompt and type the password using ...

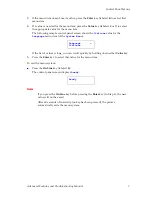
Page 23: ...e Italiano value for the Language menu item of the System Menu If the list of values is long you can scroll quickly by holding down either Value key 5 Press the Enter key to select that value for the menu item To exit the menu system Press the On Line key labeled 0 The control panel screen displays Ready Notes If you press the On Line key before pressing the Enter key in Step 5 the new value will ...

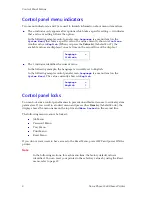
Page 24: ...ing example the Language is currently set to English In the following sample control panel screen Language is a menu item on the System Menu The value currently shown is English Control panel locks You can lock some control panel menus to prevent unauthorized access to critical system parameters If you scroll to a locked menu and press either Item key labeled 2 or 6 the display shows the menu name...

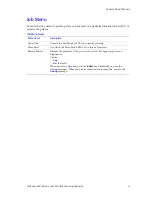
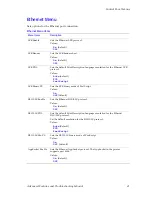
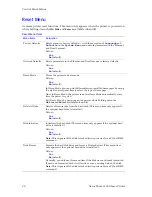
Page 25: ...ms Description Cancel Job Cancels the PostScript or PCL job currently printing Form Feed Use when the Form Feed LED is on to force a form feed Restart Printer Reboots the printer as if the power was cycled but bypasses power on diagnostics Values Yes No default When you select Yes and press the Enter key labeled 4 you see the startup messages When the printer initialization is complete you see the...

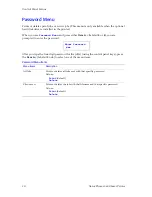
Page 26: ... 2 or 6 you are prompted to enter the password After you type the four digit password for the job s using the control panel keys press the Item key labeled 2 or 6 to select one of the menu items Enter Password _xxx Password Menu Items Menu items Description All Jobs Prints or deletes all jobs sent with that specific password Values Print default Delete Filename n Prints or deletes the job with tha...

Page 27: ...7 5 in A5 148x210 mm Custom see page 12 A4 210x297 mm for Custom Units menu item The default MBF size is Letter when Inches is set and A4 when Millimeters is set as the System Menu s Defaults value MBF Type Defines the paper type that is loaded in the Multi Bypass Feeder Values Plain default Color Preprinted Cardstock Letterhead Envelope Transparency User Type 1 if loaded Prepunched User Type 2 if...

Page 28: ...y the user in the print driver even if the other trays contain the correct stock for that job Configure Custom Allows access to the setting of custom paper sizes If this parameter is OFF the following entries are not visible Custom Units Custom X and Custom Y Values Off default On Custom Units Specifies the units used to set custom paper size dimensions Values Inches Millimeters Note When set to I...

Page 29: ... the Tray Menu is set to On media types are available as a menu item also in the Tray Menu This enables the user to set fuser temperatures appropriately to match the requirements of each media type The following settings are available Fuser Setting Description Examples of Usage Normal Normal Temperature Ordinary Plain Paper Low Low Temperature Plastic Label High High Temperature Card Stock Fuser t...

Page 30: ...l quickly through the pitch values hold down either key Point Size Sets the point size of the default font in PCL when the default font is a scalable proportional spaced font Values 4 00 999 75 default is 12 00 Note The point size changes incrementally by 25 each time you press either Value key labeled 3 or 7 Hold down either key to scroll quickly through the point sizes Symbol Set Sets the defaul...

Page 31: ...using the formula Form Length logical page length in inches 1 inch 6 Values 005 128 default is 60 when inches is set and 64 when millimeters is set as the System Menu s Defaults value Note The form length changes incrementally by 1 each time you press either the Value key labeled 3 or 7 To scroll quickly through the values hold down either key Line Termination Causes an additional carriage return ...

Page 32: ...A5 148x210 mm Monarc 3 8x7 5 in The default paper size is Letter when Inches is set and A4 when Millimeters is set as the System Menu s Defaults value Paper Type Sets the default paper type used in PostScript and PCL Values Plain default Color Preprinted Cardstock Letterhead Envelope Transparency User Type 1 if loaded Prepunched User Type 2 if loaded Labels User Type 3 if loaded Bond User Type 4 i...

Page 33: ...ong Edge or Short Edge see Printing two sided duplex jobs in the User Guide Draft Mode Enables disables Draft Mode which reduces the amount of toner by up to two thirds and prints a draft quality output Intended for occasional not continuous use Values Off default On Note This item is visible when the resolution value is 600x600 PCL Edge to Edge Enables disables edge to edge printing for PCL Value...

Page 34: ...er Saver mode 15 30 60 default 90 120 180 Defaults Specifies the type of factory defaults to use when a printer reset is performed Values Inches Millimeters Notes For these changes to take place you must either power the machine Off and then power it back On or restart the printer from the Print or Job Menus When set to Inches the default Paper Size value is Letter the default MBF Size is set to L...

Page 35: ...ntrol D in PostScript or ESC E in PCL and invokes the emulation functions associated with this action e g formfeed reset etc Values in seconds 5 300 default is 30 The value changes by 1 each time you press either Value key labeled 3 or 7 Hold down either key to scroll quickly through the values Parallel PDL Sets the default Print Description Language emulation for the parallel port Values Auto def...

Page 36: ...n PostScript or ESC E in PCL and invokes the emulation functions associated with this action e g formfeed reset etc Values in seconds 5 300 default is 30 The value changes by 1 each time you press either Value key labeled 3 or 7 Hold down either key to scroll quickly through the values USB PDL Sets the default Print Description Language emulation for the USB port Values Auto default PCL PostScript...

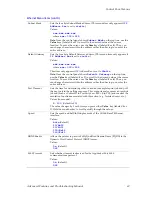
Page 37: ...rotocol Values Auto default PCL PostScript LPR Binary PS Sets the LPR binary mode of PostScript Values On Off default DLC LLC Enable Sets the Ethernet DLC LLC protocol Values On default Off DLC LLC PDL Sets the default Print Description Language emulation for the Ethernet DLC LLC protocol Set the default emulation for the DLC LLC protocol Values Auto default PCL PostScript DLC LLC Bin PS Sets the ...

Page 38: ... if the DHCP server does not respond with an IP address Values On default Off IP Address Res Sets the method used to resolve assign the IP address including Subnet Mask and Default Gateway Values Static BOOTP RARP DHCP default IP Address Sets the four byte IP address This menu item only appears if IP Address Res is set to static Values xxx xxx xxx xxx where xxx 000 to 255 Note Once the control pan...

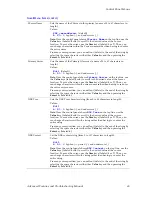
Page 39: ...t the cursor location To move the cursor use the Item keys labeled 2 or 6 Thus you can change characters within the address rather than having to re enter the entire address Port Timeout Sets the time for determining when to end an incomplete print job and poll the next port in the polling sequence This menu item also causes an implicit job end such as Control D in PostScript or ESC E in PCL and i...

Page 40: ...ets the Novell binary mode of PostScript Values On Off default Novell Mode Sets the PServer mode for the Novell protocol Values NDS BEM NDS BEM default Frame Type Sets the frame type used for the Novell protocol Values Auto default 802 2 802 3 SNAP Ethernet II Polling Interval Sets the rate in seconds at which the PServer issues polling requests for assigned queues Values in seconds 1 29 default i...

Page 41: ... cursor position you can null out delete to the end of the string by selecting the space character with either Value key and then pressing the Enter key labeled 4 NDS Tree Sets the NDS Tree character string from 0 to 63 characters in length Values Null A Z 0 9 hyphen and underscore _ Note Once the control panel shows NDS Tree on the top line use the Value keys labeled 2 or 6 to scroll to the desir...

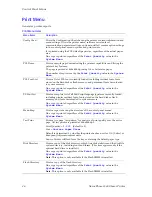
Page 42: ...f all PostScript language typefaces currently loaded including printer resident fonts fonts stored on the hard disk or flash memory and fonts downloaded to system memory One copy is printed regardless of the Print Quantity value in the System Menu Menu Map Prints a report showing the structure of the control panel menus One copy is printed regardless of the Print Quantity value in the System Menu ...

Page 43: ...nditions logged by the printer one by one Log entries 1 100 can be selected This complements the Fault History option which can be used by a service technician to print a history of the last 100 recorded faults Values Most Recent Fault Oldest Fault up to 100 Note The Display Faults are intended mainly for use by service technicians Hex Mode Sets hex dump mode where the data stream is printed as he...

Page 44: ...nce in Demo Mode the printer re enters Demo Mode automatically every time the power is cycled Exit Demo Mode by powering on the printer while holding down the On Line and Enter keys labeled 0 and 4 Delete All Jobs Deletes all secure jobs from the hard disk This menu item only appears if the optional hard drive is installed Values Yes No default Disk Initialize Initializes the hard disk This menu i...

Page 45: ...oubleshooting Manual 29 Control Panel Menus Flash Format Formats the flash memory and forces a Printer Restart This menu item only appears if the optional flash memory is installed Values Yes No default Reset Menu Items cont d ...

Page 46: ...uplex printing if you have the optional Duplex Module refer to the User Guide for instructions Print quality modes see page 31 Draft mode which reduces the amount of toner required per page at the expense of lower print quality intended for occasional proof printing of high density documents see page 32 First page different which enables the selection of a different paper source and media type for...

Page 47: ...ic Options tab 5 Under Resolution select a print quality by clicking the radio button For Windows 2000 and Windows NT PS PCL5e operating systems 1 In your application select File and then Print 2 Select the Xerox Phaser 5400 laser printer driver 3 Open the Properties dialog box 4 Select the Advanced tab 5 Under Graphic select Resolution 6 Select the desired print quality 600x600 dpi 1200 Quality o...

Page 48: ...s NT PS PCL5e operating systems 1 In your application select File and then Print 2 Select the Xerox Phaser 5400 laser printer driver 3 Open the Properties dialog box 4 Select the Advanced tab 5 Under Document Options select Printer Features 6 Select Quality under Printer Features 7 Select Draft Mode On For Windows NT PCL6 operating system 1 In your application select File and then Print 2 Select t...

Page 49: ... is available Feeding custom size paper from Trays 1 2 or 3 A4 Letter If the Width is in the range from 5 83 to 11 69 in 148 to 297 mm and the Length is in the range 3 875 to 8 5 in 98 4 to 216 mm then A3 Ledger If the Width is in the range from 8 27 to 11 69 in 210 to 297 mm and the Length is in the range 5 5 to 17 in 139 7 to 431 8 mm then Duplex Not Available Paper Tray All trays are available ...

Page 50: ...m size paper 1 In your application select File and then Print 2 Select the Xerox Phaser 5400 laser printer driver 3 Open the Properties dialog box 4 Select the Advanced tab 5 Under Paper Output select Paper Size 6 Select PostScript Custom Page Size under Paper Size 7 In the Custom Page Size Definition dialog set the dimensions for Width and Height in Inches Millimeters or Points select the Paper F...

Page 51: ...en into chunks as large as memory allows All collated copies will still be printed but you will have to put the chunks in order by hand Note Many applications have a collate option in their Print dialog box Since collation done at the printer is faster than collation performed by an application only select collation in the printer driver not in the application for faster printing of a collated job...

Page 52: ...r printer driver 3 Open the Properties dialog box 4 Select the Layout Watermark tab 5 Under Pages per side select 1 2 4 6 9 or 16 Pages Up from the drop down list For Windows 2000 and Windows NT PS PCL5e operating systems 1 In your application select File and then Print 2 Select the Xerox Phaser 5400 laser printer driver 3 Open the Properties dialog box 4 Select the Advanced tab 5 Under Document O...

Page 53: ... The booklet printing feature is available for any paper sizes that can be used for duplex printing See the table of supported paper sizes in the User Guide The booklet can have any number of page images The printed output will contain one fourth the number of sheets of paper two page images per side per sheet If the total number of page images is not an exact multiple of four there will be one or...

Page 54: ...indows NT PS PCL5e operating systems 1 In your application select File and then Print 2 Select the Xerox Phaser 5400 laser printer driver 3 Open the Properties dialog box 4 Select the Advanced tab 5 Under Document Options select Booklet Layout 6 Select Enabled 7 Under Booklet Layout change the Fold Setting by selecting either On Left or On Right For Windows NT PCL6 operating system 1 In your appli...

Page 55: ...ton to create your own text 6 Check for First Page Only Print in Foreground or Outline Only For Windows 2000 and Windows NT PS operating systems 1 In your application select File and then Print 2 Select the Xerox Phaser 5400 laser printer driver 3 Open the Properties dialog box 4 Select the Advanced tab 5 Under Document Options select Watermark 6 Select Enabled 7 Under Watermark you can adjust the...

Page 56: ...t Secure Print or Proof Print from the drop down list Note You must have configured the printer on the System Configuration tab to include the hard disk 6 Under Password type a 4 digit password using the numbers 0 through 7 7 Click the OK button to save the properties 8 Send the job to the printer For the Windows 2000 and Windows NT PS PCL5e operating systems 1 In your application select File and ...

Page 57: ...e or proof job Automatic tray switching With automatic tray switching available for both PCL and PostScript jobs you can group two or more input trays together into one logical tray You specify the order in which the trays will be searched to satisfy a print request Tray switching is useful for Increasing paper capacity When the current paper tray runs out of paper the printer automatically switch...

Page 58: ... when sending a job to the printer that request is overridden The printer attempts to feed paper from the MBF first If the MBF is out of paper then the other trays in the sequence are searched If you specify an input tray when sending a job to the printer and that tray is included in the tray sequence and MBF is not in the tray sequence the printer checks that tray for the correct size and type of...

Page 59: ...ecified Not specified Default size default type Not specified Not specified Specified not manual feed Default size Type configured in specified tray Not specified Not specified Specified manual feed Manual feed request default size Not specified Specified Not specified Default type specified size Not specified Specified Specified not manual feed Specified size Type configured in specified tray Not...

Page 60: ... for Letter paper but there is no paper in Tray 1 You request Letter paper with the source set to Auto Since Tray 1 is empty paper is fed from Tray 2 until it becomes empty When Tray 2 becomes empty a load paper message is displayed on the control panel Although Tray 3 contains letter paper this tray is not searched since it is not part of the Tray Sequence The Tray Sequence is 1 2 3 You request T...

Page 61: ...trays with the requested size paper and specify the paper type in the tray using the Tray Menu Press the Value keys labeled 3 or 7 to scroll through all the trays and see the size and type of paper in each tray If one of these alternate papers is acceptable press the Enter key labeled 4 to continue printing on the new paper You see the available trays in tray sequence order ...

Page 62: ...CentreWare DP using Internet technology as the platform It provides another option for implementing advanced services for the configuration and management of your printer Each of the features in CentreWare Internet Services can be accessed through familiar client resident software interfaces such as the Netscape Navigator or Microsoft Internet Explorer browsers Through a web browser users and syst...

Page 63: ...otely manage install and troubleshoot printers on your network using a web browser Printers are found through network or print server discovery and managed over TCP IP networks using SNMP Simple Network Management Protocol Some of the features provided by CentreWare Web are Ability to remotely add ports queues and drivers to Windows 2000 and NT4 SP6 print servers Install troubleshoot upgrade and c...

Page 64: ...iate printer driver s Driver features Printer drivers support the following features Input tray selection Output bin selection Duplex selection Paper size orientation and media Number of copies Collating Environment PCL5e emulation printer driver PCL6 emulation printer driver Windows Windows 95 98 Me Windows 2000 Windows NT 4 0 Windows 95 98 Me Windows NT 4 0 Environment PostScript printer driver ...

Page 65: ...p Water mark Overlay Duplex Booklet printing PCL5e Windows 95 98 Me C C C C C C C C C Windows 2000 U U U U U N N U U Windows NT 4 0 U U U U N N N U N PCL6 Windows 95 98 Me C C C C C C N C C Windows NT 4 0 C C C C C C N C C PostScript Windows 95 98 Me C C C C C C N C C Windows 2000 U U U U U U N U U Windows NT 4 0 U U U U U U N U U MAC PS N N Y N Y N N Y N UNIX PS N N N N N N N Y N C Feature only a...

Page 66: ...a Narrow Bold Oblique Helvetica Narrow Oblique Helvetica Oblique ITC Bookman Demi ITC Bookman Demi Italic ITC Bookman Light ITC Bookman Light Italic Times Bold Times Bold Italic Times Italic Times Roman ITC Zapf Chancery Medium Italic Wingdings Marigold CG Omega CG Omega Bold CG Omega Bold Italic CG Omega Italic CG Times CG Times Bold CG Times Bold Italic CG Times Italic Univers Bold Univers Bold ...

Page 67: ...hard disk Refer to the User Guide or the Xerox web site for part numbers of the hard drive and memory Downloading fonts saves print time when printing large or several documents that use those fonts Fonts can be downloaded to the printer with the Font Download Utility the PCL5e driver s Font Installer option or PJL commands as described on page 54 AvantGarde Book AvantGarde BookOblique AvantGarde ...

Page 68: ...ownloading fonts forms and overlays The optional flash memory may also be used for downloading fonts and macros Memory board DIMM locations The following figure shows the location of memory boards DIMMs on the printer s controller board Note The printer must be set to Reset Mode before the following two actions can be performed See page 28 Hard disk initialization The hard disk is preformatted and...

Page 69: ...s based graphical user interface tool It downloads fonts single double byte to the hard disk or flash memory In PostScript the supported font types are Type 1 Type 2 and Forms In PCL the supported font types are HP PCL fonts Bitmap Scalable and Macros Windows TrueType fonts can also be downloaded in PostScript Type 1 ASCII The Font Download Utility can print a list of the fonts currently loaded on...

Page 70: ...onts and macros PJL commands You can use the PJL command FSDOWNLOAD to download fonts forms and macros to the printer s disk or flash memory You can use the PJL command FSDELETE to delete them Using the FSDOWNLOAD command The FSDOWNLOAD command is used to download fonts forms and macros to the printer s file system If a file with the same name exists the downloaded file overwrites it Syntax PJL FS...

Page 71: ...he following PCL sequence In the example note that The macro ID must be the same case as in the original download command The number of characters in the macro name after the n and before the W must equal the ID byte count plus 1 The following example shows a sequence of commands that can be sent to the printer to download a font to the disk ESC 12345X PJL CR LF PJL FSDOWNLOAD FORMAT BINARY NAME 0...

Page 72: ...name in the FSDOWNLOAD command The number of characters in the macro name 6 in the above example must equal the string ID byte count plus 1 Using the FSDELETE command The FSDELETE command is used to delete files from the printer s file system ESC n6W HEX 00 font2 CR LF Sets the current font ID to the given string ID font2 ESC n6W HEX 01 font1 CR LF Associates the current font ID with the string ID...

Page 73: ... driver you can create secure jobs by preceding the job with the following PJL commands PJL XSECUREJOB PJL XJOBPASSWORD number These commands must be immediately followed by a standard PJL JOB command that includes the jobname The job name can be up to 16 alphanumeric characters The password must contain four numeric characters 0 7 If there is not a job name or there is a syntax error in the job n...

Page 74: ...e associated with password 7777 requesting five collated sets in addition to the proof copy ESC 12345X PJL XPROOFJOB PJL XJOBPASSWORD 7777 PJL JOB NAME Sample PJL ENTER LANGUAGE PCL PJL SET QTY 5 PCL file ESC 012345X PJL EOJ ESC 012345X The printer continues processing all data after the PJL SET QTY 5 command as part of the proof job named Sample The proof job is stored on the hard disk under the ...

Page 75: ...vice Note DDNS only works if DHCP and DNS servers are running and DNS gets updated from DHCP For setting a TCP IP address refer to the Quick Network Install Guide Determine which method is appropriate to use for your network and follow the steps of the procedure Enabling bidirectional communications If a TCP IP port is established you can configure the port to enable bidirectional communications 1...

Page 76: ...nt driver Please contact your system administrator You can still print to the device however any status received from the device is ignored 2 If the device is not responding possibly due to being powered off or disconnected the following message displays Device status is not available at this time The print device is not responding Depending on the error condition you may still be able to print to...

Page 77: ...ing Warming up Not Ready Unknown Printer State Warning status Toner Low Paper Low Paper Tray Empty Insert Paper Tray Error condition status Offline Cover Open Toner Empty Paper jam Output Bin Full Load Paper User Intervention Required Printing is not possible whenever error messages are displayed Printing will not resume until the error message is resolved ...

Page 78: ...ented or decremented by 1 each time the key is pressed Holding down Value Up or Value Down causes continuous scrolling through the values 5 To change other characters in the Subnet Mask press Item Up or Item Down to scroll right or left respectively through the character string then press Value Up or Value Down to change the value of the character above the cursor as in Step 4 6 When you have comp...

Page 79: ... You should see Ethernet Menu Default Gateway 7 Press On Line You should see Ready Setting up AppSocket To enable or disable the AppSocket protocol perform the following steps 1 Press Menu Up or Menu Down until you see Menus Ethernet Menu 2 Press Item Up or Item Down until you see Ethernet Menu AppSocket Enabl 3 Press Value Up or Value Down until you see AppSocket Enabl On or Off 4 Press Enter You...

Page 80: ...anel 1 Press Menu Up or Menu Down until you see Menus Job Menu 2 Press Item Up or Item Down until you see Job Menu Restart Printer 3 Press Value Up or Value Down until you see Restart Printer Yes 4 Press the Enter key labeled 4 You should see Restart Printer Please Wait Power On Initializing Please Wait Ready ...

Page 81: ...this software is contained in the help files If you prefer a CentreWare DP User Guide in several languages is provided in PDF form on the Printer Management Software CD ROM in the doc folder Please take a minute to examine this software Advanced setup in bindery mode or for NetWare Directory Services Network NDS The Advanced Setup option of CentreWare DP gives you an additional tool to control how...

Page 82: ...fy that the printer is receiving network traffic by monitoring the LEDs on the back of the printer When the printer is connected to a functioning network receiving traffic its link LED is green and its orange traffic LED is flashing rapidly 3 Verify that the client is logged into the network and printing to the correct print queue Also verify that the user has access to the Phaser 5400 printer que...

Page 83: ... a known good network device to it and test 4 Print a Configuration Sheet from your printer 5 Review the Connectivity Settings and check for these things NetWare is enabled Frame Type matches the frame type of the desired file server Note To determine your NetWare IPX frame type type config at the Novell console screen On large networks using multiple IPX frame types it is CRITICAL that the frame ...

Page 84: ...er still selected select the Printer drop down menu and highlight the Advanced Setup entry 5 Under this menu is a sub menu for NetWare Select this option 6 When the Advanced Setup dialog appears verify the information contained on this screen against the information contained on the Configuration Sheet Check for these items Check the queue name the Phaser 5400 printer is set to service If necessar...

Page 85: ...x is brought to the front and displays information about frame type and connectors 15 Be certain the printer is enabled and the connector and frame type are correct 16 If any changes are made reset the printer from the control panel 17 Run a test print again If the test print does not print refer to the Xerox web site at www xerox com officeprinting support ...

Page 86: ...s green and its traffic LED amber is flashing rapidly 3 Verify that the client is logged into the network and printing to the correct print queue Also verify that the user has access to the Phaser 5400 printer queue 4 Verify that the Phaser 5400 printer NetWare print queue exists is accepting jobs and has a Print Server attached If not try using Setup Wizard in CentreWare DP to reconfigure the pri...

Page 87: ...raNetWare Client or Microsoft Client for IPX networks TCP IP Networks No additional software is required but your printer must have a valid TCP IP address assigned 5 If any of the above protocols or services are not installed install any components necessary and restart the system 6 Once rebooted select the Start button and Settings then select the Printers folder The printers window should appear...

Page 88: ...rk Neighborhood With the left mouse button select Properties from the cascade menu 4 The Network dialog should appear Select the Protocols tab 5 Check the list of installed network protocols for the following item TCP IP Protocol 6 If you have elected to run CentreWare DP you must have loaded Novell NetWare Client 32 and a NWLink IPX SPX Compatible transport protocol component You may also discove...

Page 89: ...heck the list of installed network components for the following item AppleTalk Protocol 6 If you have elected to run CentreWare DP you must have loaded Novell NetWare Client 32 Novell NetWare Client a Novell server on the network and an IPX SPX Compatible protocol component You may also discover printers that have been assigned a TCP IP address 7 As required install any components not listed and r...

Page 90: ... Requirements A working knowledge of the Macintosh 8 0 or higher operating system Xerox Phaser 5400 Laser Printer CD ROM Driver installation for Macintosh system 8 0 1 Insert the CD ROM in your computer s CD ROM drive 2 Double click on the disk icon 3 Double click on the installer icon 4 Follow the installation instructions when prompted Note For more up to date information on installing your Phas...

Page 91: ...re that it is selected as the current printer in the Chooser 1 At the printer print a Configuration Sheet and note the EtherTalk Name Refer to the Quick Network Install Guide for instructions 2 At your computer select the APPLE in the upper left corner of the Desktop 3 Select the Chooser entry in the menu 4 Make sure that AppleTalk is active 5 In the left window of the Chooser click on the Adobe P...

Page 92: ...een loaded into each Macintosh computer that is sending jobs to the Phaser 5400 printer For first time installations 9 Highlight the PPD for your Phaser 5400 printer Click Select 10 Configure your driver with the options installed on your printer 11 Go to Step 16 For reconfiguration of existing printers 12 Click on Select PPD The window displays a list of PostScript printer description files 13 Hi...

Page 93: ...orm any of the checks outlined in this section 3 If your printer name does not appear proceed to the next section Macintosh troubleshooting step by step 1 Verify that the printer is plugged in turned on and connected to an active network 2 Verify cable connection to the printer from the EtherTalk network 3 Verify that the printer is receiving network traffic by monitoring the LEDs on the back of t...

Page 94: ...n about the connection and configuration of your printer in UNIX environments refer to the following documentation also included on your Printer Management Software CD ROM in the doc unix folder For Solaris systems CentreWare for UNIX Systems User Guide For TTY TTY Printer Services User Guide ...

Page 95: ... contains information on solving paper size type mismatch problems print quality problems and media jams Quick Network Install Guide step by step instructions for how to connect your printer to a network in a specific environment Installation Setup poster Supplies Options instructions Printer drivers ReadMe release notes Material Safety Data Sheets MSDS Software utilities Electronic registration s...

Page 96: ...x com officeprinting infoSMART The infoSMART Knowledge Base is the same troubleshooting knowledge database used by Xerox Customer Support staff to provide the latest technical information on Application issues Networking issues Printer errors Print quality issues Troubleshooting www xerox com officeprinting support Technical support information www xerox com officeprinting contacts Local sales and...

Page 97: ...eaning Clean the exterior of the printer about once a month using a soft slightly damp cloth For stubborn stains soak the cloth in a mild detergent solution and squeeze out the excess water before cleaning Always finish by wiping the printer again with a soft dry cloth Caution Use only water or mild detergent on exterior surfaces Do not use cleaning alcohol or other volatile substances that may di...

Page 98: ...ing the interior of the printer The Fuser area becomes very hot in operation It is best to wait at least 15 minutes for the printer to cool off before attempting to clean the interior of the printer After removing a paper jam or replacing the Laser Print Cartridge remove any paper scraps and wipe off paper dust with a dry clean cloth 3925 102 3925 103 ...

Page 99: ...properly If the printer is configured properly check the Configuration Sheet to confirm that the correct PDL is enabled for the port or protocol you are using If the correct PDL is enabled and the printer continues not to print contact your Customer Support Center Problem A printed page does not look like it should Actions Make certain that the software application you are using to create your pri...

Page 100: ...ts there is a problem in the PostScript coding Correct the coding problem and resend the job Asking for features not available can cause a configuration error If an error page does not print and the job still does not print the job may require additional memory Problem A PostScript or PCL job fails to print Actions for a PostScript job Check that you are using a PostScript printer driver Set the P...

Page 101: ...tive trays this is especially important for transparencies because they tend to stick together Do not overfill the media tray don t stack paper higher than the indicator mark on the side or back of the tray Clean the paper feed rollers and paper pick rollers refer to page 81 Problem Labels are printed on the wrong side Actions Make sure that the labels are loaded face up in the trays or Multi shee...

Page 102: ...r Customer Support Center 5 flashes 1 second 5 flashes etc A resolution enhancement self test fault has occurred Contact your Customer Support Center 6 flashes 1 second 6 flashes etc A communications ports internal loopback test fault has occurred Contact your Customer Support Center 8 flashes 1 second 8 flashes etc A system controller to print engine fault has occurred Make sure the controller bo...

Page 103: ... the exposed paper path close the covers and trays then refer back to the control panel for further messages Close Covers The top or rear cover is open Close the open cover to resume printing Close Stacker Door The Stacker Bin s rear door is open Close the door to resume printing Close Tray 2 Rear Door The printer cannot feed from the 2 000 Sheet Feeder when installed as Tray 2 because the rear tr...

Page 104: ...Please Wait The printer is being loaded with new operating code Please wait Duplex Jam Open Rear Cover A paper jam has occurred in the Duplex Module Open the printer s rear cover then refer back to the control panel for further messages Duplex Unit Fail or Removed The Duplex Module has failed or is not installed properly Printing from the Duplex Module cannot continue Remove and re install the Dup...

Page 105: ...reWare Internet Services It may be necessary to re initialize without the lock Initializing This message appears for a few seconds while the printer is initializing after being powered ON Wait Initializing Flash Memory The printer is initializing the flash memory Wait Insert MBF The printer cannot feed from the Multi sheet Bypass Feeder because it is not set normally or is not in position Insert t...

Page 106: ...anel to match the requested paper type If you decide to use another paper size or type for the job press the Value keys labeled 3 or 7 to scroll through all the trays until you find an acceptable alternate then press the Enter key labeled 4 Printing continues on the new paper but data can be lost off the page or not formatted correctly when you change paper size type Low Paper MBF or Low Paper Tra...

Page 107: ...Open Top Cover A paper jam has occurred inside the top cover Open the printer s top cover then refer back to the control panel for further messages Paper Size Jam Open Rear Cover The size of the paper fed into the printer was not the size expected by the printer causing a jam Load any tray with the size requested in the job printing Check the Multi sheet Bypass Feeder size menu to confirm that the...

Page 108: ...l menu structure is being printed Processing PCL Font List A PCL Font List is being printed Processing PostScript A PostScript Font List is being printed Processing TEST A Test Page is being printed Processing Tray n The specified tray is being used Ready The printer is online and waiting for data to print Remove Output From Stacker Bin The Stacker Bin is full Remove the output from the Stacker Bi...

Page 109: ... 3 Failure Power Off On Tray 2 or Tray 3 has failed Power OFF the printer Reinstall the 500 Sheet Feeders for Tray 2 and Tray 3 Power ON the printer If the problem persists contact your Customer Service Center Tray 3 Failure Power Off On Tray 3 has failed Power OFF the printer Reinstall the Tray 3 Feeder Power ON the printer If the problem persists contact your Customer Service Center Tray 3 Jam O...

Page 110: ...Up The Fuser has not warmed up yet This message disappears when the printer is ready The message displays at Power ON and may display after the cover has been opened for some time or when the printer is exiting Power Saver mode Error Description and corrective action ...

Page 111: ...e paper Processor Motorola Power PC 266 MHz Maximum Monthly Duty Cycle Up to 200 000 impressions Nominal Voltage 100 120 V or 220 240 V Nominal Frequency 50 60 Hz Power Consumption Less than 1440 W 110 V or 1500 W 220 V during operation Power Saver mode operational after specified period of not printing 15 30 60 90 120 minutes or Off Noise Level 49 5 dBA continuous running 35 dBA in standby Temper...

Page 112: ...Ware administration software Unidirectional Windows 95 98 Me drivers Bidirectional Windows 2000 drivers Internet Printer Administration Embedded HTTP Server PostScript 3 Language Available Options 16 32 and 64 Mbyte EDO DRAM DIMMs 8 Mbyte Flash ROM DIMMs 2 Gbyte Hard Disk Drive 500 Sheet Feeder A4 Letter size tray 500 Sheet Feeder A3 Ledger size tray 2 000 Sheet Feeder A4 Letter size tray A4 Lette...

Page 113: ...l environment This equipment generates uses and can radiate radio frequency energy and if not installed and used in accordance with the instructions may cause harmful interference to radio communications Operation of this equipment in a residential area is likely to cause harmful interference in which case the user will be required to correct the interference at his own expense Changes or modifica...

Page 114: ...Notices and Certifications Certifications Canada 60 HZ 115V The equipment is listed by the Underwriters Laboratories UL 1950 and approved by Underwriters Laboratories to meet Canadian Standards Association Certification requirements CSA22 2 No 950 ...

Page 115: ...ted to electromagnetic compatibility A full declaration defining the relevant directives and referenced standards can be obtained from your Xerox representative WARNING In order to allow this equipment to operate in proximity to Industrial Scientific and Medical ISM equipment the external radiation from ISM equipment may have to be limited or special mitigation measures taken WARNING This is a Cla...

Page 116: ...ulations All system ports meet the requirements for Safety Extra Low Voltage SELV circuits for connection to customer owned devices and networks Additions of customer owned or third party accessories attached to the system must meet or exceed the requirements listed above Since this system consists of several modules requiring external connection it must be installed per the manufacturer s install...

Page 117: ...r MediaSize Supported devices A3 297x420mm SEF Ec l27A eA3Paper 5 Trays 1 3 MBF Duplex A4 210x297mm LEF Ec l26A eA4Paper 2 Trays 1 3 MBF Duplex A5 148x210mm LEF Ec l25A eA5Paper 16 Tray 1 MBF Duplex A6 105x148mm SEF Ec l24A eA6Paper 18 MBF B4 JIS 257x364mm SEF Ec l46A eJB4Paper 10 Trays 1 3 MBF Duplex B5 JIS 182x257mm LEF Ec l45A eJB5Paper 11 Trays 1 3 MBF Duplex Statement 5 5x8 5 LEF Ec l15A eSta...

Page 118: ... if loaded from Network Administration software with a maximum of 16 characters each Paper type selection Paper type PCL5e command PCL6 string parameter for MediaType Plain Ec n6WdPlain Plain Preprinted Ec n11WdPreprinted Preprinted Letterhead Ec n11WdLetterhead Letterhead Transparency Ec n13WdTransparency Transparency Prepunched Ec n11WdPrepunched Prepunched Labels Ec n7WdLabels Labels Bond Ec n5...

Page 119: ...UpperCassette 4 n a Tray 22 2 Trays 2 or 3 may be the optional 2 000 Sheet Feeder Ec l4H eLowerCassette 5 Tray 1 Tray 33 3 Tray 3 is the optional 2 000 Sheet Feeder Ec l5H eOptionalTray 130 Tray 1 Manual MBF4 4 The MBF selection refers to the 150 Multi sheet Bypass Feeder Ec l2H eManualFeed 2 n a Manual Envelopes MBF Tray Ec l3H eManualEnvelope 131 n a MBF multi sheet Ec l8H eMultiPurposeTray 3 n ...

Page 120: ...DARD Stacker Bin Ec l2G LOWER or OPTIONALOUTPUTBIN1 Printer specific PJL commands Function PJL command Value range Start Secure Job PJL XSECUREJOB n a Start Proof Job PJL XPROOFJOB n a Job Password Assign PJL SET XJOBPASSWORD integer 4 digit string 0 7 Resolution PJL SET RESO UTION integer 600 1200 1200 dpi Quality PJL SET X1200QUALITY value ON OFF Select Collated Sets PJL SET QTY integer 0 999 Se...

Page 121: ... value NDS BEM NDSBEM Novell NDS Tree PJL DEFAULT XNDSTREE tree name 0 63 characters Novell NDS Context PJL DEFAULT XNDSCONTEXT context 0 255 characters Jam Recovery PJL SET JAMRECOVERY value ON OFF Set Parameter for Defaults PJL DEFAULT XDEFAULTS value USA EUROPE inches millimeters Request Print of Configuration Sheet PJL SETXEMBEDDEDJOB 2 Request Version of Controller Software PJL DINQUIRE XVERS...

Page 122: ...106 Xerox Phaser 5400 Laser Printer Appendix C Unique Printer Commands ...

Page 123: ...he printer 64 setting a TCP IP address 59 setting up AppSocket 63 Subnet Mask 62 UNIX 78 control panel 1 5 display examples 3 location on printer 1 keys description 4 5 locking menus 8 menu system see menus messages 87 94 custom size paper 33 D diagnostics LED flash sequences 86 downloading fonts 53 forms 53 macros 53 draft mode 32 drivers PCL emulation description 48 features 48 PostScript descri...

Page 124: ...ading 53 MaiLinx Mail send and receive 47 menus ethernet menu see ethernet menu job menu see job menu locking 8 main menu see main menu Novell menu see Novell menu parallel menu see parallel menu password menu see password menu PCL menu see PCL menu print menu see print menu reset menu see reset menu setting options 6 7 system menu see system menu tray menu see tray menu USB menu see USB menu N ne...

Page 125: ...pport 80 temperature for printer xi toner reducing usage 17 transparencies picking errors 85 tray menu 11 13 tray sequence also see tray switching usage examples 44 usage rules 42 tray switching also see tray sequence description 41 45 examples 44 rules 42 troubleshooting 79 control panel messages 87 94 frequent paper picking errors 85 infoSMART web site 80 local sales and support 80 Macintosh 77 ...

Page 126: ......

Page 127: ...7 2 1 P 5 8 0 1 0 ...

Reviews: