


15
®
LEADERS IN POLE & AERIAL FITNESS
Copyright© Vertical Leisure Ltd. 2020 Version 3.0
All rights reserved.
B Pole
A Pole
6mm Hex Key
CLOCKWISE to
TIGHTEN
ANTI/COUNTER
- CLOCKWISE to
LOOSEN
Key not in U Slot
Unaligned
Hex Screw
Unaligned
Hex Screw
Visible gap
EXP
AN
D
CO
NTRA
CT
B Pole
A Pole
EX
PA
ND
CONTRA
CT
'A' Pole
X-Joint
Aligned
Key & U slot
‘B’ Pole
Tube Hex Key Hole
EX
PA
ND
CONTRA
CT
EX
PA
ND
CONTRA
CT
Key
X-Joint
‘A’ Pole
U Keyway Slot
Tube Hex Key Hole
U Keyway slot
Tube Hex Key Hole
‘A’ Pole
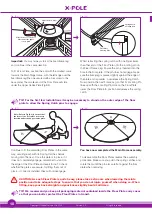
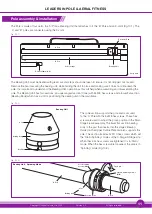
Using the X-Joint to install the pole tubes
At the top of the 'A' Pole, you will see a hole on the outside and two U slots on the inside of the pole. To install the X-Joint
simply slide one half into the A-Pole, ensuring the 2 x keys on the joint locate fully into the corresponding U slots in the tube.
The slots stop the tube rotating. When inserting the X-Joint make sure that the large locking screw on the X-Joint aligns with
the hex key hole in the pole tube otherwise you will not be able to insert the hex key.
DO NOT TIGHTEN/EXPAND NOW.
Fig. (13.1)
Fig. (13.2)
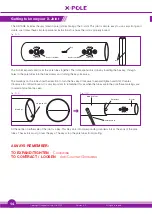
Next, take the 'B' Pole and slide it onto the X-Joint, checking the 'A' and 'B' Poles butt together. Take care to ensure that
the hole in the 'B' Pole is positioned in line with the X-Joint’s hex screw. Once properly joined, there should be a smooth
transition between the 'A' and 'B' Poles. Now that the Poles are joined, you can begin to 'TIGHTEN' the X-Joint, ½ a turn
at a time, alternating between the hex screw in the 'A' Pole, then the 'B' Pole, until the X-Joint has sufficiently expanded
and locked the two poles securely together.
Fig. (13.3)
Fig. (13.4)
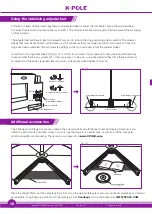
It is important to tighten the locking screws
progressively, alternating the screws, top > bottom > top
etc. so that the joint expands evenly, otherwise one side
will not expand fully and the pole tube joints will not lock
correctly.
To undo the X-Joint - turn both hex screws ‘anti/
counter-clockwise’. Undo screws until the Hex Key
moves freely and remove the X-JOINT.
Fig. (13.5)