background image

48

WPS-550-BUL-IP Installation Manual

Video Streaming 1 and 2 Setup, Continued

GOP Size

GOP (Group of Pictures) is used to generate the visible frames of a video stream. The GOP size setting 

determines the multiplier to use for producing intermediate frames based on a standard of 15fps.
Example: 1/2xFPS=7.5fps     1xFPS=15fps     2xFPS=30fps

Note: 

Changing this setting will affect the performance of the stream. The highest setting (2XFPS) may result in 

saved video playback issues when Video Format is MPEG4 or MJPEG. We recommend that this setting is left at 

the default setting.

Video Format

While the default of H.264 is most efficient and will work in most cases; some devices that access Streaming 1 

or Streaming 2 video streams may not support this format. For example, mobile devices, and automation system 

GUIs sometimes do not support H.264. Adjust the format to suit the system requirements and intended use of 

the streams.

Available Formats

• 

H.264

• 

MJPEG

RTSP Path

Enter the name of RTSP (Real Time Streaming Protocol) path if RTSP has been configured.

Click “Apply” at the bottom right of the page to save modified settings.

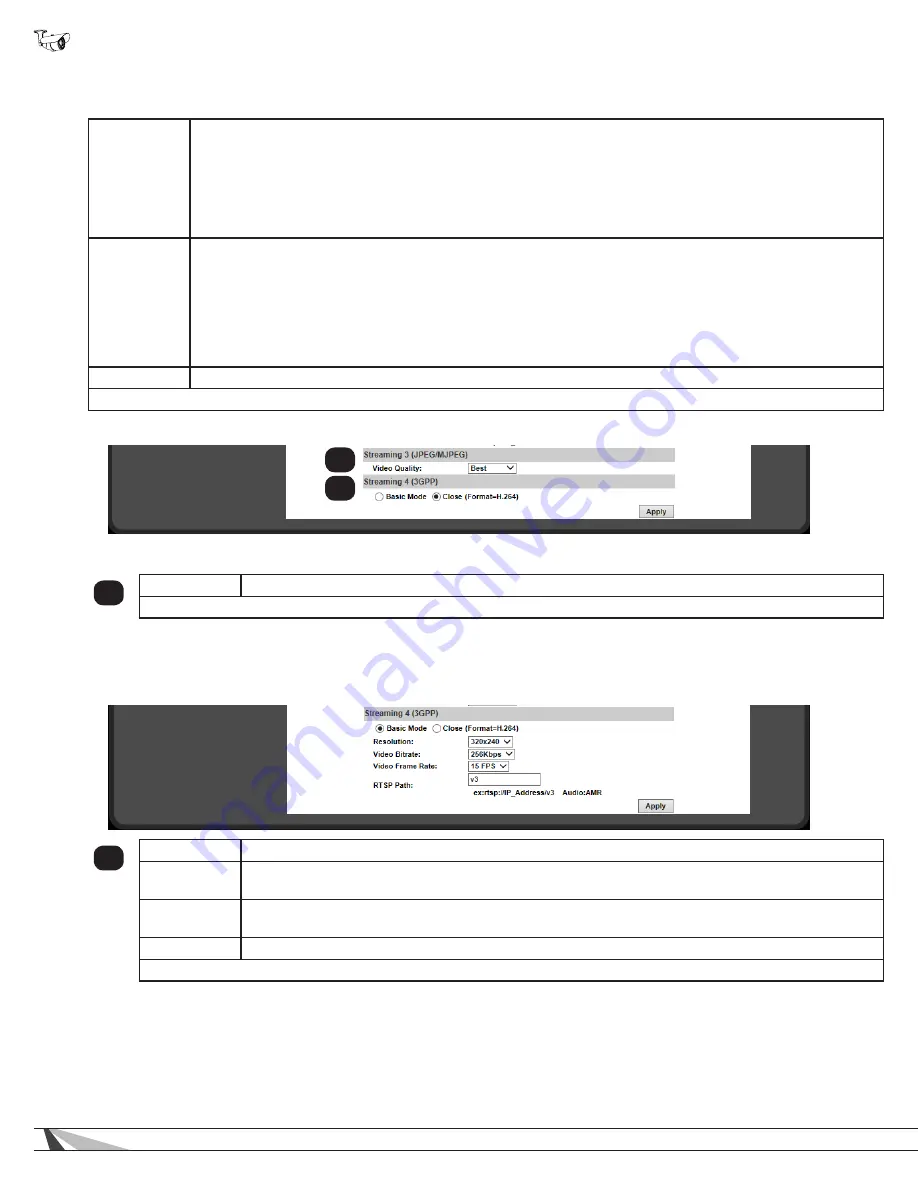
9.4.5. Streaming 3 and 4 Setup

9.4.5.1.  Streaming 3

1

Video Quality

Changes the video bitrate based on a level from Low (slowest) to Best (fastest).

Click “Apply” at the bottom-right of the page to save modified settings.

9.4.5.2.  Streaming 4

In “Close” mode, stream 4 defaults to h.264 only (settings will be inherited from Stream 2). Switch the setting to “Basic” mode to 

access more settings:

2

Resolution

Sets the resolution for Stream 4. Select from 176x144 (lowest), 320x240 (default), or 640x480 (best).

Video Bitrate

Set the constant bitrate for Stream 4. Settings range from 32 Kbps (minimum) to 1 Mbps (maximum). 

Default: 256Kbps.

Video Frame 

Rate

Set the frames-per-second (FPS) rate for Stream 4. Select from 5 to 30FPS. Default: 15FPS.

RTSP Path

Enter the name of RTSP (Real Time Streaming Protocol) path if RTSP has been configured.

Click “Apply” at the bottom right of the page to save modified settings.

1

2

Summary of Contents for Surveillance WPS-550-BUL-IP

Page 1: ...CAMERA IP BULLET INSTALLATION MANUAL Review manual thoroughly before installation Retain for future reference WPS 550 BUL IP...

Page 2: ...VICEABLE PARTS INSIDE REFER SERVICING TO QUALIFIED SERVICE PERSONNEL The lightning flash with arrowhead symbol within an equilateral triangle is intended to alert the user to the presence of uninsulat...

Page 3: ...lation 11 7 3 Mount the Camera 11 7 3 1 Using Mounting Accessories 11 7 3 2 Surface Mounting 11 7 4 Connecting the Test Adapter 11 7 5 Aiming the Camera 11 7 6 Closing the Camera 11 7 7 Network Softwa...

Page 4: ...er Login 22 9 2 3 2 Add User Guest Account only 22 9 2 3 3 User List 22 9 2 3 4 User Account Levels 22 9 2 3 5 Administrator Account Setup 23 9 2 3 6 Add Edit or Remove a Guest Account 23 9 2 4 System...

Page 5: ...ettings 42 9 4 1 Image Settings Menu 42 9 4 1 1 Tips for Getting the Best Camera Image 43 9 4 2 How to Configure Day and Night Settings Color Modes 43 9 4 2 1 Day Night Modes 43 9 4 2 2 EXT Light Sens...

Page 6: ...ling for Events 54 9 5 3 3 Set Up Snapshot 54 9 6 Log List 55 9 6 3 1 System Log 55 9 6 3 2 Motion Detection Log 55 9 6 3 3 All Logs 55 9 7 SD Card Menu 56 9 7 1 Playback 56 9 7 2 SD Management 56 10...

Page 7: ...vanced Image Processing Advanced DSP Digital Signal Processor to improve image quality including Sense Up Automatically slows the shutter speed to improve image quality in low light D WDR Digital Wide...

Page 8: ...ng to power cameras Network connection at each camera location Access to a PC connected to the local network Static IP address to assign to the camera Additional access information for network equipme...

Page 9: ...o the camera in the network router The user enters this address into a PC smartphone or other device connected to the LAN and logs in using a customizable username and password For access outside the...

Page 10: ...tages or AC current will cause permanent damage that is not covered by the warranty 6 1 Network Cable Recommendation PoE and non PoE Cable Type Cat5e 6 Max Length 100 meters 328 feet Termination 568B...

Page 11: ...nt the camera and then continue to 7 4 Aiming the Camera below 7 3 2 Surface Mounting A Use the camera mounting base as a template to mark the location of the 3 screws on the mounting surface B Connec...

Page 12: ...n the software Windows may attempt to block the action If this occurs allow the software to run No changes will be made to Windows or other system files It may be necessary to log in as or provide the...

Page 13: ...xamples FrontDoor1 SideDoor D Enter the reserved static IP address for the camera E Enter the Net Mask usually 255 255 255 0 F Enter the default Gateway found in the router G Enter the DNS 1 address f...

Page 14: ...the WPS IP Installer software by double clicking a camera in the device list C A dialog box will open asking for a username and password Default settings Username admin Password admin 8 1 1 Recommend...

Page 15: ...the Digital Zoom window Use the slider to magnify the camera view to a small area of the screen The Live View will only remain at this zoom level and area selection for the current viewing session Wh...

Page 16: ...configured for a high resolution stream for viewing over a faster connection and Streaming 2 is a lower resolution for viewing over slower connections See section 9 4 3 Video Settings Menu Overview fo...

Page 17: ...account any account except the root admin account you will be prompted for a log in You must enter the admin credentials to access the menu 9 1 2 Configuration Menu Layout The the left column of the...

Page 18: ...to right of Server Name field Check to display the status bar in the camera image Click Apply at the bottom right of the page to save modified settings 9 2 1 2 OSD Setting 2 Time Stamp Select whether...

Page 19: ...le Daylight Savings Time Check to enable Daylight Savings Time Settings When this setting is enabled DST start and end times may be set Default times are standard for most participating regions Time s...

Page 20: ...lection 1 48 hours Default 6 hours Time Shift Shift the camera time forward or behind by any number of minutes from the NTP time Default 0 Click Apply at the bottom right of the page to save modified...

Page 21: ...sed F Time shift may be set to a positive or negative number of minutes if the camera time must be off by a set amount Do not use this setting to alter the time for Daylight Savings Time G Click Apply...

Page 22: ...List 3 Username Displays registered usernames that have been set up User Group Displays whether the user is an Administrator Edit Click the edit button to change the administrator username or passwor...

Page 23: ...changes C After selecting OK the camera will automatically log out Enter the new log in information in the pop up and sign back into the camera as normal to continue setup Be sure to record the Admini...

Page 24: ...firmware version installed on the camera New Firmware Click Browse to search for a firmware file to upload from the PC to the camera Click Upgrade to the right to upload the selected firmware in the N...

Page 25: ...he file to be downloaded and select the location for it using the Save As feature C All Browsers Select the location for the file from the window and then click Save The file will download to the loca...

Page 26: ...the file and select it using the window Click the Open button to return to the camera interface in the main browser window F Click the Upgrade button below the Browse button on the right A message wil...

Page 27: ...IP address type to make changes to the IP settings All IP Assignment fields remain grayed out until Static is selected IP Address Current IP address of the camera Enter a new address here to change th...

Page 28: ...he camera to appear under the PC network devices To use this feature UPnP must be enabled on the PC Also contains settings for UPnP Port forwarding for use with compatible routers 3 UPnP Enable or dis...

Page 29: ...P communications 1024 9997 RTSP End Port End port for UDP communications 1027 10000 Click Apply at the bottom right of the page to save modified settings 9 3 1 5 Multicast Setting Based on RTSP Server...

Page 30: ...ive Click Apply at the bottom right of the page to save modified settings 9 3 1 7 Bonjour Enabling this setting allows for the camera to be accessed by Mac computers as a Bonjour device 7 Bonjour Enab...

Page 31: ...then click ONVIF from the sub menu that opens 9 3 2 1 Created Request 1 Subject Displays the subject content of the loaded certificate Date Displays the certificate creation date Content Click Conten...

Page 32: ...agement host This is an advanced setting that should be used only on larger systems Configuration requires consulting with the network administrator Navigation Log in as an administrator From Home Scr...

Page 33: ...ck Advanced in left column then click Access List from the sub menu that opens 9 3 4 1 IP Address Filter Setting 1 Enable Check the box to enable IP address filtering for all visitors IP Address Use t...

Page 34: ...3 4 3 Controlling Administrator Access For installations where the Administrator account is only accessed from one computer the IP address of the computer may be reserved Enabling this feature preven...

Page 35: ...t number to video streams guarantees the quality of the stream on the network Navigation Log in as an administrator From Home Screen click Config button in top right corner then click Advanced in left...

Page 36: ...ck Config button in top right corner then click PPPoE DDNS in left column menu 9 3 6 2 PPPoE Settings 1 Enabled Disabled Turn PPPoE features on or off Enable to use PPPoE to access the camera Username...

Page 37: ...ovides maximum uptime thanks to redundant USA based servers located across the country If an NVR is being used in the system we recommend that remote DDNS access is handled through the NVR Only config...

Page 38: ...ix for the address in the host name field as shown in the example above system1 C Click Apply in the bottom right corner to save the address After a moment the page will reload and the address will ap...

Page 39: ...osoft email The SMTP server used must be configured for POP3 protocol Username Login Method Account only Enter the username for the email account being used to send notifications Some servers require...

Page 40: ...transferred Username Enter the FTP account username Password Enter the FTP account password Port Enter the port configured for FTP connections Usually port 21 Path Directory for the files to be saved...

Page 41: ...followed by the network share name Example 192 168 0 250 JonesFolder Workgroup Optional may be left blank Enter the Work Group name for the Network Share server Username Enter the Network Share server...

Page 42: ...rom 16x Low to 64x High Default 16x Shutter Time Use automatic Indoor or Outdoor preset modes or set 1 30 Slow 1 1000 Fast Default Outdoor Sense Up Set slow shutter time for use in low light areas fro...

Page 43: ...es The camera can record an image in color or black and white mode Color mode requires more light but provides the best image given ideal conditions Black and white requires much less light and the ca...

Page 44: ...lit scene to switch to Day mode Day to Night Lux Sets the detected light level at which the camera will switch from Color Day to B W Night mode Selected level must be at least 4 units lower than Night...

Page 45: ...ng a Privacy Mask 1 Select Area 1 next to the blue box 2 Place the mouse at the upper left hand corner of the area to mask hold down the left mouse button and drag the box over the area to mask and re...

Page 46: ...reams and mobile app access Stream 1 is set to the best quality that can be used for the camera for the given application External factors like network traffic or a slow Internet connection limit the...

Page 47: ...e Bitrate of the image will remain constant regardless of image complexity Provides a fixed known bandwidth use VBR Variable Bitrate Bitrate of image increases and decreases based on image complexity...

Page 48: ...ed use of the streams Available Formats H 264 MJPEG RTSP Path Enter the name of RTSP Real Time Streaming Protocol path if RTSP has been configured Click Apply at the bottom right of the page to save m...

Page 49: ...ocation The log lists detail all camera events including record triggers logins and settings changes 9 5 1 Event Settings Menu 1 Motion Detection Up to 3 areas of a scene may be set up for detecting m...

Page 50: ...5 seconds in one video clip Multiple recordings will be saved for motion events longer than the time set Motion Detection Interval section In such cases there may be a gap of several seconds between r...

Page 51: ...s configuration of Email Settings as defined in section 9 3 8 2 Mail Settings FTP check the box to save media to an FTP site or server Requires configuration of FTP as defined in section 9 3 8 3 FTP S...

Page 52: ...ct the type of Events to perform when motion is detected in that area G Select a Name to use for the Subject line of email notifications H Set the Interval between motion events the minimum time to wa...

Page 53: ...nd or save media See Only in Schedule times in section Click Apply at the bottom right of the page to save modified settings 9 5 3 1 Snapshot Menu 2 Send To Select the method used to send or save JPEG...

Page 54: ...me for the desired Day of week and Time of day 9 5 3 3 Set Up Snapshot A In the Snapshot section select the delivery method for the Snapshot B Select an Interval between the Snapshots for the selected...

Page 55: ...figuration changes This log is maintained even through loss of power Click Logs to open and view the log file in a new browser window 9 6 3 2 Motion Detection Log 2 Displays Motion Detection events Th...

Page 56: ...to be Saved or Saved As to your PC SD Card displays the total size and available space of the installed microSD card 9 7 2 SD Management 2 Auto Deletion Select the method used to send or save JPEG sn...

Page 57: ...e camera will boot up as normal and can be discovered on the network again using the IP Installer software 11 Manual Camera Reset If the camera ever becomes unresponsive after an update or Administrat...

Page 58: ...SCP Access list IEEE 802 1X RTSP TCP IP UDP SMTP FTP PPPoE DHCP DDNS NTP UPnP 3GPP SAMBA Bonjour Technology Video Adjust Brightness Contrast Hue Saturation Sharpness Shutter Speed adjustable AGC Sense...

Page 59: ...3af 3 36W 70mA IR Off 4 32W 90mA IR On 12VDC Power Consumption 2 04W 170mA IR Off 3 6W 30mA IR On Certifications Onvif Yes CE FCC RoHS Yes Client System Requirements OS Windows 7 2000 XP 2003 Microsof...

Page 60: ...60 WPS 550 BUL IP Installation Manual 14 Dimensions 3 24in 3 73in 8 39in 9 07in 3 06in 1in 0 6in...

Page 61: ...shall not apply to products that have been abused modified disassembled or improperly installed Products to be repaired under this warranty must be returned to Wirepath Surveillance or a designated se...

Page 62: ...140825 1900 2014 Wirepath Surveillance...

Reviews: