background image

27

3. 

Care, cleaning and maintenance

3.3.2  Blower box, blower wheel

Att

ention!

Before cleaning the blower box and blower wheel, de-energise the boiler!


Recommended cleaning implement: Spatula, brush and vacuum cleaner

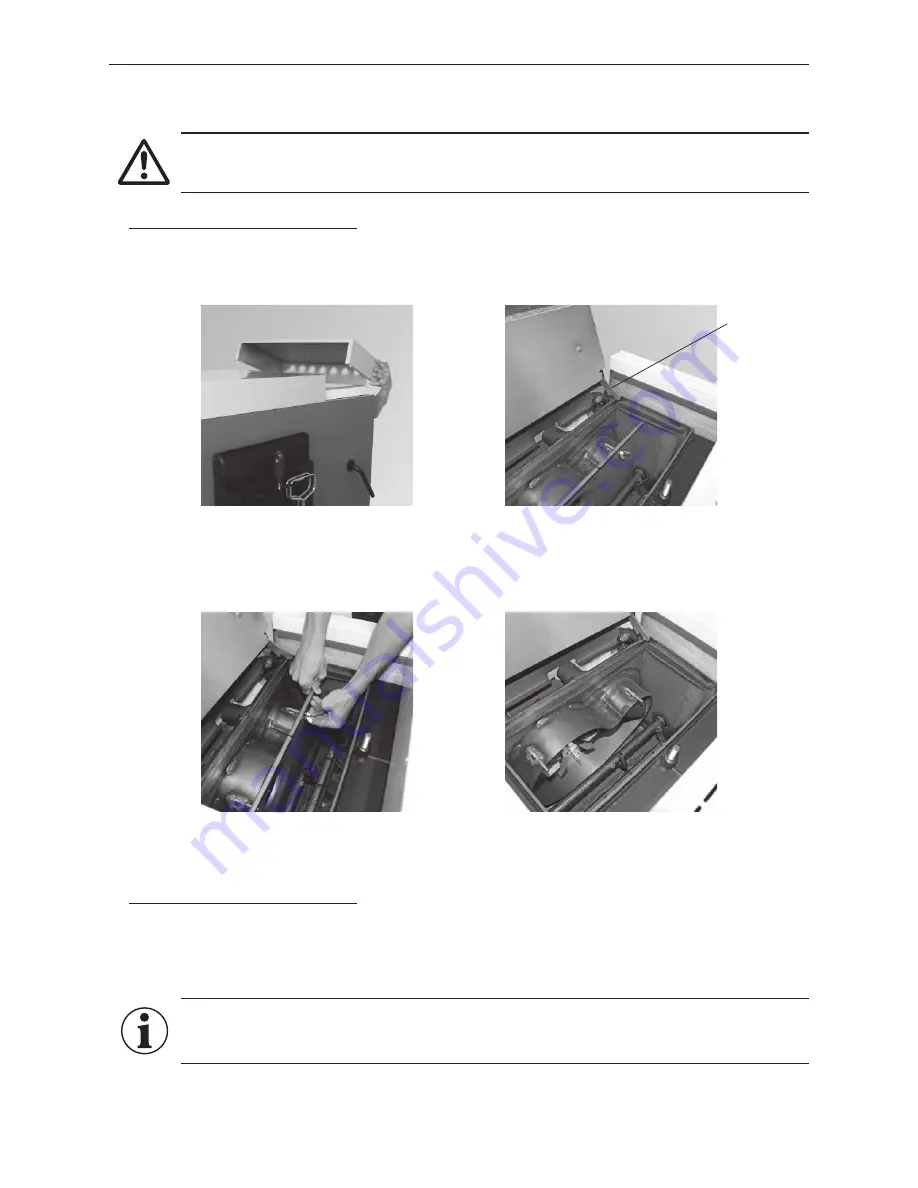
–  Remove the rear boiler cover – Fig. 63.

–  Remove screw connection from cleaning cover and fold up cover until cover lock snaps in – Fig. 64.

Fig. 63  Removing the boiler cover

Fig. 64  Opening cleaning cover

Cover lock

–  Remove wing nut from blower box (Fig. 65), take out blower cover and clean.

–  Clean all of blower box, including blower wheel – Fig. 66.

Fig. 65  Removing wing nut from blower cover

Fig. 66  Cleaning blower box and blower wheel

3.3.3  Exhaust pipe:


Recommended cleaning implement: Spatula, cleaning brush, soft cloth

–  Clean  the  exhaust  pipe  leading  to  the  flue  through  the  cleaning  opening  provided  in  the  exhaust  pipe  or 

through the blower box.

–  Use soft cloth to clean exhaust sensor.

Information!

Watch out for the sensors in the flue outlet when cleaning the exhaust pipe. Do not bend or damage 
them. No warranty claims will be accepted for damage attributable to incorrect cleaning!

Summary of Contents for LogWIN

Page 1: ...erating Manual LogWIN windhager com Wood gasification boiler Nominal thermal output 13 to 50 kW Suitable fuels 1 3 m and 1 2 m split logs unprocessed residual wood wood briquettes Wood 07 2012 092412...

Page 2: ...FF mode 9 2 3 2 ON mode lighting ON self test lighting OFF 9 2 3 3 Chimney sweep function 10 2 4 Operating phases 11 2 4 1 Standby 11 2 4 2 Cladding door open 11 2 4 3 Ignition ready 11 2 4 4 Ignition...

Page 3: ...3 1 1 Lever for cleaning heating surfaces 25 3 1 2 Ignition openings on lighting door and vertical grate 25 3 2 Weekly 26 3 2 1 Removing ash 26 3 3 Annually 26 3 3 1 Low temperature carburisation gas...

Page 4: ...the manufacturer cannot be held liable in the following cases Incorrect use of the unit Failure to perform proper maintenance Incorrect installation of the unit 1 1 2 Installer s obligations The insta...

Page 5: ...plastic parts PVC panels saw dust or impregnated glued wood residue and the like these cause boiler corrosion and are prohibited by legislation on air purity 1 3 Sources of danger Power failure or if...

Page 6: ...enclosed guarantee limitations Note When the boiler is heated up for the first time bad smells may result from gas emissions from in sulation or paint residue being burnt off Ensure that the boiler ro...

Page 7: ...5 16 17 Supplied as standard Folder containing instructions Poker Scratcher Cleaning brush Spatula Ash pan Hanger for installation on the wall or Log WIN side panel 5 Ash door 6 Lighting door 7 Fillin...

Page 8: ...unction as well as four individual menu buttons The function of each menu button is displayed on the Menu line Fig 4 InfoWINplus Kesseltemperatur Standby Info Men 38 C Operating phases are displayed h...

Page 9: ...ecked during the self test After a successful self test the display shows an operating phase and the boiler water temperature standard display The LED control lamp lights up green and the desired func...

Page 10: ...mney sweep function can only be started in modu lation mode or stratified charge operating phases In all other operating phases pressing the chimney sweep func tion button causes an information messag...

Page 11: ...The boiler is in automatic ignition mode Once the ignition phase is complete the system switches to the Start procedure operating phase Fig 15 Boiler temperature Ignition phase Info Menu 42 C 2 4 5 S...

Page 12: ...5 C or 65 C or automatically after 2 hours The system then switches to the Flame stabilisation operating phase and on into Modulation mode Fig 20 Boiler temperature Fan OFF Info Menu 89 C 2 4 10 Burno...

Page 13: ...Fig 26 Combustion chamber temperature Back 578 C 2 5 1 Combustion chamber temperature The current temperature in the boiler s combustion chamber is displayed Fig 27 Accumulator temp top Back 70 C 2 5...

Page 14: ...module and opera ting unit is displayed Fig 32 Software version display module LW 2 2 10 Back 2 5 8 Firing automate software version The current software version of the firing automate main PCB is dis...

Page 15: ...item or sub menu item is exited by pressing the Back button Fig 38 or after a delay of 45 seconds Information Only trained service personnel may perform system modifications on the Service level Fig 3...

Page 16: ...ained service technician in the service level Accumulator temp top Combustion cham ber temperature Accumulator temp bottom Flue gas temperature Operating hours Number of starts Software version firing...

Page 17: ...et here is overwritten Confirm the selected Time sub menu by pressing the Choose button Fig 41 Use the or button to set the required time Fig 42 Fig 39 Boiler temperature Operating phases Info Menu 42...

Page 18: ...after a delay of 45 seconds Fig 43 Time 13 50 Save Back Confirm the changed time by pressing the Save button Fig 43 The display shows Parameter is saved for a few seconds Fig 44 and then changes back...

Page 19: ...een adjusted by a trained service technician in the basic settings Fig 46 Operator level Service level Information level MES Module 1 Choose Back Information Changes on the Service level may be perfor...

Page 20: ...el check Outflow must not drip 2 8 Heating operation Preparing heating up or refilling Important note before heating up or replenishing fuel Do not heat up or replenish fuel unless adequate heat consu...

Page 21: ...hamber as required Fig 53 Fig 53 Section through the filling chamber Note After heating up do not open the filling door except in order to replenish fuel This ensures the fuel will burn evenly without...

Page 22: ...the display Fig 56 5 The arrow buttons select the desired type of ignition the Choose button confirms the choice Fig 56 Types of ignition Instant The ignition phase begins immediately after selection...

Page 23: ...22 C Boiler temperature Start procedure Info Menu 22 C Delay start until save back 18 00 Instant With off period Automatic choose back Boiler temperature Ignition ready Info Cancel Menu 22 C Paramete...

Page 24: ...all the way 3 Embers check we recommend only replenishing fuel once the wood has already burnt down if there are still sufficient embers left spread them evenly throughout the filling chamber and rep...

Page 25: ...ing surfaces Press lever for cleaning heating surfaces 5 10 times Fig 58 Information The specified cleaning intervals are for guidance only The cleaning intervals vary depending on the quality of the...

Page 26: ...emoving ash Fig 61 Removing ash from combustion chamber and ash chamber Holes in the hook in plates Combustion chamber Ash chamber 3 3 Annually 3 3 1 Low temperature carburisation gas duct Recommended...

Page 27: ...lower box Fig 65 take out blower cover and clean Clean all of blower box including blower wheel Fig 66 Fig 65 Removing wing nut from blower cover Fig 66 Cleaning blower box and blower wheel 3 3 3 Exha...

Page 28: ...r seals must leave a clean imprint Remove any crusting and deposits that could impair the door seals and ease of movement If the door seals do not leave a clean imprint or are not sealed adjust the do...

Page 29: ...hook in plate checking primary air openings Fig 69 Taking out burning plates checking secondary air openings Secondary air openings Primary air openings 3 3 8 Lambda sensor These parts are automatica...

Page 30: ...utton after rectifying the cause of the information fault or alarm message In these cases Reset is displayed in the menu line Fig 72 If Reset is not displayed in the menu line the boiler starts operat...

Page 31: ...Windhager Customer Service or a heating technician FE 268 Cladding door switch defective Do not continue heating Let the boiler burn out the fault must be rectified After burning out Standby operatin...

Page 32: ...efect Secondary airflap blocked or defect The secondary airflap is no longer reaching its position Secondary airflap motor or limit switch defect Press the Reset button If the fault reoccurs after a r...

Page 33: ...temperature falls below 90 C open the cladding door and flap remove the cover press the Release button of the safety temperature limiter firmly Fig 75 If this malfunction occurs again contact Windhag...

Page 34: ...chnical documentation DI Richard Reiter Anton Windhager Stra e 20 A 5201 Seekirchen Subject of the declaration LogWIN range of wood gasification boilers The units conform to the relevant requirements...

Page 35: ...35 5 EG Declaration of conformity...

Page 36: ...d warranty limitations require that the boiler and related accessories be properly installed and started up by Windhager Customer Service or Customer Service Partner otherwise the manufacturer s guara...

Reviews: