background image

16

Chapter 3 - Using SABRE

TM

 Ranger Web Console

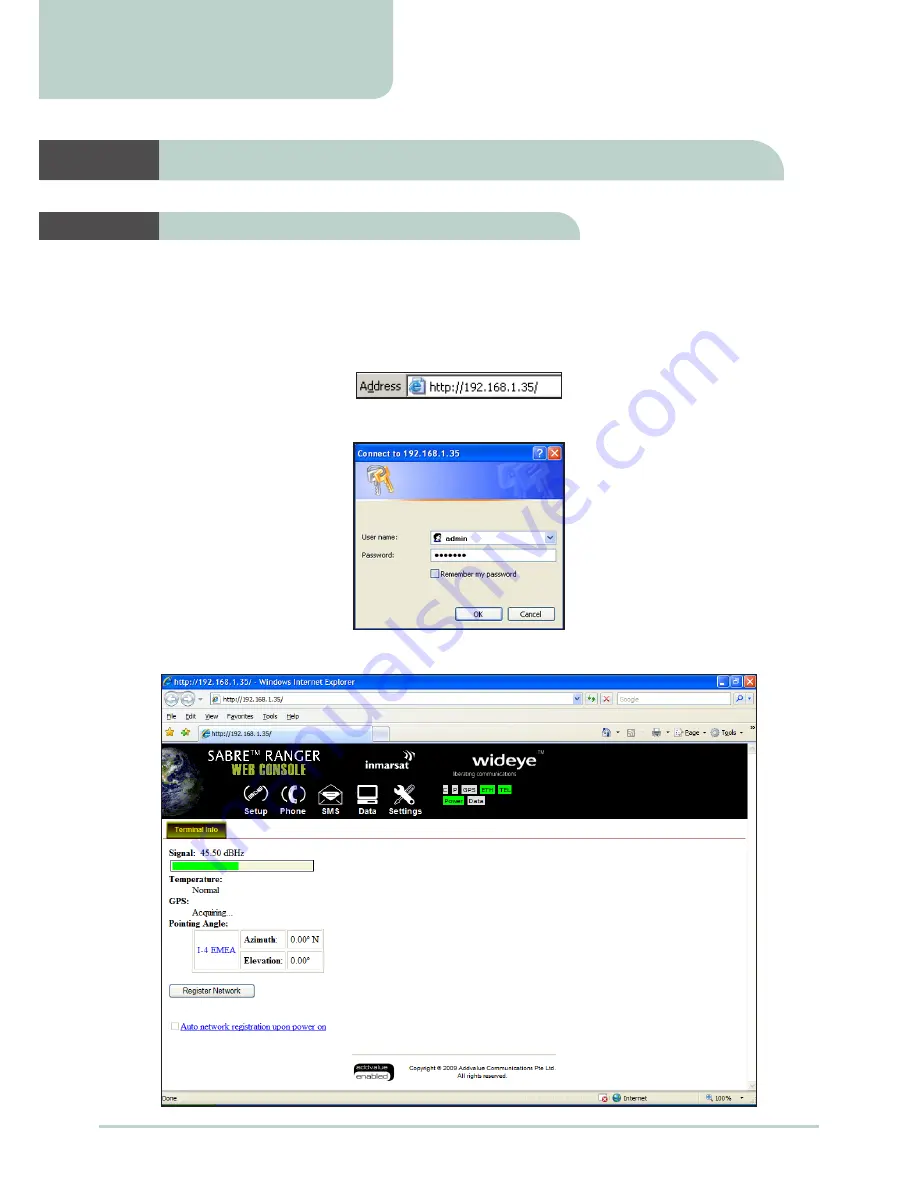
1.  When the Ethernet connection between the SABRE™ Ranger terminal and your computer has been setup, start 

your Internet browser.

2.  Type 

http://192.168.1.35

 in the Address field and press Enter.

The 

Connect to 192.168.1.35 

login screen appears. 

3.  At the login screen, type in 

admin

 in the 

Username

 field and 

wideye

 in the 

Password

 field. Click 

OK

.


4.  The SABRE™ Ranger Web Console will appear on your screen.

Activating SABRE

TM

 Ranger Web Console

Chapter 3

Using SABRE™ Ranger Web Console

Summary of Contents for Sabre Ranger

Page 1: ......

Page 2: ...material including but not limited to the implied warranties of merchantability and fitness for a particular purpose All trademarks marks names or product names referenced in this publication are the...

Page 3: ...installation If this equipment does cause harmful interference to radio or television reception which can be determined by turning the equipment off and on the user is encouraged to try to correct the...

Page 4: ...the Product brand name as Wideye and model SABRE Ranger Satellite Broadband Communicator a GMPCS Terminal to which this declaration relates is in conformity with the following standards and or other n...

Page 5: ...minal performance please ensure the unit s antenna is not damaged or covered with foreign material like paint or labeling When inserting the SIM card do not bend it or damage the contacts in any way W...

Page 6: ...system is operational Maintain a distance of one meter or more from the front of the satellite terminal antenna FCC RF Hazard Warning High levels of radio frequency radiation are considered health ha...

Page 7: ...ing your equipment in any country without permission causes you to run the risk of confiscation of the equipment by the local authorities The normal procedure to bring such equipment into another coun...

Page 8: ...ing Frame 10 Mounting the SABRETM Ranger 11 Positioning the SABRETM Ranger 11 Powering up the SABRETM Ranger V1 Variant 12 Powering up the SABRETM Ranger V2 Variant 13 Connecting to your Computer usin...

Page 9: ...llite GPS Satellite Addvalue s BGAN for SCADA Solution IOTATM M2M Application Enabler Troubleshooting 49 Temperature Warnings 51 Error Messages 52 Firmware Upgrade 53 Voice Mail Access 54 The BGAN Sys...

Page 10: ...computer using a Ethernet cable Chapter 3 Using SABRE Ranger Web Console This chapter explains how to use the built in web interface of the SABRE Ranger terminal and describes available menus and sett...

Page 11: ...touch the antenna front during pointing To indicate what the user should select in the user interface Example Select European Caller Line ID Phone Connected or US Caller Line ID Phone Connected from...

Page 12: ...me The SABRE Ranger provides built in Ethernet and telephone ports providing voice SMS and data services Control Interface The SABRE RANGER can be controlled using SABRE Ranger s Web Console with a co...

Page 13: ...top computer system requirements for successful interface with the SABRE Ranger terminal Intel Pentium III CPU or above 200 MB of free hard disk space 256 MB of RAM Ethernet port RJ45 CD ROM drive for...

Page 14: ...copy Product CD software utilities and documentations If any of the items are missing from the package please contact your reseller where you have purchased the satellite terminal package Note There a...

Page 15: ...ABRE Ranger V2 Terminal Rear View SABRE Ranger V1 Terminal Connector cover and thumb screws SABRE Ranger V2 Terminal Connector cover and thumb screws Connection headers and SIM card slot Getting to kn...

Page 16: ...Type 2 Pin Power Cord US Type Ethernet port Power plug Ethernet plug Phone plug Phone port DC power input socket AC DC Power Adapter 3 Pin Power Cord UK Type Note The SABRETM Ranger V2 terminal packa...

Page 17: ...bolts with nuts and washers U Bolts with four washers and nuts Cat 5 Network Ethernet Cable IP54 Compliant 8P4C RJ45 1 5m Telephone Cable IP54 Compliant 6P4C RJ11 1 8m Product CD software utilities an...

Page 18: ...he eight thumb head screws securing the connector cover 2 Remove and keep the connector cover and the eight thumb head screws in a safe location 3 Push tab and lift up the SIM card slot Location of th...

Page 19: ...and Heater cables 1 Remove the running couplers and rubber gaskets from the cable glands attached to the Multi function and Heater power cables 2 Thread the three connectors of the Multi function cab...

Page 20: ...power cables to the connector cover 4 Install the Multi function and Heater cable plugs to the respective headers on the SABRE Ranger terminal 5 Install and secure the connector cover with the eight...

Page 21: ...secure the mounting frame together Follow these steps to install the mounting frame 1 Place mounting frame on the back end of the SABRE Ranger terminal 2 Orientate the mounting frame to desired posit...

Page 22: ...the mounting frame Follow these steps to mount the SABRE Ranger terminal 1 Locate a vertical pole or column to mount the SABRE Ranger terminal 2 Mount the SABRE Ranger terminal to the vertical pole o...

Page 23: ...d up which may damage the cable glands Follow these steps to power up the SABRE Ranger V1 variant terminal 1 Insert the power adapter output connector into the DC power input socket on the Multi funct...

Page 24: ...nto the DC power input socket on the Multi function cable 4 Insert the plug end of the power adapter into an AC outlet 5 Turn on the power to power up the heater and SABRE Ranger terminal 6 Allow 30 m...

Page 25: ...Insert one connector end of the Ethernet cable to the Multi function cable s Ethernet port 2 Insert the other connector end of the Ethernet cable to your computer s Ethernet port A message confirming...

Page 26: ...t the SABRE Ranger terminal to your analog corded phone 1 Insert one connector end of the Phone cable to the Multi function cable s Phone port 2 Insert the other connector end of the Phone cable to yo...

Page 27: ...net browser 2 Type http 192 168 1 35 in the Address field and press Enter The Connect to 192 168 1 35 login screen appears 3 At the login screen type in admin in the Username field and wideye in the P...

Page 28: ...ordinates will not be displayed until you click Register Network to register to Inmarsat s BGAN network The GPS display prohibited message will be displayed if the GPS coordinates are prohibited by th...

Page 29: ...BRE Ranger Web Console launched follow these steps to register with the network 1 Select the satellite you want the SABRE Ranger terminal to point to 2 Rotate the terminal left or right until it point...

Page 30: ...register to the BGAN network Once network registration is completed the Registered to network You are now able to make phone call or send SMS and data transfer message is displayed Note The GPS co ord...

Page 31: ...be displayed When you click Register Network you will be prompted to To acquire new GPS fix and then auto register to network Use existing GPS fix Note It is recommended to register to the BGAN netwo...

Page 32: ...nection Terminal Info Phonebook Inbox Primary Profile Ethernet Call History Sent Secondary Profile Bluetooth Emergency Draft Port Forwarding Telephony Settings PIN SMS Audio ATCmd Misc Support About G...

Page 33: ...egistering to the Inmarsat BGAN network Signal Indicates the signal strength during antenna pointing Adjust the antenna to ensure that the signal strength is at least 45dBHz Temperature Indicates the...

Page 34: ...te This SABRE Ranger terminal is not intended to be connected to any North American U S Canada TNV circuit or PSTN Public Switch Telephone Network Ensure the analog corded phone is connected to the Mu...

Page 35: ...ries stored in the SIM card Terminal only To view the entries stored in the SABRE Ranger terminal Storage Usage Shows the number for Phonebook entries used in the SIM card and Terminal locations For e...

Page 36: ...try Follow these steps to make a call from a Phonebook 1 Select the entry from the Phonebook list 2 Click Call The Phonebook console switches over to the Dialler console Note Ensure the analog corded...

Page 37: ...istory list Follow these steps to make a call to a Call History list 1 Select the entry from the list 2 Click Call The Call History console switches over to the Dialler console Note Ensure the analog...

Page 38: ...to refresh the Call History list Emergency To Make an Emergency Call Follow these steps to make an Emergency call 1 Select the number from the list 2 Click Call The Emergency console switches over to...

Page 39: ...To Compose a New SMS Follow these steps to compose a new SMS 1 Enter the receiver s phone number in the Phone no field or click the Phonebook icon if the receiver s number is listed in the Phonebook...

Page 40: ...Follow these steps to reply a SMS 1 Click on a SMS to select it The selected SMS will be highlighted in light blue 2 Click Reply 3 Click OK to reply with the original contents or Cancel to reply witho...

Page 41: ...to the Dialler console Note Ensure the analog corded phone is connected to the Multi function cable Phone port before making a voice call 3 Press the Offhook button on the analog corded phone and cli...

Page 42: ...on a SMS to select it The selected SMS will be highlighted in light blue 2 Click Forward The Sent console switches over to the Compose console 3 Enter the receiver s number in the Phone No field 4 Cli...

Page 43: ...to abort deleting the SMS To Delete Multiple SMS from the Sent List Follow these steps to delete multiple SMS from the Sent list 1 Select the message by checking the checkboxes beside each SMS 2 Click...

Page 44: ...all to the SMS Receiver Follow these steps to make a call to the SMS receiver 1 Click on a SMS to select it The selected SMS will be highlighted in light blue 2 Click Call The Draft console switches o...

Page 45: ...efresh to refresh the Draft list Click to select the Data menu Data menu provide the following options Connection Primary Profiles Secondary Profiles Port Forwarding Settings Connection To activate th...

Page 46: ...pe Select the connection type to be used during the connection Standard Charged by the volume in kilobytes of data used Streaming Charged by the time per minute used during the connection Access Point...

Page 47: ...t Streaming Parameters 1 Select the Desired Rate 32k or 64k 2 Select the Minimum Rate 32k or 64k 3 Check the Error Correction checkbox if it is required to use Error Correction Click Update Settings w...

Page 48: ...uired to use Error Correction Destination Port Ranges Default destination port ranges and protocol type for each profile are listed Follow these steps to add a new destination port range 1 Enter the p...

Page 49: ...er the Incoming Port number in the space provided For example the user expecting HTTP the port is 80 3 Enter the Destination IP Address For example the IP Address of the PC that is connected to the SA...

Page 50: ...e effect Click Refresh to query the current mode Note If the Auto PDP Context Activation is enabled the terminal will establish a PDP connection upon power up After that if the PDP connection is lost...

Page 51: ...d Subscriber number Terminal Select Auto or Manual to power up the SABRE Ranger terminal when power is supplied via the AC DC power adaptor Auto Power On SABRE Ranger terminal will automatically power...

Page 52: ...it the DHCP settings Click Update to allow the settings to take effect Telephony Select Enabled to use the Telephone Interface Select Disabled if you do not need to use the Telephone Interface Select...

Page 53: ...not need to set the Terminal PIN Select Enabled to set the terminal PIN Enter the PIN number in the Enter PIN field and click Update PIN SIM PIN Click SIM PIN to configure the SIM PIN settings Select...

Page 54: ...hange the PIN Password 1 Enter the old PIN number in the Enter Old PIN field 2 Enter the new PIN number in the Enter New PIN field 3 Re enter the new PIN number in the Re enter New PIN field 4 Click C...

Page 55: ...Service Provider PIN Enter the PIN number in the space provided and click Update PIN Corporate PIN Click Corporate PIN to configure the Corporate PIN settings Select Disabled if you do not need to set...

Page 56: ...Registration on the Setup page to register to the network Click Update Settings after you have made your selection ATCmd Enter the AT Commands in the text editor Click Send to register the AT Command...

Page 57: ...eb Console Support Display information of the support telephone number support email address Support URL and Services URL The information shown are for sample purpose only About Displays the wideye we...

Page 58: ...nnel network providing Circuit Switch CS for voice and Packet Switch PS for IP network data upon registering to the BGAN network CS is available by default However PS is not connected unless activated...

Page 59: ...SABRE CONNECT bgan inmarsat com Remote SMS De activation of IP Connection To use Remote SMS De activation of IP Connection use the DISCONNECT command with the following syntax SABRE DISCONNECT Remote...

Page 60: ...o ordinates Extend GPS co ordinates acquisition time Up to 10 minutes Re orientate the position and adjust the elevation of the SABRE RANGER terminal to the appropriate direction with a clear view to...

Page 61: ...restarting the SABRE RANGER terminal The SABRE RANGER terminal is registered to the network but fails to make any voice call or data connection The stored GPS co ordinates is outdated if the SABRE RA...

Page 62: ......

Page 63: ...invalid characters in dial string 30 no network service 31 network timeout 32 network not allowed emergency calls only 40 network personalization PIN required 41 network personalization PUK required...

Page 64: ...computer s hard drive Note Make sure the SABRE Ranger terminal is switched on and connected to the desktop laptop computer via the Ethernet cable 2 Insert the SABRE Ranger Product CD into your compute...

Page 65: ...ow the guided instructions and prompting from the system to activate the Voicemail Listed below is the procedure for Voice Mail activation i Enter a four digit PIN code followed by key ii Press 1 key...

Page 66: ...fice applications browse the Internet and send large file attachments Streaming IP For applications where quality of service is paramount such as live video or video conferencing BGAN offers a Streami...

Page 67: ...nd the SABRE Ranger It controls the SCADA equipment for data collection and at the same time manages the transmission whether periodically or continuously over BGAN via the SABRE Ranger terminal The I...

Page 68: ...dware platform is an embedded ARM 9 microprocessor based system Operating System WinCE Interface 1 IOTA and SABRE Ranger terminal Ethernet 2 IOTA and monitoring equipment RS232 USB or GPIO 3 User inte...

Page 69: ...Client port mini USB connector Serial ports x3 RS232 D SUB 9 up to 230 4Kbits s 16 byte Tx Rx FIFO Tx Rx only via RS232 General purpose I O x4 Optically isolated digital inputs Terminal Blocks x4 Opti...

Page 70: ...MN selection COPS Facility lock CLCK Change password CPWD Calling line identification presentation CLIP Calling line identification restriction CLIR Connected line identification presentation COLP Clo...

Page 71: ...Flow Template CGTFT Quality of Service Profile Requested CGQREQ Quality of Service Profile Minimum acceptable CGQMIN 3G Quality of Service Profile Requested CGEQREQ 3G Quality of Service Profile Minim...

Page 72: ...ore Settings CRES Message Receiving and Reading Commands New Message Indications to TE CNMI List Messages CMGL Read Message CMGR New Message Acknowledgement to ME TA CNMA Message Sending and Writing C...

Page 73: ......

Page 74: ...maximum signal strength Data streaming at selected rates Telephony Security settings Data logging SMS GPS Network Services Usage tracking Operating Temperature Ambient SABRETM Ranger V1 SABRETM Range...

Page 75: ...22 2 No 60950 22 ANSI UL 60950 22 Inmarsat Type Approved B3AD01 RoHS EU Directive 2002 95 EC Tested to IEC 62321 Ed1 Part 6 Ingress Protection IP 65 IEC 60529 2001 SABRETM Ranger V1 DC Input 15V DC Po...

Reviews: