background image

24

FLYING THE EXTRA 330L EP

The Extra 330L EP is designed for those pilots who

are experienced in flying sport models.  It is not a trainer.
If you do not feel comfortable that you are able to test fly
the airplane, don't hesitate to ask someone for some help
test flying and trimming it.

Flying the Extra 330L EP is much like flying any

other sport airplane.  The airplane can either be taken off
from the ground (ROG) or hand-launched.

ROG Technique

To ROG you should be using a hard runway or firm

dirt strip.  The airplane will not ROG from grass.  It is
important to let the airplane get up to flying speed before
lifting off the ground.  Lifting the airplane off the ground
too fast will cause the airplane to stall and crash.  You
should allow the airplane to roll out until the tail is com-
pletely off the ground and flying.  Allow the airplane to
roll out on its main wheels about 50 feet more and then
gently pull it off the ground and into a shallow climb.
Because of the torque of the motor, the airplane will have
a natural tendency to pull to the left when it is accelerat-
ing down the runway.  You will need to compensate for
this by applying and holding right rudder during the take-
off roll.  Once the airplane lifts off the ground, you can
release the right rudder.

Hand-Launch Technique

To hand-launch the Extra 330L EP, gently grasp the

belly pan between your thumb and forefingers at the C.G.
location.  Hold the airplane above shoulder level and turn
on the motor to full power.  With the motor running at full
power, firmly toss the airplane straight ahead and level.
Do not throw it up at a steep angle.  Let the airplane fly
straight and level to pick up airspeed, then climb up to
your desired altitude.  Be careful not to climb too steeply
after hand-launching or the airplane could stall.

Flying

In the air the Extra 330L EP is a very smooth flyer.

Set up with low rate settings, the airplane behaves very
gently.  It will fly very smooth and stable throughout the
entire flight envelope.  With high rate control settings,
aerobatics are possible.  Loops, rolls, immelmann turns,
knife edge flight, snap rolls and more can be done with
ease.

When it is time to land, gradually reduce altitude and

power.  It is not a good habit to chop the throttle and dive
the airplane to the runway.  When you are a few feet above
the runway, turn the motor off and allow the airplane to
settle onto the runway.  You will find that the airplane
lands easier if you come in slightly faster and land on the
main gear rather than trying to slow down to do a three
point landing.

Ailerons:  

The ailerons are the control surfaces on the

wing that move up and down.  These surfaces control roll.

Blind Nut:  

A special type of nut that is used when you

can't reach to install or tighten a standard nut.  A blind nut
has prongs that secure it into place.

C/A Glue:

  An acronym for Cyanoacrylate.  It dries very

fast like "Super Glue."  It comes in many different formu-
las for different uses.

Center of Gravity:

  Most commonly referred to as the

CG or balance point, it is the point at which the airplane is
in complete balance in all three axes.

Control Horn:

  Part of the control system, the control

horn is mounted to the control surface.  It allows the push-
rod to be connected to the control surface.  Almost all
control horns are adjustable to allow for more or less con-
trol surface movement.

Covering:

  Made out of vinyl or polyester.  Covering has

heat sensitive adhesive that, when heated, sticks to the wood
frame of the airplane.  The Extra 330L EP uses real iron-
on polyester covering material.

Covering Iron:

  A small hand-held iron, usually Teflon

®

coated.  It is used to heat and apply covering material.

Cycling:

  The act of fully charging and discharging the

flight battery.  Cycling the battery increases performance
and duration.

Dihedral:

  The upward angle of each wing half.  Dihe-

dral creates more stability which makes learning to fly
much easier.

Elevator:

  The elevator is the control surface on the back

of the airplane that moves up and down.  This surface
controls pitch.

EPA: 

 An acronym for End Point Adjustments.  This  is a

feature found on newer radio systems that allows you to
electronically adjust the end-travel in servos.

Epoxy:

  A two-part glue containing a resin and a hard-

ener.  Epoxy is available in several drying times and is
stronger than C/A glue.  Epoxy is used in high stress
areas such as joints of wing halves.

ESC:

  An acronym for Electronic Speed Control.  See

Motor Controller.

GLOSSARY OF TERMS

Summary of Contents for Extra 330l EP

Page 1: ...final assembly no liability shall be assumed for any damage resulting from the use by the user of the final user assembled product By the act of using the final user assembled product the user accepts all resulting liability To make your modeling experience totally enjoyable we recommend that you get experienced knowledgeable help with assembly and during your first flights Your local hobby shop h...

Page 2: ... Ailerons 10 Hinging the Elevator 11 Installing the Tail Wheel Wire 12 Hinging the Rudder 12 Installing the Tail Wheel 12 Main Landing Gear 13 Installing the Landing Gear Wire 13 Installing the Wheels 13 Servo Installation 14 Installing the Servos 14 Elevator Pushrod 15 Installing the Elevator Pushrod Control Horn 15 Installing the Servo Horn 15 Adjusting the Elevator Pushrod 16 Rudder Pushrod 16 ...

Page 3: ... fill it out and send it to us We always enjoy hearing any comments or suggestions you may have This instruction manual is designed to guide you through the entire final assembly process of your new Wattage Extra 330L EP ARF in the least amount of time possible Along the way you ll learn how to properly assemble your new airplane and also learn tips that will help you in the future We have listed ...

Page 4: ... 1 ounce including the wiring and switch What Flight Battery Do I Use Through much testing with this power system and airframe combination we recommend using a Sanyo 7cell CP1300SCR flight pack The CP1300SCR pack is ideal because it will provide superior runtime without any significant weight penalty We do not suggest using NiMH battery packs At this time they cannot handle the current draw of thi...

Page 5: ... process Before you begin assembly group the parts like we show This will ensure that you have all of the parts before you begin assembly and it will also help you become familiar with each part The corresponding part number is listed first then the quantity of that particular part along with a short description of the part As you proceed through assembly you will notice the same part number liste...

Page 6: ...it also includes two separate pinion gears The mid sized pinion gear will give a 2 1 gear ratio and the smallest pinion gear will give a 2 3 1 gear ratio Use these two pinion gears if you decide to use a bigger propeller and or decide to use the Wattage 10 cell 800Mah flight battery Wattage carries a complete line of replacement parts for your Extra 330L EP Listed below are the replacement parts t...

Page 7: ...Needle Nose Pliers Paper Towels Trinity Break In Drops Performance Plus Motor Spray 1 Using a 0 phillips screwdriver remove the four wood screws that hold the cowling onto the fuselage Remove the cowling and set it and the screws aside 2 Using a 0 phillips screwdriver loosen the four wood screws that hold the motor clamp to the plywood motor mount beams See photo 1 below 3 Once the motor clamp beg...

Page 8: ... 23 MOUNTING THE WING 1 Using a modeling knife cut away the covering material from over the predrilled wing hold down hole in the bottom of the belly pan The hole is located 1 2 in front of the trailing edge and is 7 16 in diameter See photo 4 below Photo 4 2 Using a modeling knife cut away the covering material from over the 1 8 diameter hole located on the top of the wing directly above the hole...

Page 9: ...o 5 below Figure 1 7 Now check to make sure that the tips of the sta bilizer are equal distances from the tips of the wing Use a ruler and measure from one wing tip to the stabilizer tip on the same side Do this for both sides When the stabilizer is aligned properly both of these mea surements should be the same See figure 2 below Figure 2 8 When you are satisfied with the alignment hold the stabi...

Page 10: ...e photo 8 below Photo 8 6 Slide the vertical stabilizer back into place and realign it Using a builder s triangle check to ensure that the vertical stabilizer is aligned 90º to the horizon tal stabilizer See figure 3 below Figure 3 7 Mix a generous amount of Kwik Bond 5 Minute Epoxy Apply a thin layer to the mounting slot in the top of the fuselage and to the sides and bottom of the vertical stabi...

Page 11: ... even with the tip of the wing 7 While holding the aileron tight against the wing rotate the aileron down about 45º Apply 3 4 drops of Kwik Bond Thin C A to the exposed area of each hinge Turn the wing over and repeat for the other side of the hinges Allow the C A and epoxy to fully cure Once cured the aileron may be stiff and difficult to move This is normal Gently pivot the aileron up and down a...

Page 12: ...before proceeding HINGING THE RUDDER 20 Locate the two precut hinge slots in the trailing edge of the vertical stabilizer and the leading edge of the rudder 21 Test fit the two C A hinges into the hinge slots in the rudder Each hinge should be inserted far enough into the slots so that the centerlines of the hinges are flush with the leading edge If the hinges cannot be inserted deeply enough use ...

Page 13: ...ear wire into the landing gear slot Push the wire down evenly until it bottoms out See photo 15 below There are plywood stops preglued into each side of the slot that the top of the wire is pushed down against 3 When satisfied with the fit remove the landing gear wire Mix a small amount of Kwik Bond 5 Minute Epoxy Apply a very thin layer of epoxy onto both sides of the landing gear slot 4 Push the...

Page 14: ...nd set it aside 2 Locate the three servos you intend to use for the elevator rudder and aileron controls Carefully install the rubber grommets and brass collets onto each of the servo mounting lugs For proper vibration reduction the brass collets should be inserted into the rubber grommets with the flanges facing the bottom of the servo mounting lugs See figure 6 below 3 Position two servos into t...

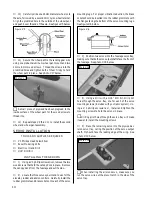
Page 15: ...he Z Bend into the outermost hole in the control horn so that the V shape points toward the left side of the control horn See photo 21 below Photo 21 5 Using a modeling knife remove the covering from over the elevator pushrod exit hole in the back of the fuselage The hole is located on the right side of the fuselage 1 3 4 in front of the rudder hinge line and 1 1 16 up from the bottom of the fusel...

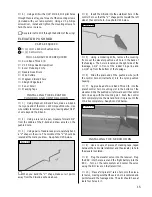
Page 16: ...move up If it does not flip the servo reversing switch on your transmitter to change the direction 16 Pull back completely on the elevator control stick While holding the control stick completely back use a ruler and measure the amount the trailing edge of the elevator moves up This measurement should be 3 8 measured at the widest point of the elevator See figure 7 below Figure 7 17 If the control...

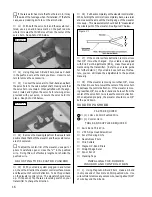
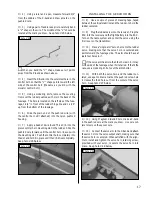
Page 17: ...ies completely See photo 26 below Photo 26 INSTALLING THE SERVO HORN 8 Use a couple of pieces of masking tape taped between the vertical stabilizer and the rudder to hold the rudder centered 9 Plug the rudder servo into the receiver Plug the ESC into the receiver and the flight battery into the ESC Turn on the radio system and center the servo using the trim lever on the transmitter 10 Place a sin...

Page 18: ...he Z bend in one hole toward the center of the servo horn to decrease the control deflection If the rudder is mov ing less than 1 2 move the Z bend out one hole from the center of the servo horn to increase the control deflection When adjusted properly the rudder should move 1 2 both right and left Double check that both the elevator and the rudder pushrods move without binding If there is any bin...

Page 19: ...and turned on check the directions the aileron control surfaces move and the amount of control deflection To do this push right on the aileron control stick The aileron on the right side of the wing should move up and the aileron on the left side should move down looking at the wing right side up from the rear If they do not flip the servo re versing switch on your transmitter to change the direct...

Page 20: ...ner backplate adapter that fits firmly over the propeller shaft from the plastic spur and press it firmly into the spinner backplate 7 Slide the spinner backplate and the propeller onto the propeller shaft Thread the machine screw and washer into the front of the adaptor and tighten them against the propeller Tighten the screw until it is snug It is not necessary to overtighten it See photo 33 bel...

Page 21: ...balance the airplane in the next section After you deter mine the final location of the flight battery use Kwik Bond Thick C A to glue a piece of the Velcro provided to both the top and the bottom of the flight battery at the location of the Velcro strap See photo 36 below Photo 36 When you install the flight battery the pieces of Vel cro and the Velcro strap will hold the battery securely in plac...

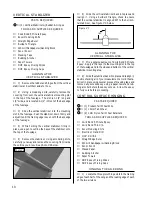
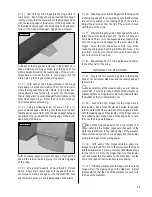
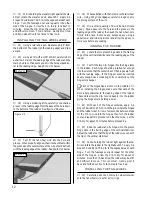
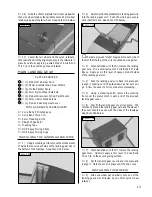
Page 22: ...k from the leading edge of the wing at the fuselage sides LATERAL BALANCING While not absolutely necessary lateral balancing will make the airplane easier to trim and will make it track straighter in the air 4 Turn the airplane upside down and tie one length of string to the propeller shaft and one length of string to the tail wheel wire 5 Carefully lift the airplane up by the two pieces of string...

Page 23: ... charged 5 Check every bolt and glue joint in the Extra 330L EP to ensure that everything is tight and well bonded 6 Double check the balance of the airplane Do this with the flight battery securely mounted in the fuse lage and the canopy deck installed 7 Check the control surfaces They should move in the correct direction and not bind PREFLIGHT CHECK 8 Check to ensure that the control surfaces ar...

Page 24: ...with ease When it is time to land gradually reduce altitude and power It is not a good habit to chop the throttle and dive the airplane to the runway When you are a few feet above the runway turn the motor off and allow the airplane to settle onto the runway You will find that the airplane lands easier if you come in slightly faster and land on the main gear rather than trying to slow down to do a...

Page 25: ...nts to the control surfaces from the transmitter Vertical Stabilizer Mounted on the rear of the airplane it works with the rudder to turn the airplane It also gives the airplane vertical stability Wing Saddle The portion of the fuselage on which the wing is mounted Z Bend This is a special bend made in the pushrod wire While it cannot improve your ability to make adjustments the Z Bend is the most...

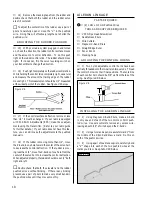
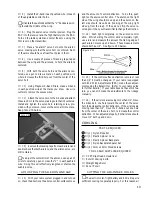
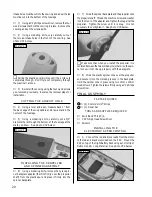
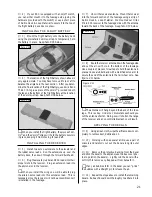
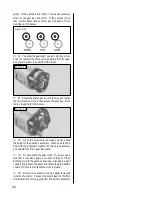
Page 26: ...e photo 39 below 10 Once the screws are loosened you can adjust the height of the gear box assembly When you are satis fied with the alignment tighten the two screws securely and reinstall the front gear box plate 11 Double check the gear mesh If you are satis fied that it is correct apply a couple of drops of Trinity bushing oil onto the gear box bearings Also apply a light coating of grease to t...

Page 27: ...ve the problem Yes No 7 Was any of the assembly difficult for you If yes please explain Yes No ________________________________________ ________________________________________ ________________________________________ ________________________________________ 8 What did you like most about this kit Assembly Manual Parts Fit Hardware Supplied Price Other ________________________________________ ____...

Page 28: ...obby Distributors Attn Wattage Customer Care 18480 Bandilier Circle Fountain Valley CA 92728 8610 Post Office will not deliver without proper postage _____________________________ _____________________________ _____________________________ Return Address Here ...

Reviews: