background image

5 - Error Conditions, Problems and Solutions - Paper Jams

88

Watkiss PowerSquare™224 User Manual
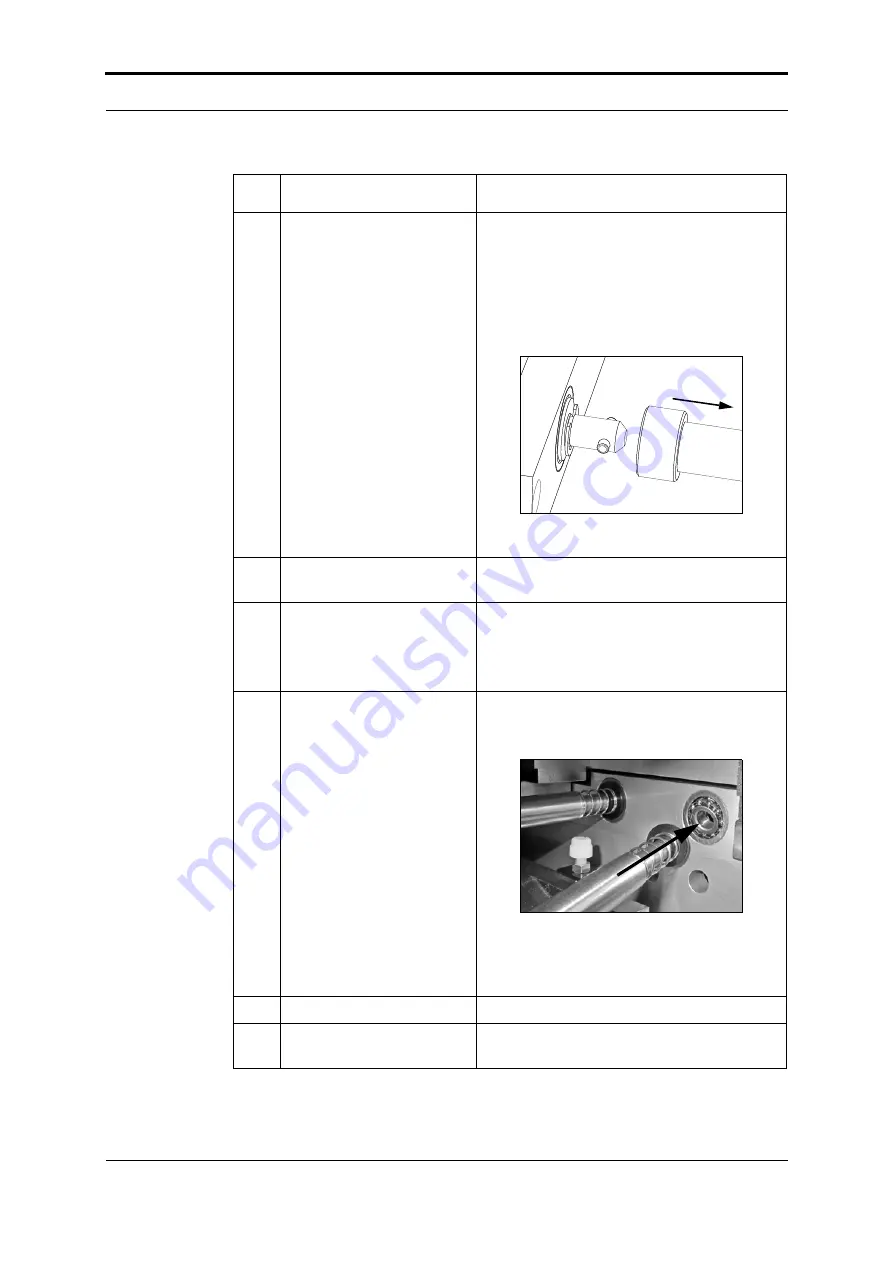
3

Loosen the trimmer infeed 
conveyor.

The procedure can be seen from the top of 
the machine.  See Figure 44.

Access to the parts is through the former 
clamp mechanism. See Figure 45.

Hold the shaft and push to the right, against 
spring pressure to disengage the shaft from 
the drive pin.

Lift the left hand end clear.

4

Remove the book, if one is 
found.

5

Remove any paper offcuts 
from the trimmer infeed 
conveyor.

Look down through the former clamp. See 
Figure 45.

Small pieces of paper trimmings can cover 
the jam sensor and cause an error message. 

6

Fit the trimmer infeed con-
veyor.

Look down through the former clamp. 

• Insert the right hand end of the shaft into 

the bearing, against the spring pressure. 

• Rotate the trimmer infeed conveyor, so 

that the green belts are vertical. 

• Insert the left hand end, so that the shaft 

engages with the drive pin.

7

Fit the trim bin.

8

Close the PowerSquare 
main deck and covers.

Step Action

Information

Summary of Contents for PowerSquare 224

Page 1: ...Watkiss PowerSquare 224 User Manual with Side Trimming option English Issue 5 June 2013...

Page 2: ...ocument is subject to change without notice Watkiss Automa tion Limited makes no warranty of any kind with regard to this material including but not limited to the implied warranties of merchantabilit...

Page 3: ...AD SAVE Window 23 The ADVANCED Window 25 The CONFIGURE Window 26 The MENU Window 27 4 Standard Tasks 29 Introduction 29 Load and Save the Job Settings 30 Adjust the Stitch Pitch 31 Adjust the Side Tri...

Page 4: ...blems 56 Book Quality Problems 57 Message List 72 Paper Jams 84 Clear a Stitch wire Jam 92 Clear a Stitch Head Jam 94 Calibrate the Touch Screen 97 Change the Fuses PowerSquare 97 Change the Fuses Boo...

Page 5: ...he Watkiss PowerSquare 224 User Manual does not describe the operation of the printer If needed refer to your printer user manual In this manual the Watkiss PowerSquare 224 is referred to as the Power...

Page 6: ...nection The correct machine voltage is shown on the label at the mains power supply input on the rear of the machine If the machine is connected to the wrong supply the warranty is cancelled How to Ge...

Page 7: ...werSquare Watkiss PowerSquare 224 User Manual 3 Operator Side of the PowerSquare FIGURE 1 Operator Side of the PowerSquare Stacker Connecting Bridge User Interface PowerSquare FIGURE 2 Book Stacker op...

Page 8: ...ch screen The user interface The user interface has a colour touch screen a start button and a stop button The PowerSquare The PowerSquare stitches folds spine forms and trims the sheets to make a fin...

Page 9: ...chine serial number power use and fuse information Mains power ON OFF switch The mains power ON OFF switch turns ON or turns OFF the PowerSquare When you turn OFF the PowerSquare the current settings...

Page 10: ...ber power use and fuse information 2 Voltage advisory label The voltage advisory label shows that the input voltage is 230V AC The 230V power is supplied by the PowerSquare 3 Power input connector The...

Page 11: ...he book If the PowerSquare is configured with a Book Stacker and a P2T Side Trimmer the P2T trim bin is located in the Book Stacker 3 The Stacker The stacker collects the finished books 4 Communicatio...

Page 12: ...owerSquare 224 User Manual 8 Fuses The fuses make sure the operator and the machine are protected if there is an electrical problem or short circuit 9 Rating and serial label The rating label displays...

Page 13: ...w to run a job on the PowerSquare For information on how to operate the printer refer to the printer documentation Information about the user interface is included in The User Interface on page 15 Inf...

Page 14: ...h and the amount of spine form according to the set thickness There are two operating modes Sheet thickness and page count This is the default operating mode Measure the thickness of a single sheet En...

Page 15: ...ers the PowerSquare CAUTION Do not operate the touch screen with a sharp object or with too much force These actions can damage the touch screen Before You Begin Note This set can be made into a book...

Page 16: ...TATE to turn the sheet rotation ON or OFF Always select the page direction before you change the rotate setting 5 Enter the sheet thickness or Touch SET THICKNESS Set AUTO to ON Use or to enter the SH...

Page 17: ...re are complete before you release the print job from the print queue 2 Start the print job The PowerSquare starts automatically 3 Check the quality of the first book 4 If the quality is not acceptabl...

Page 18: ...a message if the stacker is full If the optional Book Stacker is fitted see Unload the Book Stacker on page 42 Empty the trim bin from time to time The PowerSquare displays a message if the trim bin i...

Page 19: ...xample a palm top wand or the blunt end of a pen Do not use too much force A light touch is all that is needed CAUTION Do not operate the touch screen with a sharp object or with too much force These...

Page 20: ...S LEVEL on page 27 Power save The touch screen has a power save function After several minutes without use the brightness of the touch screen decreases After several hours the touch screen turns off T...

Page 21: ...he STATUS line shows the machine status GREEN The PowerSquare is READY or RUNNING ORANGE PLEASE WAIT wait until the PowerSquare is ready ATTENTION the PowerSquare needs an action by the operator RED T...

Page 22: ...b Mimic No Icon Information 1 Paper Size The following items are shown the size of paper the format of the paper in the gathering area the broken line shows the fold line the small thick lines show th...

Page 23: ...The number of forms is shown If the pressure is adjusted the setting is shown in brackets A red X shows that the form function is not active 5 Trim The trim setting is displayed A red X shows that the...

Page 24: ...ke a book Touch SET THICKNESS and enter the value Or Use AUTO and SHEET THICKNESS to automatically calcu late the SET THICKNESS AUTO Touch SET THICKNESS AUTO to select automatic adjustment of SET THIC...

Page 25: ...te for thin books Alternatively increase the PRESSURE PRESSURE Touch PRESSURE to increase or decrease the pressure used to form the spine Touch to increase the amount of spine form Touch to decrease t...

Page 26: ...h side The minimum side trim is 1mm from each side The machine will not permit a setting that conflicts with the stitch position Change the stitch pitch if necessary The side trim function can be turn...

Page 27: ...job name Touch OK or CLOSE The original job is not changed If the job name is not changed before OK or CLOSE is touched the job will be saved with the current name followed by an asterisk JOB DETAILS...

Page 28: ...plate jobs and jobs saved by the operator The Factory Template jobs are at the top of the list A Z Touch A Z to list the jobs in alphabetical order BY USE Touch BY USE to list jobs in the order they w...

Page 29: ...SET If the print job has been cancelled a set or part of a set can remain in the gathering area Touch START then touch PURGE SET to clear the set from the machine The book is not stitched or trimmed...

Page 30: ...ensor that checks for stitches Touch STITCH SENSOR to turn the stitch sensor on or off The default setting is ON PRESET PAPER SIZES The preset paper sizes can be either ISO A sizes or US paper sizes T...

Page 31: ...one of the flags to select the language you need AXES Touch AXES to re reference individual axes Supervisor access level is needed for this function Other functions on this button are used by the ser...

Page 32: ...3 The User Interface The MENU Window 28 Watkiss PowerSquare 224 User Manual...

Page 33: ...Watkiss PowerSquare 224 User Manual 29 CHAPTER 4 Standard Tasks Introduction This chapter describes the standard tasks that are needed in the day to day operation of your PowerSquare...

Page 34: ...ons appear select one REPLACE to over write the previous job with the current job settings SAVE NEW to save the current job with a new name CANCEL to cancel the job save 3 Enter the name for the job o...

Page 35: ...is 15mm When to do If you need the PowerSquare to insert the stitches in a non standard position For example to keep the stitches away from the text on the spine of the book Select a non standard sti...

Page 36: ...pitch if necessary see Adjust the Stitch Pitch on page 31 If the TRIM OFFSET is changed the icon changes to show the setting The icon is the same orientation as the book delivery out of the Side Trimm...

Page 37: ...to do If a machine error occurs or for maintenance To clear a paper jam The PowerSquare will not stop if you open the connecting bridge cover WARNING Keep your hands clothing and hair away from the b...

Page 38: ...ver 1 Lift the black locking handle against the spring pressure 2 Turn the handle through 90 to unlock 3 Lift the folder cover carefully to the vertical Close the Folder Cover CAUTION Check that the f...

Page 39: ...Lift the clincher frame to the vertical position Lower the Clincher Frame 1 Lower the clincher frame 2 Turn the locking handle to the right until the handle is tight 3 Check that the locking handle wi...

Page 40: ...Use the gathering area cover handle to lift the gathering area cover Lift the PowerSquare Main Deck When to do If a machine error occurs or for maintenance To access the stitch head To access the form...

Page 41: ...on the screen Wait for the message to clear Then continue with the procedure below If the error message is not displayed Continue with the procedure below Step Action Information 1 Open the connecting...

Page 42: ...e trim bin removed for a short time The printer waits while the trim bin is removed then continues when the trim bin is replaced To prevent lost production you must remove empty and return the trim bi...

Page 43: ...h wire is jammed or finished An error message is displayed on the touch screen when the stitch wire is jammed or finished To install a new stitch wire spool See Install New Stitch wire on page 116 Pro...

Page 44: ...ake further adjustment if necessary FIGURE 20 The stacker Collection table Catch tray Catch tray adjustment Book size in window Collection table Orange plastic hand screw Catch tray FIGURE 21 Collecti...

Page 45: ...he left There is no need to empty the Book Stacker until the stacker is full 2 If you are making thin books attach the magnetic paper guide above the book outfeed on the PowerSquare Insert the loose e...

Page 46: ...rt the book divider so that the stack does not slip while you unload the books 2 Remove the books 3 Push the book support completely to the left See Figure 22 4 Remove the book divider until it is nee...

Page 47: ...ot pedal When to do to access the mains ON OFF switch to replace the mains input fuses to access the Side Trimmer Procedure 1 Use your foot to release the docking latch 2 Rotate the Book Stacker away...

Page 48: ...er waits while the side trim bin is removed then continues when the side trim bin is replaced To prevent lost production you must remove empty and return the side trim bin to the PowerSquare as quickl...

Page 49: ...t in the waste drawer 4 Close the side trim bin waste drawer Adjust the Side Trimmer Stacker The stacker must be adjusted according to the book size When to do When you start a new job Procedure Set t...

Page 50: ...the folding part of the stacker Procedure Raise the stacker 1 Press down on the top of the stacker beside the green belts 2 At the same time push down on the stacker release handle 3 Release pressure...

Page 51: ...p 3 See Move the Book Stacker on page 43 When needed rotate the Side Trimmer back to the docked position the latch will click closed FIGURE 32 The Side Trimmer docking latch Step Action Information 1...

Page 52: ...0mm or less Ensure the book supports are fitted when the side trim dimension is over 190mm FIGURE 33 Top view of Side Trimmer centre book support Centre book support Outer book support left FIGURE 34...

Page 53: ...ocedure Removal Outfeed Guard Top Cover FIGURE 36 The side trimmer Step 1 preparation Use PAPER SIZE to set the paper width to 365mm Then use SIDE TRIM to set the side trim dimension to 365mm See PAPE...

Page 54: ...irection shown by the arrow until it unclips from the fixings Hold the outfeed guard open with one hand and remove the centre book sup port though the opening See Figure 36 on page 49 Step 3 remove th...

Page 55: ...se PAPER SIZE to set the paper width to 365mm Then use SIDE TRIM to set the side trim dimension to 365mm See PAPER SIZE on page 20 See SIDE TRIM on page 22 Open the top cover of the Side Trimmer See F...

Page 56: ...e book support Hold the outfeed guard open with one hand and slide the centre book support in though the opening Keep the book support central See Figure 36 on page 49 The centre book support is secur...

Page 57: ...tons For safety reasons this task is for a single operator Do not let another person help you CAUTION Do not use this function when SET THICKNESS is set to AUTO The SET THICKNESS must be the correct s...

Page 58: ...4 Standard Tasks Operate the PowerSquare offline 54 Watkiss PowerSquare 224 User Manual...

Page 59: ...werSquare then Check the Touch START to start the machine Touch ADVANCED PURGE SET PURGE SET The partial book is delivered to the stacker Discard the book 3 Check the PowerSquare screen If an error me...

Page 60: ...your service engineer Is the touch screen in power save mode See Power save on page 16 Touch the screen to restore the normal brightness No Yes Go back to the start of this fault finding table Is the...

Page 61: ...size of the printed paper The paper dimension changes when the paper is printed If the book is made from several different types of paper make sure the dif ferent paper types are all the same size If...

Page 62: ...fter printing Yes No Print a sample to the stacker and measure the printed paper Accurate measurement will improve book quality Have you entered the measured PAPER SIZE into the touch screen Yes No En...

Page 63: ...he TAMPER TIME to give the paper more time to settle Supervisor access level is needed see page 27 On thin books this may reduce the produc tion speed Touch CONFIGURE SHUTTLE Increase the TAMPER TIME...

Page 64: ...ontinue Yes No Further action is not needed Check the THRESHOLD setting If the SET THICKNESS is less than the THRESHOLD a square spine is not formed See THRESHOLD on page 21 Adjust THRESHOLD if needed...

Page 65: ...Yes No The problem is caused by the cover material or the finish on the cover Change the cover material Re reference the machine Touch ADVANCED RE REF RE REF to re reference the machine Does the probl...

Page 66: ...e 36 Pull approximately 100 150mm of stitch wire from the stitch wire spool See Fig ure 37 on p 61 Does the wire move freely Yes No Open the stitch wire cabinet Discard any tangled wire and reload the...

Page 67: ...er weight and paper type Yes No Accurately measure the different papers Are the different types of paper exactly the same size Yes No You must use paper that is the same size Is the paper within speci...

Page 68: ...ing Fore edge trim Side Trim Side Trim Is the TRIM option turned off No Yes Turn on the TRIM option Is AUTO turned off in the TRIM window No Yes Set TRIM to AUTO Does the problem continue Yes No Furth...

Page 69: ...rimmed Is the correct trim size entered in the touch screen Yes No Enter the correct size in the touch screen Re reference the machine Touch ADVANCED RE REF RE REF to re reference the machine Does the...

Page 70: ...the SIDE TRIM option turned off No Yes Turn on the SIDE TRIM option Is AUTO turned off in the SIDE TRIM window No Yes Set SIDE TRIM to AUTO Does the problem continue Yes No Further action is not need...

Page 71: ...em continue Yes No Further action is not needed Turn off the Side Trimmer at the mains ON OFF switch Wait for 5 seconds and then turn on the Side Trimmer Does the problem continue Yes No Further actio...

Page 72: ...yor belt this is normal Are there paper trimmings or a book in other places No Yes Clear the paper trimmings or book Does the problem continue Yes No No further action is needed Is the side trim dimen...

Page 73: ...48 Call your service engineer if there are marks on the trimmed edge different to a normal witness mark or if the edge is badly trimmed Side Trimming problem cannot enter settings If the user interfa...

Page 74: ...110 Are there dirty marks on the cover of the book near to the spine No Yes Clean the polyurethane form strips See Clean the Polyurethane Strips in the Form Clamp on page 106 Are there curved dirty m...

Page 75: ...your service engineer Is the spine torn or creased No Yes The spine is over formed See Spine form problems on page 60 Is there damage to the spine at the stitch positions or is the cover falling off N...

Page 76: ...message does not clear touch ADVANCED RE REF BOOK CYCLE TIME TOO LONG The printer has delivered the sets faster than the books can be made To decrease the book cycle time adjust the machine settings...

Page 77: ...mains ON OFF switch Turn the machine OFF then turn the machine ON If the problem continues then call your service engineer Centre axis moving The centre axis in the bridge is moving This message clea...

Page 78: ...ains ON OFF switch Turn the machine OFF then turn the machine ON If the problem continues then call your service engineer ERROR IN TRIM AREA There is an error at the trimmer Check the trimmer for a pa...

Page 79: ...lade axis moving The fold blade axis book thick ness adjustment is moving This message clears when the adjust ment is complete If the message does not clear touch ADVANCED RE REF FOLD BLADE NOT PARKED...

Page 80: ...r Jams on page 84 JAM AT BRIDGE INFEED There is a paper jam at the infeed to the connecting bridge Clear the jam and continue See Jam in the Bridge Infeed on page 84 JAM AT FORM ROLLER Open the folder...

Page 81: ...ed Remove the books from the stacker infeed Press the reset button on the stacker See Jam at stacker infeed Book Stacker on page 90 JAM AT STACKER OUTFEED There is a jam in the stacker out feed or the...

Page 82: ...paper jam and con tinue See Jam in the Stitch Area on page 86 JAM IN STITCH HEAD There is a jam in the stitch head See Clear a Stitch Head Jam on page 94 JAM IN TRIMMER There is a book jammed in the...

Page 83: ...hering area and remove the sheets See Jam in the Gathering Area on page 85 REMOVE SET STITCH AREA Open the folder cover and remove the set See Jam in the Stitch Area on page 86 Rotate axis moving The...

Page 84: ...ngs or obstructions Close the top cover of the side trimmer If the message still does not clear use the side trimmer mains ON OFF switch Turn the side trimmer OFF wait at least 5 seconds and then turn...

Page 85: ...witch is ON If the problem continues then call your service engineer Stitch axis moving The stitch axis is moving This message clears when the adjust ment is complete If the message does not clear tou...

Page 86: ...erwise follow the instructions below for other 41 xx system errors See Remove and re fit the Side Trimmer Book Supports on page 48 SYSTEM ERROR 41 xx Open the top cover of the side trimmer and check f...

Page 87: ...VANCED RE REF TRIM BIN OPEN The trim bin is not fitted or is not contacting the safety switch Fit the trim bin See Empty the Trim Bin on page 38 TRIM BLADE NOT PARKED The trim blade is in the wrong po...

Page 88: ...over 5 Close the connecting bridge cover Jam in the Connecting Bridge 1 Open the connecting bridge cover 2 Remove the jammed paper 3 Close the connecting bridge cover 4 If the message FLOW ERROR BRIDG...

Page 89: ...Area 1 Open the connecting bridge cover 2 Lift the gathering area cover 3 Remove the jammed paper 4 Check the belts are in the correct position Adjust the position of the belts if necessary See Figure...

Page 90: ...ose the folder cover Step Action Information 1 Open the folder cover See Open and Close the Folder Cover on page 34 2 Lift the clincher frame See Lift and Lower the Clincher Frame on page 35 3 Remove...

Page 91: ...per trimming has covered the jam sensor Trimmer Infeed Conveyor FIGURE 44 Trimmer Infeed Conveyor viewed from above Former clamp mechanism Reach in here to access the trim infeed conveyor Former clamp...

Page 92: ...ove the book if one is found 5 Remove any paper offcuts from the trimmer infeed conveyor Look down through the former clamp See Figure 45 Small pieces of paper trimmings can cover the jam sensor and c...

Page 93: ...te to release the trim stop guard Pull the trim stop guard towards you 3 Remove the jammed book 4 Check the trim stop and remove any pieces of trimmed paper In particular check around the sensor The s...

Page 94: ...ook Stacker infeed 1 Remove the book 2 If you are making thin books attach the magnetic paper guide See Adjust the Book Stacker on page 41 3 Press the reset button on the stacker 5 Close the trim stop...

Page 95: ...trimmings and remove them if present 3 Press the reset button on the stacker If the pusher is in the forward position so that the stacker outfeed is not visible 1 Use your hand to move the pusher to t...

Page 96: ...Jam 92 Watkiss PowerSquare 224 User Manual Clear a Stitch wire Jam Before You Begin Lift the PowerSquare main deck See Lift the PowerSquare Main Deck on page 25 Top location of Middle Wire Tube Middle...

Page 97: ...the stitch wire guide 2 Cut the stitch wire at position B between the feed gears and the middle wire tube 3 Pull the stitch wire from the stitch wire guide block 4 Remove the middle wire tube See Fig...

Page 98: ...continues do Procedure 2 Procedure 1 Step Action Information 1 Open the folder cover See Open and Close the Folder Cover on page 34 2 Lift the clincher frame See Lift and Lower the Clincher Frame on p...

Page 99: ...cutters Supplied with the machine Flat blade screwdriver Stitch head Wire holder Wire holder retaining spring FIGURE 52 Remove the stitch head wire holder FIGURE 53 Inspect for stitch wire Inspect th...

Page 100: ...the pivot block See Figure 53 3 Inspect the area behind the wire holder for pieces of stitch wire See Figure 53 on page 95 4 Remove any stitches or pieces of stitch wire and clean the area with the a...

Page 101: ...duction The PowerSquare has two fuses at the mains power input See Figure 5 on page 5 If either fuse is broken the PowerSquare will not operate WARNING Turn OFF the machine and remove the mains power...

Page 102: ...730 017 Procedure 1 Turn OFF the Book Stacker 2 Disconnect the Book Stacker from the power supply 3 Check each fuse 4 If the fuse is broken then replace with a fuse of the correct specification Result...

Page 103: ...rimmer Watkiss PowerSquare 224 User Manual 99 2 Disconnect the Side Trimmer from the power supply 3 Check each fuse 4 If the fuse is broken then replace with a fuse of the correct specification Result...

Page 104: ...tle 100 Watkiss PowerSquare 224 User Manual Manually park the Shuttle When to do The error messages MANUALLY PARK SHUTTLE and SHUTTLE NOT PARKED are displayed Illustrations FIGURE 55 Shuttle Assembly...

Page 105: ...pen and Close the Folder Cover on page 34 2 Push the shuttle assembly to the end Figure 54 on page 100 shows the correct position for the shuttle assembly The screw A must align with the white gear B...

Page 106: ...5 Error Conditions Problems and Solutions Manually park the Shuttle 102 Watkiss PowerSquare 224 User Manual...

Page 107: ...needs service This interval is every 3rd spool of stitch wire Only a Watkiss service engineer can service the PowerSquare Contact your supplier for further information Operator Maintenance Correct mai...

Page 108: ...quare Touch screen Clean the touch screen with a clean dry cloth Never use an abrasive material or chemical to clean the touch screen Light pressure with a clean dry cloth is enough to remove fingerpr...

Page 109: ...ore than one cycle can be needed Procedure Check The book is delivered to the stacker Check the book Repeat the procedure until the book spine is clean FIGURE 56 Dirty marks on the spine Step Action I...

Page 110: ...and toner can collect on these parts especially when you make thin books Materials description Alcohol wipe 3DUW QXPEHU or a lint free cloth and alcohol isopropanol CAUTION Only use alcohol to clean t...

Page 111: ...ver 2 Use an alcohol wipe or apply a small amount of alcohol to a lint free cloth Wear protective gloves when you use the alcohol wipe 3 Reach into the form clamp and clean each of the polyurethane st...

Page 112: ...ner can collect on the trimmings removal fingers and cause marks on the book Materials needed Alcohol wipe 3DUW QXPEHU CAUTION Wear protective gloves when you use the alcohol wipe FIGURE 59 Curved mar...

Page 113: ...f the machine Access to the parts is through the former clamp mechanism See Figure 60 Wear protective gloves when you use the alcohol wipe 4 Rotate the conveyor shaft by half a turn 1 Hold the shaft a...

Page 114: ...ls needed Lint free cloth Procedure FIGURE 62 Grease marks around the stitches Step Action Information 1 On the user interface touch ADVANCED STITCHER UP STITCHER UP The folder cover must be closed Th...

Page 115: ...art number 952 436 CAUTION Only use the grease shown in this manual Correct lubrication extends the performance and service life of the stitch head Other types of grease do not protect the stitch head...

Page 116: ...ead to the correct position for lubrication 5 Lift the PowerSquare main deck See Lift the PowerSquare Main Deck on page 36 You will see that the stitch head in the STITCHER UP position 6 Use the suppl...

Page 117: ...bricate the Stitch Head Watkiss PowerSquare 224 User Manual 113 Apply the Grease to the Driver Bar 20mm Driver bar FIGURE 64 Driver bar Driver Apply grease here FIGURE 65 Apply the Grease to the Drive...

Page 118: ...long to the visible surface of the driver bar The line of grease must be a maxi mum of 0 5mm thick and as shown in FIGURE 64 Note Apply the grease in an upward direction from the bottom of the driver...

Page 119: ...MENU FIGURE 66 Lubricate the wire feed cam Nozzle of the tube of grease Wire feed cam Feed lever Step Action Information 1 Apply 10mm of grease from the tube between the bearing surface of the wire fe...

Page 120: ...PowerBind 0 6mm 15kg Part number 812 038 Before You Begin Lift the PowerSquare main deck See Lift the PowerSquare Main Deck on page 25 Remove the Stitch wire from the Stitch Head Stitch wire Guide Bl...

Page 121: ...ol 3 Fit a new stitch wire spool 4 Fit the stitch wire cap 5 Loosen the end of the stitch wire from the edge of the stitch wire spool 6 Use wire cutters to remove the damaged end of the stitch wire Re...

Page 122: ...itch wire guide 2 Make sure the stitch wire runs behind the gas strut 3 Feed the end of the stitch wire between the felt wire cleaning pads 4 Push the stitch wire into the stitch wire guide block 5 Pu...

Page 123: ...n Information 1 Touch START 2 Set the number of stitches to 6 Touch BASIC STITCHES 3 Hand feed or print an A4 or larger size test job Enter the correct settings on the touch screen according to the si...

Page 124: ...astic Hand Screw FIGURE 69 Trim Stop Trim Stop Step Action Information 1 Remove the trim bin 2 Open the trim stop guard See Figure 68 Loosen the 2 orange plastic hand screws to release the locking pla...

Page 125: ...2000m above mean sea level Production Cycle time Printer dependent Interset gap minimum 1 second Minimum set time 4 2 seconds Maximum set time 12 5 seconds Stock Sizes Online Minimum input size 200 x...

Page 126: ...ets 70gsm dependent on paper type and quality Stitching 1 6 stitches evenly spaced on the spine of the book Stitches spool up to 291 500 Books spool approximately 127 000 Fore Edge Trimming Maximum fo...

Page 127: ...CC rules Part 15 Class A and VCCI Class A Radio Frequency Emissions This equipment has been tested and found to comply with the limits for a Class A digital device pursuant to part 15 of the FCC Rules...

Page 128: ...7 Specifications 124 Watkiss PowerSquare 224 User Manual...

Page 129: ...s that the product Name of Product Watkiss PowerSquare Serial No WA PSQ 0010 onwards Watkiss PowerSquare Book Stacker Serial No WA PBS 0001 onwards Watkiss P2T Two Knife Trimmer Serial No WA P2T 0001...

Page 130: ...r States relating to electromagnetic compatibility EN55022 2010 Class A EN55024 2010 EN61000 3 2 2006 A1 2009 A2 2009 EN61000 3 3 2008 RoHS 2011 65 EC Council Directive WEEE 2002 96 EC Council Directi...

Page 131: ...hen they print in booklet mode Alternatively adjustment can be made in origination software such as InDe sign or PDF pages can be adjusted before they are printed using imposition software such as Qui...

Page 132: ...ront page and back page are both moved 8mm away from the spine Negative creep Adjust the pages incrementally so that the inside pages are both moved 8mm towards the spine Balanced adjustment Adjust th...

Page 133: ......

Page 134: ...Watkiss Automation Limited 1 Blaydon Road Middlefield Industrial Estate Sandy Bedfordshire SG19 1RZ United Kingdom Tel 44 0 1767 685700 Fax 44 0 1767 689900 Email info watkiss com...

Reviews:

Related manuals for PowerSquare 224