background image

31

32

OIMM – VENTUS PRO

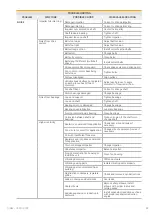
TROUBLESHOOTING

PROBLEM

SYMPTOMS

POSSIBLE CAUSE

OTHER CAUSES OR ACTION

NOISE

Impeller hits inlet ring

Damaged impeller

Correct or change impeller

Damaged inlet ring

Correct or change inlet ring

Impeller not centered on shaft

Center the impeller

Shaft loose in bearing

Tighten shaft

Impeller loose on shaft

Tighten impeller

Noise from drive 

system

Belts too loose

Adjust belt tension

Belts too tight

Adjust belt tension

Belts wrong section

Install correct section belts

Belts worn

Change belts

Belts oily or dirty

Clean belts

Belts length different (multi-belt 

drives)

Install correct belts.

Drive systems hits drive guard

Check drive system and drive guard.

Fan, motor or motor base fixing 

bolts loose

Tighten bolts

Pulleys misaligned.

Align pulleys

Variable speed pulleys not adjusted 

so each groove has different 

diameter.

Adjust each groove to same 

diameter for required air flow

Fan shaft bent

Correct or change shaft

Motor bearings damaged

Change bearings

Noise from bearings

Loose on support

Tighten bearings

Loose on shaft

Tighten shaft

Bearings worn or damaged

Change bearings

Bearings need lubrication

Lubricate bearings

Foreign material inside bearing

Clean bearings

Corrosion between shaft and 

bearings

Clean corrosion, if the shaft worn 

change shaft

High air velocity

Ductwork undersized for application Check duct size and revise if 

necessary

Fan size is too small for application Change size of equipment, revise if 

necessary

Coil with insufficient face area
Registers and/or grilles undersized 

for application
Worn or damaged impeller

Change impeller

Unbalanced impeller

Balance impeller

Foreign material in fan housing or 

inside the unit

Clean fan housing

Vibrating ductwork

Stiffen ductwork

Vibrating casing parts

Isolate vibrating parts properly

Vibrating parts not isolated from 

building
Obstruction in dampers, registers, 

grilles

Check and remove any obstructions

Leaks in casing and ductworks

Seal leaks

Sharp elbows

Remove sharp elbows, install 

elbows with proper radius and 

turning vanes

Sudden expansion or reduction in 

ductwork

Install expansion/reduction sections 

with proper expansion/reduction 

angles

Summary of Contents for ventus PRO 2022

Page 1: ...VENTUS PRO AIR HANDLING UNITS OPERATION INSTALLATION AND MAINTENANCE MANUAL PRO 2022 OIMM VENTUS PRO Ver 1 0 0 31 05 2022...

Page 2: ...FOR AHU ASSEMBLY CARRIED OUT BY VTS AUTHORIZED SERVICE 6 INSTALLATION 7 CONNECTIONS 9 DUCTED OUTLE CONNECTIONS 10 PIPING CONNECTIONS 11 CONDENSATE DRAIN LINES 13 ELECTRIC CONNECTIONS 13 SETTING UP OF...

Page 3: ...so as to prevent the device from being started accidentally Before connecting the electric power supply check the compliance of the mains voltage and frequency with the data on the name plate of the d...

Page 4: ...th AHU subassemblies transport of the packages to the assembly location and transport of AHU blocks and elements to the assembly location should be carried out using special equipment and qualified st...

Page 5: ...e from 5 to 35 C In case of outdoor assembly the procedure can be carried out in precipitation free conditions It is acceptable to start the assembly provided that all safety and security requirements...

Page 6: ...safe environment for the installation crew The following should be provided availability of individual AHU elements or pallets including packages on the assembly place of a particular AHU Ensured tran...

Page 7: ...ure that access routes are adequate for both size and weight of the unit sections Air handling unit installation areas should also be checked There should be sufficient space around the unit for servi...

Page 8: ...installed in the AHU sections where negative pressure occurs Drain siphons or siphon parts are not supplied as standard delivery There is no need to apply drain siphons in section with overpressure I...

Page 9: ...ted to the AHU with the flexible connections optional accessory which suppress vibrations of the unit and level the coaxial deflection of the duct and the AHU outlets Flexible connections are equipped...

Page 10: ...d prior to the reducing section To achieve ideal conditions the length of parallel ducting in both cases should be equal to 8 impeller diameters However parallel ducting of considerably shorter length...

Page 11: ...ves any air in the system into the upper part of the coil where a manual air release valve should be fitted PIPING CONNECTIONS 3 6 2 The diameter of the connection and the type of connection of the ex...

Page 12: ...12 OIMM VENTUS PRO COIL CONNECTION RULES COIL INSTALLATION HYDRONIC COILS COIL INSTALLATION STEAM COILS Hydronic Steam...

Page 13: ...d together with ahu diagrams Before starting connecting power supply check conformity of the voltage and frequency of a supply network with the data shown on the device s rating plate Permissible fluc...

Page 14: ...efault motors with their own cooling system and with fans built into a shaft Supply cabling must be led to the fan s motor via rubber passes located in the back panel of the AHU casing One should conn...

Page 15: ...s in accordance with guidelines outlined in the operation and maintenance manual of the frequency converter Before putting into service and after long time of storage or standstill the resistance of i...

Page 16: ...e marked U V W and the neutral terminal N please check data on the rating plate The voltage marked on the rating plate must be in agreement with the mains voltage the terminal board is normally equipp...

Page 17: ...h water heat exchangers heaters coolers glycol recovery air damper s actuators of supply units should be equipped with a return spring ensuring its spontaneous closure in case of power cut SETTING UP...

Page 18: ...d be taken in to account System layout should take into consideration of possible coil withdrawal It is recommended that the water flow is shut off when the fan is switched off To avoid the overheatin...

Page 19: ...tarters controls overload protecting devices interlocks etc should be provided as required See page 34 After the start up check that direction of rotation of the fan is correct The electric heater sho...

Page 20: ...nits must not be used for handling of flammable gases Spark proof versions of rotating parts fans motors etc must be selected for this kind of applications so air handling unit manufacturer should be...

Page 21: ...represent a danger suitable guards can be installed drive guards Safety guards should be used when drive systems are accessible by the personnel limit switch Cuts off the power supply of the fan moto...

Page 22: ...ensure all panels if removed during installation are in position and all service doors are closed ensure that minimum water level is maintained in the humidifier On the downstream or pressure side of...

Page 23: ...rical supply secure fan impeller if there is a possibility of windmilling Check carefully for the cause of the problem and correct as necessary After ensuring that there is not any problem no leaks be...

Page 24: ...less electric supply has been locked out and the impeller has been secured Before the maintenance operation the safety precautions should be taken by locking out the main and maintenance switch and pr...

Page 25: ...AR Check the filter frame for proper sealing Replace synthetic filter media in panel filters Check the controls and operation of automatic roll filters Check the coils and fins Wash with water spray i...

Page 26: ...cracks on the copper tubes by oxyacetylene welding Check with water if the welding is successful or not After cleaning the coil drain should be checked and the siphon should be cleaned Condition of th...

Page 27: ...the filters can be taken out by pulling aside Synthetic bag filter can be cleaned by vacuumed or compressed air besides can be washed with the sensitive detergent and warm water Humidifier should be c...

Page 28: ...quate It goes without question however that like all Rules of thumb some judgement is necessary on the part of person doing the adjusting A belt should be just tight enough to avoid slippage Before lo...

Page 29: ...the housing Relubrication interval depends on the fan speed and bearing internal diameter and is calculated by the following formula t 10 x 14x106 n x d 4 x d where t relubrication interval h n fan sp...

Page 30: ...se be removed from the bearing arrangement and replaced by fresh grease The 6 months limit represents a very rough guideline recommendation and may be adapted to particular applications By adding smal...

Page 31: ...s recommended to contact the unit manufacturer System checklist A systematic check of items listed below may identify the problem See that a impeller rotation is correct b pulley are aligned c belts a...

Page 32: ...ings Noise from bearings Loose on support Tighten bearings Loose on shaft Tighten shaft Bearings worn or damaged Change bearings Bearings need lubrication Lubricate bearings Foreign material inside be...

Page 33: ...tlet duct system is not completed Check access doors and duct joints Seal leaks Complete duct system HIGH AIR FLOW Ducts are oversized or duct resistance overestimated Close balancing dampers or slow...

Page 34: ...w Oversized coil or compressor ELECTRONIC STEAM HUMIDIFIER No humidifying Electronic power failure Power is not reaching elements or control valve Thermostatic gear fault Heater elements faulty Safety...

Reviews: