background image

VisionNet 202ER ADSL Ethernet Router User’s Guid 


23

Part 3 — Configuring the VisionNet 202ER 

Logging in to the VisionNet 202ER Quick Setup 

The VisionNet 202ER provides a preinstalled software program 
called Configuration Manager which enables you to configure the 
operation of the device via your Web browser. The settings that you 
are most likely to need to change before using the device are 
grouped onto a single Quick Start page. 

To access the Configuration Manager Quick Start page, open the 
Web browser on any PC connected to the VisionNet 202ER. Type 
the following URL in the address/location box and press 

<Return>

:

10.0.0.2/hag/pages/home.ssi 
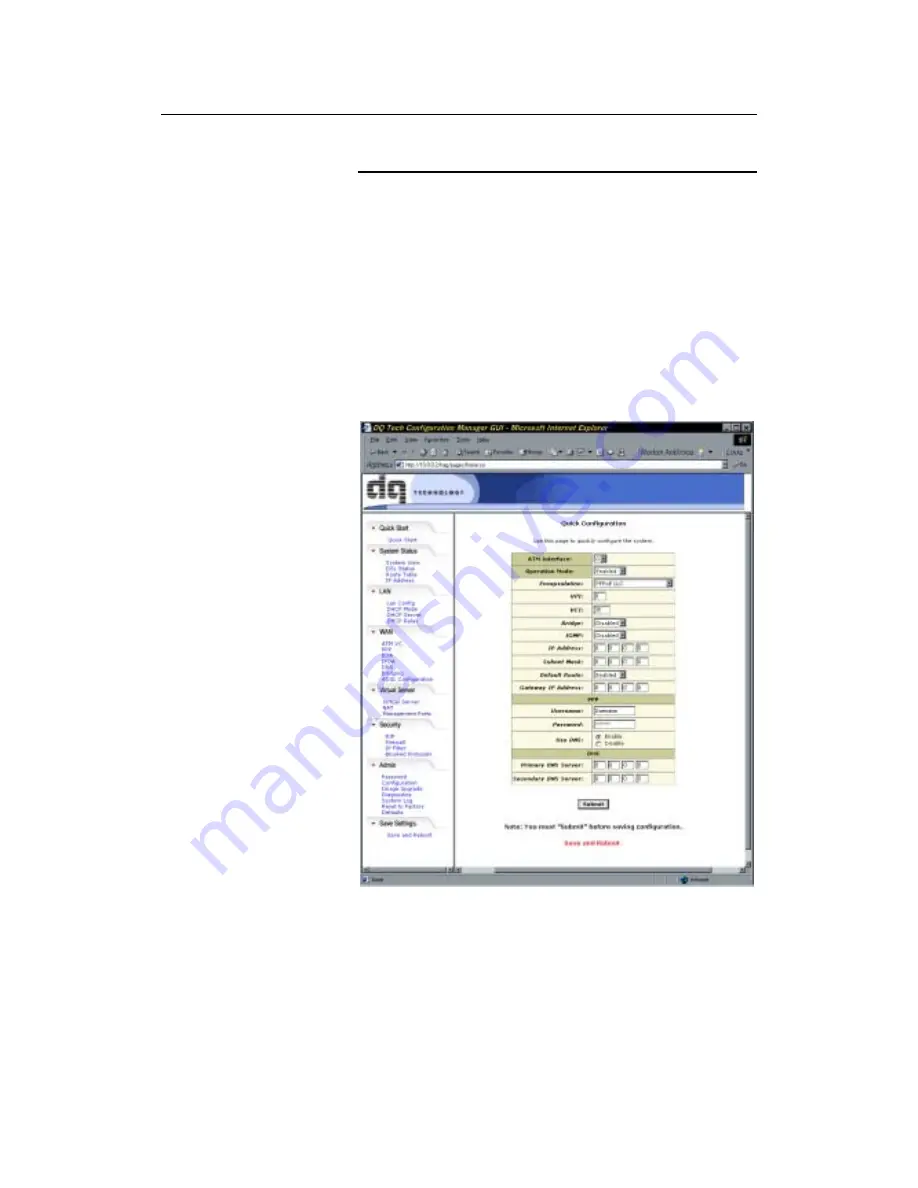
Figure 5

 shows the Quick Start page: 

Figure 5. Quick Start Page—Configuration Manager 

Summary of Contents for ADSL 202ER

Page 1: ...ewall and IP filtering functions to provide security for your LAN Network configuration through DHCP Server and DHCP Relay Services including IP route and DNS configuration RIP and IP and DSL performa...

Page 2: ...entify terms that are defined in the glossary Appendix D Bolded text is used for items you select from menus and drop down lists and to identify field labels you view on screen Special messages This d...

Page 3: ...ument your VisionNet 202ER should arrive with the following in picture clockwise from upper left VisionNet 202ER ADSL Ethernet Router Power adapter and power cord CD with Manual Quick Start Guide Ethe...

Page 4: ...ing PPPoE or PPPoA if the user has authenticated to the ISP s server LAN On LAN link established and active Off No LAN link SYNC On ADSL link established and active Blinking DSL signal found Off No AD...

Page 5: ...on and off DC INPUT Connects to the supplied power converter cable Ethernet Connects the device to your PC s Ethernet port or to the uplink port on your LAN s hub using the cable provided PHONE Provi...

Page 6: ...r ISP These instructions provide a basic configuration that should be compatible with your home or small office network setup Refer to the subsequent chapters for additional configuration instructions...

Page 7: ...on the rear panel of the device Connect the other end to your wall phone jack You can attach a telephone line to the device This is helpful when the ADSL line uses the only convenient wall phone jack...

Page 8: ...nNet 202ER with a hub switch you must use a crossover Ethernet cable not provided to attach directly to the device Step 3 Attach the power connector Connect the AC power adapter to the PWR connector o...

Page 9: ...ndows 95 98 PCs First check for the IP protocol and if necessary install it 1 In the Windows task bar click the Start button point to Settings and then click Control Panel 2 Double click the Network i...

Page 10: ...point to Settings and then click Control Panel 2 In the Control Panel window double click the Network icon 3 In the Network dialog box click the Protocols tab The Protocols tab displays a list of curr...

Page 11: ...list includes Internet Protocol TCP IP then the protocol has already been enabled Skip to step 10 4 If Internet Protocol TCP IP does not display as an installed component click 5 In the Select Networ...

Page 12: ...In the Select Network Component Type dialog box select Protocol and then click 6 Select Microsoft in the Manufacturers box 7 Select Internet Protocol TCP IP in the Network Protocols list and then clic...

Page 13: ...t cases this is the address assigned to the LAN port on the VisionNet 202ER By default the LAN port is assigned this IP address 10 0 0 2 You can change this number or another number can be assigned by...

Page 14: ...peration of the device via your Web browser The settings that you are most likely to need to change before using the device are grouped onto a single Quick Start page To access the Configuration Manag...

Page 15: ...associated subnet mask in the boxes provided WAN Gateway Enter the gateway IP address for your ISP s network DNS Settings DNS Proxy Selection This setting determines how the VisionNet 202ER will obtai...

Page 16: ...We strongly recommend that you contact your ISP prior to changing the default configuration Table 1 Default Settings Summary Option Default Setting Explanation Instructions DHCP Dynamic Host Configur...

Page 17: ...indicate that the device can communicate with your LAN SYNC Solid green to indicate that the device has successfully established a connection with your DSL provider Tx Rx Flashing when the device is...

Page 18: ...he Internet you can use utilities on the VisionNet 202ER while working with your ISP to diagnose any problems You can access these diagnostic utilities which are shown in Figure 6 from your Web browse...

Reviews: