


Series 613
FEHLER! VERWEISQUELLE KONNTE NICHT GEFUNDEN WERDEN.
984360EC
Edition 12.08.2022
135/149
8.2.2.3
Required tools
•
Allen Wrench 2 mm / 2.5mm
•
Allen Wrench 3 mm
If you need any further information, please contact one of our service centers. You
can find the addresses on our website: www.vatvalve.com.
Description
Required tool
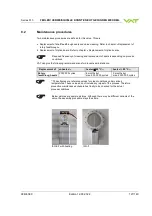
Make sure that the valve is in closed position
1.
Vent vacuum system, disconnect electrical connections and remove valve from vacuum
system. If you only replace control and actuating unit, the valve can remain in the
system.
Take care not to damage sealing surface!
Attention!
Do not move the plate by hands when control an actuating unit is installed.
Depending on
flange screws
2.
Unfasten clamp coupling
Allen Wrench:
steel coupling
2.5 mm
3.
Unfasten the 4 connection bolts and separate
both parts.
Valve size DN 160 (6”) and bigger require
a shortened wrench. For ordering number
refer to «Spare parts and accessories».
Allen Wrench
3 mm
12 mm


