2GM
1-5-25
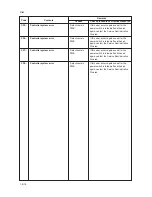
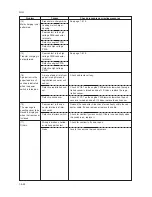
Clean with isopropyl alcohol.
Check visually and replace any deformed
rollers (see pages 1-6-5, 6).
See pages 1-5-22, 23.
Clean with isopropyl alcohol.
See page 1-5-23.
Repair or replace if necessary .
See page 1-5-22.
Check the cassette claw visually and cor-
rect or replace if necessary.
Change the paper.
Check visually and replace any deformed
guides.
Check visually and remedy if necessary.
Clean or replace the press roller.
Repair if any springs are off the separation
claws.
Grease the bearings and gears.
Correct.
(1)
No primary paper feed.
(2)
No secondary paper
feed.
(3)
Skewed paper feed.
(4)
The scanner does not
travel.
(5)
Multiple sheets of paper
are fed at one time.
(6)
Paper jams.
(7)
Abnormal noise is
heard.
Check if the surfaces of the feed roller and
MP feed roller are dirty with paper powder.
Check if the feed roller and MP feed roller
are deformed.
Electrical problem with the feed clutch and
MP feed clutch.
Check if the surfaces of the upper and lower
registration rollers are dirty with paper pow-
der.
Electrical problem with the registration
clutch.
Deformed width guide in a cassette.
The scanner motor malfunctions.
Deformed cassette claw.
Check if the paper is curled.
Deformed guides along the paper conveying
path.
Check if the contact between the upper and
lower registration rollers is correct.
Check if the press roller is extremely dirty or
deformed.
Check if the contact between the heat roller
and its separation claws is correct.
Check if the rollers and gears operate
smoothly.
Check if the following electromagnetic
clutches are installed correctly: feed clutch,
MP feed clutch and registration clutch.
Problem
Causes/check procedures
Corrective measures
1-5-5 Mechanical problems
Summary of Contents for CD 1018
Page 1: ...Service Manual MFP Copy CD 1018 Date 17 03 2005 ...
Page 2: ...Service Manual MFP Copy DC 2018 Date 17 03 2005 ...
Page 70: ...2GM 1 5 2 2 Paper misfeed detection conditions Registration sensor Exit sensor Figure 1 5 2 ...
Page 124: ...2GM 1 6 31 Eraser lamp 9 Remove the eraser lamp Figure 1 6 35 Removing the eraser lamp ...


