


17
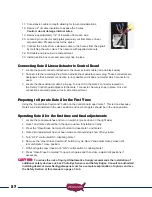
Connect Charge Device to Charge Controller
(Transformer or Solar Panel Kit)
The Sentry gate opener charge controller accepts inputs from
either the supplied AC transformer or the optional solar panel.
The transformer and solar panel come with a DC plug for easy
installation. Once the charge device is selected and installed
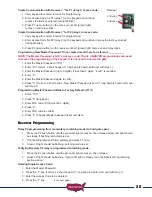
connect the DC plug into the charge controller “Power In” located
in the upper right corner of the charge controller.
If charge device cable needs to be extended to reach the
charge controller see appendix B of this manual.
Charge Controller Operation Check
Once the charge device is plugged into the charge controller verify the following:
Transformer:
1. Charge light flashes for 3 seconds and goes off
2. External power and detection lights come on
3. Detection light stays on for 3 seconds, then charging light comes on
Solar Panel:
1. Charge light flashes for 3 seconds and goes off
2. Solar power and detection lights come on
3. Detection light stays on for 3 seconds, then charging light comes on
If External Power or Solar Power LED is on and the Detection LED is on, the battery is not connected
to the charger. Verify Red/Black connectors are plugged into the bottom of the charger as shown
above.
NOTE: Most batteries will not be completely charged when first connected and the charging
light should come on when charge controller is first connected. The fully charged light will
come on once battery is fully charged.
When using a solar panel, the charge controller is designed to only charge the battery when there
is enough sun to do so. If there is no sun, the lights on the charge controller should be “OFF”. This
feature reduces the drain on the battery in solar installations. If transformer is installed lights are
operational all the time.
Charge Device
plugs in here
13
14


