25
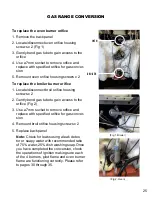
To replace the oven burner orifice
1. Remove the back panel
2. Locate/disconnect oven orifice housing
screws x 2 (Fig 1)
3. Gently bend gas tube to gain access to the
orifice
4. Use a 7mm socket to remove orifice and
replace with specified orifice for gas conver-
sion
5. Remount oven orifice housing screws x 2
To replace the broiler burner orifice
1. Locate/disconnect broil orifice housing
screws x 2
2. Gently bend gas tube to gain access to the
orifice (Fig 2)
3. Use a 7mm socket to remove orifice and
replace with specified orifice for gas conver-
sion
4. Remount broil orifice housing screws x 2
5. Replace back panel
Note:
Check for leaks using a leak detec-
tor or soapy water with recommended ratio
of 75% water, 25% dish washing soap.Once
you have completed the conversion, check
the operations of ignition making sure each
of the 4 burners, pilot flame and oven burner
flame are functioning correctly. Please refer
to pages 30 through 35.
GAS RANGE CONVERSION
(Fig 1. Broiler)
(Fig 2. Oven)
OVEN
BROILER
Summary of Contents for Prestige UGP-24V PC1 B
Page 21: ...21 WALL CLEARANCES continued ...
Page 46: ...UGP 24V PC1 S S WIRING DIAGRAM 46 ...
Page 48: ...48 UGP 24V PC1 S S PARTS DIAGRAM AND LIST ...
Page 53: ...NOTES 53 ...

