6-1
Chapter Six
REAR SUSPENSION
SHOCK ABSORBER
Removal/Installation
1. Securely support the swingarm so it will
not collapse once the shock absorber is
removed.
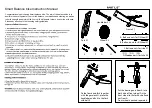
2. Before removal, measure the spring
length, which is the distance from the
upper spring seat (A,
Figure 1
) to the lower
adjusting ring (B) on the shock absorber.
3. From the left side, remove the shock
absorber bolts (C,
Figure 1
) from the upper
and lower pivot pins.
4. Use an appropriate size drift to drive
each pivot pin from the shock absorber,
and remove the pins (A,
Figure 2
) from the
right side.
5. Remove the shock absorber and its
spacers.
6. Visually inspect the spring (A,
Figure 3
)
for cracks or signs of fatigue. If necessary,
remove the adjusting ring (B) from the
shock absorber and remove the spring.
7. Inspect the shock housing for leaks or
other damage.
8. Inspect the upper and lower shock
mounts for elongation or excessive wear.
The shock absorber is not serviceable. If
damage is noted, replace the shock
absorber.
9. Inspect the pivot pins (C,
Figure 3
) for
bends or other damage. Roll the pivot pins
along a surface plate or a piece of plate
glass. Replace the pins as needed.
10. Reverse the removal procedures to
install the shock absorber. Note the follow-
ing:
a. Lubricate each pivot pin with grease.
b. Install the pins from the right side; the
bolts from the left.
FIG. 1
C
A
B
C
D
FIG. 2
A
A
B
FIG. 3
A
B
C
C
Summary of Contents for A2B Metro
Page 1: ...TM A2B Metro Service Manual TM clean mobility technology A2B Metro Service Manual...
Page 2: ......
Page 6: ......
Page 12: ......
Page 18: ......
Page 28: ......
Page 36: ......
Page 40: ......
Page 46: ...Chapter Seven 7 6...
Page 47: ......