background image

Tomcat i875PR S5102-P 

                                                                  Chapter 3: BIOS Setup 

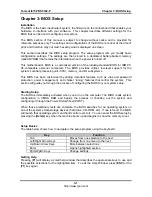
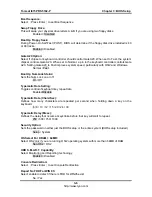
USB 2.0 Controller:


This item allows you to decide to “Enable” or “Disable” the USB 2.0 device. 
 

Enabled / Disabled 


USB Keyboard Support: 

Select “Enabled” if your system contains a USB controller and you have a USB keyboard. 
 

Enabled / Disabled 


USB Mouse Support: 

Select “Enabled” if your system contains a USB controller and you have a USB mouse. 
 

Enabled / Disabled 


Onborad i541 LAN Ctrl  

This item allows you to “Enable” or “Disable” onboard Intel 82541 LAN Ctrl function. 
 

Enabled / Disabled 

 
Onboard Promise RAID Ctrl:


This item allows you to “Enable” or “Disable” onboard Promise Raid Ctrl function. 
 

Enabled / Disabled 


Onboard i547 LAN Ctrl


This item allows you to “Enable” or “Disable” onboard Intel 82547 LAN Ctrl function. 
 

Enabled / Disabled 


Onborad LAN Boot ROM


This item allows you to “Enable” or “Disable” onboard LAN Boot ROM function. 
 

 Disabled / i562 / i547 / i541 


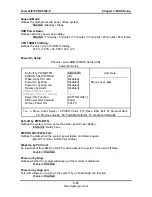
Super IO Controller:


Phoenix – AwardBIOS CMOS Setup Utility 

Super IO Device 


Onboard FDC Controller 
Onboard Serial Port 1 
Onboard Serial Port 2 
UART Mode Select 
RxD, TxD Active 
IR Transmission Delay 
UR2 Duplex Mode 
Use IR Pins 
Onboard Parallel Port 
Parallel Port Mode 
EPP Mode Select  
ECP Mode Use DMA 


[Enabled] 
[3F8 / IRQ4] 
[2F8 / IRQ3] 
[Normal] 
[Hi, Lo] 
[Enabled] 
[Half] 
[IR-Rx2 Tx2] 
[378 / IRQ7] 
[SPP] 
[EPP1.7] 
[3] 


Item Help 

_________________________
 
Menu Level   

►►


↑↓←→

: Move   Enter: Select   +/-/PU/PD: Value   F10: Save   ESC: Exit   F1: General Help 

F5: Previous Values   F6: Fail-Safe Defaults   F7: Optimized Defaults 

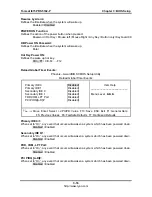
Onboard FDC Controller:


Select Enabled if your system has a floppy disk controller (FDC) installed on the system board 
and you wish to use it.  If you install and-in FDC or the system has no floppy drive, select 
“Disabled” in the field.  

3-12 


Enabled / Disabled 

http://www.tyan.com 

Summary of Contents for S5102-P

Page 1: ...M Corporation ATI ATI RAGE is a trademark of ATI Technologies Incorporated Winbond is a trademark of Winbond Electronics Corporation Analog Devices is a trademark of Analog Devices Inc Portable Document Format PDF is a trademark of Adobe Corporation Information contained in this document is furnished by TYAN Computer Corporation and has been reviewed for accuracy and reliability prior to printing ...

Page 2: ... 6 Power Management Setup 3 14 3 7 PnP PCI Configurations 3 17 3 8 PC Health Status 3 18 3 9 Frequency Voltage Control 3 19 3 10 Load Fail Safe Defaults 3 20 3 11 Load Optimized Defaults 3 20 3 12 Supervisor User Password Setting 3 21 3 13 Exit Selecting 3 22 Chapter 4 SATA RAID Setup for SATA RAID model 4 1 4 1 Getting Started 4 1 4 2 Creating Your Disk Array 4 2 Creating an Array for Performance...

Page 3: ...12 Deleting An Array 4 12 Rebuilding A Mirrored Array 4 14 Chapter 5 Diagnostics 5 1 5 1 Beep Codes 5 1 5 2 Flash Utility 5 1 Appendix I Glossary 6 1 Appendix II Post Error Code for BIOS 6 7 Appendix III SMDC Information 6 12 Technical Support 6 13 iii http www tyan com ...

Page 4: ...A 133 100 66 33 IDE cable 1x Tomcat i875PR S5102 P User s Manual 1x Tomcat i875PR S5102 P Quick Reference Guide 1x TYAN driver CD 1x I O shield 1 x Promise FastTrak 378 RAID Driver Diskette 1 x Cable set 9 pin Serial and 25 pin Parallel 2 x Serial ATA power cable 4 x Serial ATA cable 1 x USB2 0 cable If any of these items are missing please contact your vendor dealer for replacement before continu...

Page 5: ... and non ECC type memory modules Registered Memory is NOT supported Expansion Slots Four 32 bit 33MHz PCI 2 3 slots Integrated LAN Controller s Optional Two Gigabit LAN controller Intel 82547 Gigabit Ethernet controller Operating at 266MB s CSA interface Intel 82541 Gigabit Ethernet controller Optional One 10 100 Mbps LAN controller Intel 82562 10 100 Mbps LAN controller Intelligent PCI Graphic AT...

Page 6: ...remote Power on off and reset support IPMI over LAN Server Management Daughter Card SMDC via built in 2x25 header BIOS Award BIOS 8Mbit Flash ROM Support APM 1 2 ACPI 1 0B PnP DNI 2 0 WFM 2 0 Power Management Support BIOS Boot Specification v1 01 BBS Supports Watchdog timer ready and DMI Rear Panel I O ports Stacked PS 2 Mouse Keyboard ports Stacked two USB2 0 ports and one RJ45 100 10 LAN port on...

Page 7: ... your motherboard from the antistatic bag Unplug the power from your computer power supply and then touch a safely grounded object to release static charge i e power supply case For the safest conditions TYAN recommends wearing a static safety wrist strap 2 Hold the motherboard by its edges and do not touch the bottom of the board or flex the board in any way 3 Avoid touching the motherboard compo...

Page 8: ...he above photograph is purely representative Due to engineering updates and new board revisions certain components may change and or be repositioned The picture above may or may not look exactly like the board you received The following page includes details on the vital components of this motherboard 2 2 http www tyan com ...

Page 9: ...AN LED1 1 USB Bottom LAN Top KB Bottom Mouse Top LAN2 ATI RAGE XL 1 LPT1 USB2 SMDC J5 POWER FAN EFI1 COM2 8MB SDRAM Intel 10 100 LAN Optional Intel GbE LAN Optional 1 JP6 JP5 1 SATA1 1 1 1 J19 J21 J22 1 JP7 JP4 SATA3 SATA4 1 J7 J17 J18 J16 1 J6 CPU FAN 1 J11 NB FAN J20 1 This jumper diagram is representative of the latest board revision available at the time of publishing The board you receive may...

Page 10: ...Ware Hub Keyboard Mouse Floppy Parallel Serial 1 2 USB 2 0 8 ports 480Mb s 2 X Serial ATA Ports 150MB s 2 X ATA 100 66 33 Ports Intel 82541 Gigabit Ethernet Optional Promise PDC20378 RAID 0 1 0 1 2 X Serial ATA RAID Ports 150MB s One ATA 133 IDE RAID Ports Intel 82562 10 100 MB LAN 800 533 400 MHz System Bus Intel 875P Chipset Syatem Memory DDR 400 333 266 Channel A Channel B 266 MB s Four PCI Mas...

Page 11: ...Intel GbE LAN LED1 1 USB Bottom LAN Top KB Bottom Mouse Top LAN2 ATI RAGE XL 1 LPT1 USB2 SMDC J5 POWER FAN EFI1 COM2 8MB SDRAM Intel 10 100 LAN Optional Intel GbE LAN Optional 1 JP6 JP5 1 SATA1 1 1 1 J19 J21 J22 1 JP7 JP4 SATA3 SATA4 1 J7 J17 J18 J16 1 J6 CPU FAN 1 J11 NB FAN J20 1 You can reset the CMOS settings in case an incorrect setting causes system instability or you have forgotten your sys...

Page 12: ...peed fan control headers Page 2 11 JP5 JP6 SMDC I 2 C headers Page 2 11 SATA RAID SATA3 SATA4 and IDE RAID J12 functions by Promise PDC20378 chip J5 J11 J16 J17 J18 J19 J20 J21 J22 JP4 JP5 JP6 and JP7 These connectors and jumpers are reserved for OEM use only Fan Connector J1 J6 J9 J1 Chassis fan Tachometer speed Read and controlled J6 CPU fan Tachometer speed Read and controlled J9 Power fan J1 J...

Page 13: ... 1 LPT1 USB2 SMDC J5 POWER FAN EFI1 COM2 8MB SDRAM Intel 10 100 LAN Optional Intel GbE LAN Optional 1 JP6 JP5 1 SATA1 1 1 1 J19 J21 J22 1 JP7 JP4 SATA3 SATA4 1 J7 J17 J18 J16 1 J6 CPU FAN 1 J11 NB FAN J20 1 Use this connector to connect external SMBUS devices Front Panel Connector J8 Your chassis will usually come with connectors to install onto the motherboard such as HD and Power LEDs The Front ...

Page 14: ...I IDE J13 1 Winbond W83627HF PCI4 USB4 1 LED2 PCI1 RAID IDE J12 Chassis FAN J4 Intel GbE LAN LED1 1 USB Bottom LAN Top KB Bottom Mouse Top LAN2 ATI RAGE XL 1 LPT1 USB2 SMDC J5 POWER FAN EFI1 COM2 8MB SDRAM Intel 10 100 LAN Optional Intel GbE LAN Optional 1 JP6 JP5 1 SATA1 1 1 1 J19 J21 J22 1 JP7 JP4 SATA3 SATA4 1 J7 J17 J18 J16 1 J6 CPU FAN 1 J11 NB FAN J20 1 Pin 1 GND Pin 3 USBP2 Pin 5 TXD Pin 7 ...

Page 15: ...S5102 P USB3 1 1 1 1 KB MO1 USB1 CN1 COM1 J2 VGA PWR1 LAN1 J9 BIOS J1 Intel 875P Intel ICH5 PCI2 PCI3 SATA2 FDD J10 JP3 CMOS BT1 SEC IDE J15 PRI IDE J13 1 Winbond W83627HF PCI4 USB4 1 LED2 PCI1 RAID IDE J12 Chassis FAN J4 Intel GbE LAN LED1 1 USB Bottom LAN Top KB Bottom Mouse Top LAN2 ATI RAGE XL 1 LPT1 USB2 SMDC J5 POWER FAN EFI1 COM2 8MB SDRAM Intel 10 100 LAN Optional Intel GbE LAN Optional 1 ...

Page 16: ...IDE J13 1 Winbond W83627HF PCI4 USB4 1 LED2 PCI1 RAID IDE J12 Chassis FAN J4 Intel GbE LAN LED1 1 USB Bottom LAN Top KB Bottom Mouse Top LAN2 ATI RAGE XL 1 LPT1 USB2 SMDC J5 POWER FAN EFI1 COM2 8MB SDRAM Intel 10 100 LAN Optional Intel GbE LAN Optional 1 JP6 JP5 1 SATA1 1 1 1 J19 J21 J22 1 JP7 JP4 SATA3 SATA4 1 J7 J17 J18 J16 1 J6 CPU FAN 1 J11 NB FAN J20 1 Without PWM fan control and fan speed re...

Page 17: ...15 PRI IDE J13 1 Winbond W83627HF PCI4 USB4 1 LED2 PCI1 RAID IDE J12 Chassis FAN J4 Intel GbE LAN LED1 1 USB Bottom LAN Top KB Bottom Mouse Top LAN2 ATI RAGE XL 1 LPT1 USB2 SMDC J5 POWER FAN EFI1 COM2 8MB SDRAM Intel 10 100 LAN Optional Intel GbE LAN Optional 1 JP6 JP5 1 SATA1 1 1 1 J19 J21 J22 1 JP7 JP4 SATA3 SATA4 1 J7 J17 J18 J16 1 J6 CPU FAN 1 J11 NB FAN J20 1 CLOSED Full speed fan control Wit...

Page 18: ... are any studs missing you will know right away since the motherboard will not be able to be securely installed Some chassis include plastic studs instead of metal Although the plastic studs are usable TYAN recommends using metal studs with screws that will fasten the motherboard more securely in place Memory Type The Tomcat i875PR S5102 P supports unbuffered ECC and non ECC type memory modules Re...

Page 19: ... non ECC PC2100 PC2700 PC3200 DDR memory modules are supported All installed memory will be automatically detected no need to set any jumpers The Tomcat i875PR S5102 P supports up to 4GB of memory Registered Memory is NOT supported You can install either single or double sided modules on this board Each DIMM can work respectively for single channel mode and dual channel mode Please note that the s...

Page 20: ...g to the keys in the memory socket DDR modules and sockets have only one key which is slightly near the center of the module socket The method of installing memory modules is detailed in the following diagrams Once the memory modules are firmly seated in the socket two clamps on either side will close and secure the module into the socket Sometimes you may need to close the clamps manually To remo...

Page 21: ...into the socket by gently pressing down until the processor sits flush with the socket 4 Place the socket lever back down until it locks into place 5 Your processor is installed Take care when installing the processor as it has very fragile connector pins below the processor that can bend and break if inserted improperly Heatsink Installation After you are done installing the processor you should ...

Page 22: ...mall amount on to the processor s core the small shiny square in the center of the processor You may then use a small soft plastic tool like a credit card to gently smear a thin layer of heatsink compound as evenly as you can across the core In most cases you don t need to do this but it may help Then at an angle clip one side of the heatsink onto the socket and then lay the heatsink flat onto the...

Page 23: ... to be connected in the correct manner TYAN motherboards have two on board IDE channels each supporting two drives The black connector designates the Primary channel while the white connector designates the Secondary channel Attaching IDE cables to the IDE connectors is illustrated below Simply plug in the BLUE END of the IDE cable into the motherboard IDE connector and the other end s into the dr...

Page 24: ...IDE drive See the diagram below for an example of a floppy cable Most of the current floppy drives on the market require that the cable be installed with the colored stripe positioned next to the power connector In most cases there will be a key pin on the cable which will force proper connection of the cable The first floppy drive commonly denoted as A is usually attached to the end of the cable ...

Page 25: ...s a common issue Reverse the cable at the floppy drive end and try again 2 11 Installing Add In Cards Before installing add in cards it s helpful to know if they are fully compatible with your motherboard For this reason we ve provided the diagrams below showing the most common slots that may appear on your motherboard Not all of the slots shown will necessarily appear on your motherboard however ...

Page 26: ...also used for devices such as Zip drive some external CD RW drives and or other external devices More on the uncommon side these days are the Serial Ports They were primarily used to connect external modems but most modems today are using USB or are installed internally TIP While the ports have been created to accept connectors in only one direction make sure to be careful when inserting connector...

Page 27: ...Off Blink Yellow Link 1000Mbps Blink Green Blink Yellow Active 1000Mbps Blink Green Blink Yellow Standby Green Off LAN2 Intel 82541 Link Activity LED Scheme Left Right Left LED Right LED Link 10 Mbps Blink Green Off Active 10 Mbps Blink Green Off Link 100Mbps Off Blink Yellow Active 100Mbps Off Blink Yellow Link 1000Mbps Blink Green Blink Yellow Active 1000Mbps Blink Green Blink Yellow Standby Gre...

Page 28: ... FAN J4 Intel GbE LAN LED1 1 USB Bottom LAN Top KB Bottom Mouse Top LAN2 ATI RAGE XL 1 LPT1 USB2 SMDC J5 POWER FAN EFI1 COM2 8MB SDRAM Intel 10 100 LAN Optional Intel GbE LAN Optional 1 JP6 JP5 1 SATA1 1 1 1 J19 J21 J22 1 JP7 JP4 SATA3 SATA4 1 J7 J17 J18 J16 1 J6 CPU FAN 1 J11 NB FAN J20 1 ATX 20 pin connects here ATX12V 4 pin connects here PWR1 PWR2 NOTE YOU MUST unplug the power supply before pl...

Page 29: ...irus and password protection power management and chipset tuning features that control the system This section will guide you through the process of configuring the BIOS for your system setup Starting Setup The BIOS is immediately activated when you turn on the computer The BIOS reads system configuration in CMOS RAM and begins the process of checking out the system and configuring it through the ...

Page 30: ...s the same for most systems the appearance of your Setup screen may differ from the charts shown in this section Each system design and chipset combination requires a custom configuration In addition the final appearance of the Setup program depends on the system designer Your system designer may decide that certain items should not be available for user configuration and remove them from the BIOS...

Page 31: ...perature speed and voltage status Frequency Voltage Control Use this menu to specify your settings for frequency voltage control Load Fail Safe Defaults Use this menu to load the BIOS default values for the minimal stable performance for your system to operate Load Optimized Defaults Use this menu to load the BIOS default values that are factory settings for optimal performance system operations W...

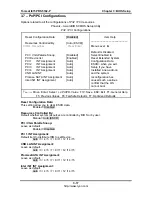
Page 32: ...nel 2 Master IDE Channel 3 Master Drive A Drive B Video Halt On Based Memory Extended Memory Total Memory Thu Apr 3 2003 13 31 30 None None None None None None 1 44M 3 5 in None EGA VGA All Errors 640K 64512K 65536K Item Help _________________________ Menu Level Change the day month year and century Move Enter Select PU PD Value F10 Save ESC Exit F1 General Help F5 Previous Values F6 Fail Safe Def...

Page 33: ...R T Capability Console Redirection Report No FDD For WIN 95 Small Logo EPA Show Press Enter Disabled Enabled Floppy Press Enter Disabled Enabled On Fast Disabled 6 250 Setup Non OS2 Disabled Press Enter No Disabled Item Help _________________________ Menu Level Allow you to choose the VIRUS warning feature for IDE Hard Disk boot sector protection If this function is enabled and someone attempt to ...

Page 34: ...s Sets the Num Lock on or off On Off Typematic Rate Setting Toggles control of keyboard key repeat rate Enabled Disable Typematic Rate Chars Sec Defines how many characters are repeated per second when holding down a key on the keyboard 6 8 10 12 15 20 24 30 Typematic Delay Msec Defines the delay that occurs at keystroke before that key will start to repeat 250 500 750 1000 Security Option Sets th...

Page 35: ... Help F5 Previous Values F6 Fail Safe Defaults F7 Optimized Defaults Delay Prior to Thermal This item allow you to select the time from Wait to CPU Thermal control 4 min 8 min 16 min 32 min CPU L1 L2 Cache Toggles the use of CPU L1 and L2 cache Enabled Disabled Hyper Threading Technology This option allows you to enabled or disabled the Hyper Threading Technology Enabled Disabled APIC Mode This op...

Page 36: ...ts to load the operating system from the devices in the sequence selected in these item Floppy LS120 HDD 0 SCSI CDROM HDD 1 HDD 2 HDD 3 ZIP100 USB FDD USB ZIP USB HDD LAN Disabled Console Redirection Phoenix AwardBIOS CMOS Setup Utility Console Redirection Console Redirection Baud Rate Agent after boot SMDC 19200 Enabled Item Help _________________________ Menu Level Move Enter Select PU PD Value ...

Page 37: ... until output starts 2 2 5 3 Active to Precharge Delay This item controls the number of DRAM clocks used for DRAM parameters 8 7 6 5 DRAM RAS to CAS Delay This field lets you insert a timing delay between the CAS and RAS strobe signals used when DRAM is written to read from or refreshed 4 3 2 DRAM RAS Precharge This item controls the idle clocks after issuing a precharge command to the DRAM 4 3 2 ...

Page 38: ...OnChip IDE Device IDE HDD Block Mode On Chip Primary PCI IDE IDE Primary Master PIO IDE Primary Slave PIO IDE Primary Master UDMA IDE Primary Slave UDMA On Chip Secondary PCI IDE IDE Secondary Master PIO IDE Secondary Slave PIO IDE Secondary Master UDMA IDE Secondary Slave UDMA On Chip Serial ATA Setting On Chip Serial ATA Serial ATA Port Mode 1 Serial ATA Port Mode 2 Enabled Enabled Auto Auto Aut...

Page 39: ...e and your system software both support Ultra DMA 33 select Auto to enable bios SUPPORT Auto Disabled On Chip Serial ATA The integrated peripheral controller contains a SATA interface with support for two SATA channels Select Enabled to activate each channel separately Enhanced Mode SATA Only Disabled Combined Mode Serial ATA Port Mode 1 2 This item allows you to set SATA mode Primary Master Prima...

Page 40: ...led Onborad LAN Boot ROM This item allows you to Enable or Disable onboard LAN Boot ROM function Disabled i562 i547 i541 Super IO Controller Phoenix AwardBIOS CMOS Setup Utility Super IO Device Onboard FDC Controller Onboard Serial Port 1 Onboard Serial Port 2 UART Mode Select RxD TxD Active IR Transmission Delay UR2 Duplex Mode Use IR Pins Onboard Parallel Port Parallel Port Mode EPP Mode Select ...

Page 41: ...o Enabled or Disabled the IR transmission delay Enabled Disabled UR2 Duplex Mode This item allows you to select IR Half or Full duplex function Half Full Use IR Pins This item allows you to select IR IR Rx2 Tx2 or RxD2 or TxD2 function IR Rx2 Tx2 RxD2 TxD2 Onboard Parallel Port This field allows the user to configure the LPT port 378 IRQ7 278 IRQ5 3BC IRQ7 Disabled Parallel Port Mode This field al...

Page 42: ...evious Values F6 Fail Safe Defaults F7 Optimized Defaults ACPI Function Toggles advanced power and configuration done by OS Enabled Disabled Power Management Option Defines the type of power saving features the system should follow User Define Maximum Saving Minimum Saving Video Off Method Defines the method used to power off graphics V H SYNC Blank Blank DPMS Video Off In Suspend Tell you what ti...

Page 43: ...ant off off Disabled Disabled Disabled Disabled 0 0 0 0 BUTTON ONLY Enter Ctrl F1 Item Help _________________________ Menu Level Move Enter Select PU PD Value F10 Save ESC Exit F1 General Help F5 Previous Values F6 Fail Safe Defaults F7 Optimized Defaults Soft off by PWR BTTN Defines the system power on method when push Power Button Instant off Delay 4 sec PWRON After PWR Fail Defines the state wh...

Page 44: ...E 1 FDD COM LPT Port PCI PIRQ A D Disabled Disabled Disabled Disabled Disabled Disabled Item Help _________________________ Menu Level Move Enter Select PU PD Value F10 Save ESC Exit F1 General Help F5 Previous Values F6 Fail Safe Defaults F7 Optimized Defaults Primary IDE 0 1 When set to On any event that occurs will awaken a system which has been powered down Disabled Enabled Secondary IDE 0 1 W...

Page 45: ...a ESCD when you exit Setup if you have Installed a new add on and the system reconfiguration has caused such a serious conflict that the OS cannot boot Move Enter Select PU PD Value F10 Save ESC Exit F1 General Help F5 Previous Values F6 Fail Safe Defaults F7 Optimized Defaults Reset Configuration Data This setting allow you to clear ESCD data Enabled Disabled Resources Controlled By Default wheth...

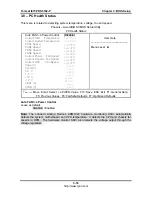
Page 46: ...xx xxx xx xxx xxxxRPM xxxxRPM xxxxRPM xxxxRPM xxxxRPM xxxxRPM xxxxRPM x xxV x xxV x xxV x xxV xx xxV xx xxV x xxV x xxV Item Help _________________________ Menu Level Move Enter Select PU PD Value F10 Save ESC Exit F1 General Help F5 Previous Values F6 Fail Safe Defaults F7 Optimized Defaults Auto FAN1 4 Power Control Leave as default Disabled Enabled Note The onboard Analog Devices ADM1027 hardwa...

Page 47: ...efaults CPU Clock Ratio Sets the CPU multiplier TYAN does not recommend changing this setting from the default setting 16X 22X Auto Default Auto Detect DIMM PCI Clk Sets the BIOS to automatically adjust PCI and memory bus speeds accordingly Enabled Disabled Spread Spectrum Reduces interference on the motherboard Leave as default if your system works correctly Enabled Disabled CPU Clock Enter a dec...

Page 48: ...lts Y N N Pressing Y loads the BIOS default values for the most stable minimal performance system operations 3 11 Load Optimized Defaults Phoenix AwardBIOS CMOS Setup Utility Standard CMOS Features Advanced BIOS Features Advanced Chipset Features Integrated Peripherals Power Management Setup PnP PCI Configurations PC Health Status Frequency Voltage Control Load Fail Safe Defaults Load Optimized De...

Page 49: ...ssion to change any options When you select this function the following message will appear at the center of the screen to assist you in creating a password ENTER PASSWORD Phoenix AwardBIOS CMOS Setup Utility Standard CMOS Features Advanced BIOS Features Advanced Chipset Features Integrated Peripherals Power Management Setup PnP PCI Configurations PC Health Status Frequency Voltage Control Load Fa...

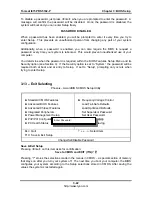
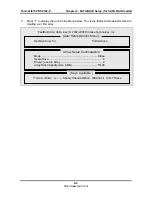
Page 50: ...em the password will be required both at boot and at entry to Setup If set to Setup prompting only occurs when trying to enter Setup 3 13 Exit Selecting Phoenix AwardBIOS CMOS Setup Utility Standard CMOS Features Advanced BIOS Features Advanced Chipset Features Integrated Peripherals Power Management Setup PnP PCI Configurations PC Health Status Frequency Voltage Control Load Fail Safe Defaults Lo...

Page 51: ...ntrol Load Fail Safe Defaults Load Optimized Defaults Set Supervisor Password Set User Password Save Exit Setup Exit Without Saving Esc Quit Select Item F10 Save Exit Setup Save Data to CMOS SAVE to CMOS and EXIT Y N Y Pressing Enter on this item asks for confirmation Quit without saving Y N Y This allows you to exit Setup without storing in CMOS any change The previous selections remain in effect...

Page 52: ...D 378 controller yet You MUST install the Windows NT4 2000 or XP driver software first onto this drive while it is still attached to your existing hard drive controller The PDC20378 controller supports up to two Serial ATA hard drives and two Parallel ATA hard drives 1 Configure the jumpers of the Parallel ATA hard drive you re preparing to connect to the SATA RAID controller using the proper Mast...

Page 53: ...ot with the PDC20378 and drives installed the Promise onboard BIOS will display the following screen FastTrak 378 tm BIOS Version 1 00 0 XX c 2002 2005 Promise Technology Inc All Rights Reserved No Array is defined Press Ctrl F to enter FastBuild tm Utility or Press ESC to continue booting 2 Press Ctrl F keys to display the FastBuild Utility Main Menu FastBuild tm Utility 2 xx c 2002 2005 Promise ...

Page 54: ...ethod to creating your first array FastBuild tm Utility 2 xx c 2002 2005 Promise Technology Inc Optimize Array for Performance Mode Stripe Spare Drive 0 Drive s used in Array 2 Array Disk Capacity size in MB 16126 Up Down Space Change Option ESC Exit Ctrl Y Save Auto Setup Options Menu Array Setup Configuration Keys Available 4 3 http www tyan com ...

Page 55: ...otection using new hard drives follow these steps 1 Using the Spacebar choose Security under the Optimize Array for section 2 Press Ctrl Y keys to save your selection 3 The window below will appear Do you want the disk image to be duplicated to another Yes No Y Create and Duplicate N Create Only 4 Press N for the Create Only option 5 A window will appear almost immediately confirming that your Sec...

Page 56: ... Capacity MB Channel ID Drive Model Capacity MB 1 Mas QUANTUMCR8 4A 8063 2 Mas QUANTUMCR8 4A 8063 Up Down ESC Exit Enter Select Please Select A Source Disk Target Disk Source Disk Keys Available 4 Use the arrow keys to choose which drive contains the existing data to be copied 5 Press Enter key to save selection and start duplication The following progress screen will appear Start to duplicate the...

Page 57: ...m the Windows 2000 XP Setup screen press the Enter key Setup will now load all device files and then continue the Windows 2000 XP installation Existing Windows 2000 XP Installation After configuring the PDC20378 controller and rebooting your system Windows 2000 setup will show a Found New Hardware dialog box Under Windows 2000 XP the Mass Storage Controller will be displayed 1 Insert the PDC20378 ...

Page 58: ...the PDC20378 Driver diskette into the A drive 12 Press the Next button A message informing you that Windows 98 has found Win98 ME Promise FastTrak 378 or SATA 150 TX Series Controller should appear 13 Press Next then Finish then Yes when asked if you want to restart your computer Be sure to remove the diskette from drive A Existing Windows 98 Me Installation 1 After configuring the PDC20378 contro...

Page 59: ...ou need to specify any additional devices to be installed do so at this time Once all devices are specified continue to step 7 7 From the Windows NT Setup screen press the Enter key Setup will now load all device files and then continue the Windows NT installation 8 After a successful installation the SCSI Adapter Setup box will show that the Win NT Promise FastTrak 378 or SATA150 TX Series Contro...

Page 60: ...isplay the following screen showing the BIOS version and status of the array FastTrak 378 tm BIOS Version 2 00 0 xx c 2002 2005 Promise Technology Inc All Rights Reserved ID MODE SIZE TRACK MAPPING STATUS 1 2 0 Stripe 16126M 611 128 32 Functional Press Ctrl F to enter FastBuild tm Utility The array status consists of three possible conditions Functional Critical Offline Functional The array is ope...

Page 61: ... abort or exit the current menu This is the first option screen when entering the FastBuild Setup FastBuild tm Utility 2 xx c 2002 2005 Promise Technology Inc Auto Setup 1 View Drive Assignments 2 Define Array 3 Delete Array 4 Rebuild Array 5 Press 1 5 to Select Option ESC Exit Main Menu Keys Available NOTE After configuring an array using FastBuild you should FDISK and format the arrayed drive s ...

Page 62: ...Setup Options Menu Keys Available Auto Setup Options Menu Optimize Array For Select whether you want Performance RAID 0 Security RAID 1 under the Optimize Array for setting Performance RAID 0 Striping Supports the maximum performance The storage capacity equals the number of drives times the capacity of the smallest drive in the disk array NOTE PDC20378 permits striped arrays using 1 2 drive attac...

Page 63: ...DMA Keys Available View Drive Assignments Deleting An Array The Delete Array 4 Menu option allows for deletion of disk array assignments This is not the same as deleting data from the drives themselves If you delete an array by accident and before it has been used again the array can normally be recovered by defining the array identically as the deleted array WARNING Deleting an existing disk arra...

Page 64: ...ID Mode Total Drv Capacity MB Status Array 1 Stripe Block 64 KB Channel ID Drive Model Capacity MB Assignment 1 Mas QUANTUMCR8 4A 8063 Y 2 Mas QUANTUMCR8 4A 8063 Y Drive Assignments Define Array Menu 3 Confirm yes to the following warning message with the Ctrl Y key to continue array deletion Are you sure you want to delete this array Press Ctrl Y to Delete others to Abort 4 After deleting the arr...

Page 65: ...ild Main Menu 3 Select submenu Define Array 3 4 Select the failed array and identify the Channel and ID of the failed drive 5 Power off and physically remove the failed drive 6 Replace the drive with an identical model 7 Reboot the system and enter the FastBuild Main Menu 8 Select the 5 Rebuild Array option The following screen will appear FastBuild tm Utility 2 xx c 2002 2005 Promise Technology I...

Page 66: ...ect Rebuild Array Menu Select Drive for Rebuild Keys Available 11 Under Select Drive for Rebuild highlight the replacement drive 12 Press Enter and confirm that the data will be copied on to the selected drive All data on the replacement drive will be written over with mirrored information from the array drive A progress bar will appear as below Please Wait While Duplicating The Image 10 Complete ...

Page 67: ...type of error is a memory error Before contacting your vendor or TYAN Technical Support be sure that you note as much as you can about the beep code length and order that you experience Also be ready with information regarding add in cards drives and O S to speed the support process and come to a quicker solution 5 2 Flash Utility Every BIOS file is unique for the motherboard it was designed for F...

Page 68: ...rogram Load IPL devices and then stores that list in NVRAM IPL devices have the ability to load and execute an OS as well as provide the ability to return to the BIOS if the OS load process fails for some reason At that point the next IPL device is called upon to attempt loading of the OS BIOS Basic Input Output System the program that resides in the ROM chip and provides the basic instructions fo...

Page 69: ... rather than on just the rising edge potentially doubling output DIMM Dual In line Memory Module faster and more capacious form of RAM than SIMMs and do not need to be installed in pairs DIMM bank sometimes called DIMM sockets because the physical slot and the logical unit are the same That is one DIMM module fits into one DIMM socket which is capable of acting as a memory bank DMA Direct Memory A...

Page 70: ...protocol HDD stands for Hard Disk Drive a type of fixed drive H SYNC controls the horizontal synchronization properties of the monitor IC Integrated Circuit the formal name for the computer chip IDE Integrated Device Drive Electronics a simple self contained HDD interface It can handle drives up to 8 4 GB in size Almost all IDEs sold now are in fact Enhanced IDEs EIDEs with maximum capacity determ...

Page 71: ...urst SRAM a type of RAM that can maintain it s data as long as power is provided to the memory chips In this configuration SRAM requests are pipelined which means that larger packets of data are sent to the memory at one time and acted upon quickly This type of SRAM operates at bus speeds higher than 66MHz Pipelining improves system performance by allowing the CPU to begin executing a second instr...

Page 72: ...o any program running on the computer ROM Read Only Memory a storage chip which contains the BIOS the basic instructions required to boot the computer and start up the operating system SATA Serial ATA is an evolutionary replacement for the Parallel ATA physical storage interface Serial ATA is a drop in solution in that it is compatible with today s software and operating systems It will provide fo...

Page 73: ...raATA hard drives USB Universal Serial Bus a versatile port This one port type can function as a serial parallel mouse keyboard or joystick port It is fast enough to support video transfer and is capable of supporting up to 127 daisy chained peripheral devices VGA Video Graphics Array the PC video display standard V SYNC controls the vertical scanning properties of the monitor ZCR Zero Channel RAI...

Page 74: ...lf test 08h 1 Test special keyboard controller for Winbond 977 series Super I O chips 2 Enable keyboard interface 0Ah 1 Disable PS 2 mouse interface optional 2 Autodetect ports for keyboard mouse followed by a port interface swap optional 3 Reset keyboard for Winbond 977 series Super I O chips 0Eh Test F000h segment shadow to see whether it is R W able or not If test fails keep beeping the speaker...

Page 75: ...gacy information 25h Early PCI Initialization Enumerate PCI bus number Assign memory I O resource Search for a valid VGA device VGA BIOS and put it into C000 0 26h 1 If Early_Init_Onboard_Generator is not defined Onboard clock generator initialization Disable respective clock resource to empty PCI DIMM slots 2 Init onboard PWM 3 Init onboard H W monitor devices 27h Initialize INT 09 buffer 29h 1 P...

Page 76: ...t the cacheable range to smaller one in case the cacheable ranges between each CPU are not identical 50h Initialize USB Keyboard Mouse 52h Test all memory clear all extended memory to 0 53h Clear password according to H W jumper Optional 55h Display number of processors multi processor platform 57h 1 Display PnP logo 2 Early ISA PnP initialization Assign CSN to every ISA PnP device 59h Initialize ...

Page 77: ...item in Setup is set to AUTO 6Fh 1 Initialize floppy controller 2 Set up floppy related fields in 40 hardware 75h Detect install all IDE devices HDD LS120 ZIP CDROM 76h Optional Feature Enter AWDFLASH EXE if AWDFLASH EXE is found in floppy drive ALT F2 is pressed 77h Detect serial ports parallel ports 7Ah Detect install co processor 7Ch Init HDD write protect 7Fh Switch back to text mode if full s...

Page 78: ...ke all ISA adapter ROMs 2 Invoke all PCI ROMs except VGA 8Dh 1 Enable Disable Parity Check according to CMOS setup 2 APM Initialization 8Fh Clear noise of IRQs 93h Read HDD boot sector information for Trend Anti Virus code 94h 1 Enable L2 cache 2 Program Daylight Saving 3 Program boot up speed 4 Chipset final initialization 5 Power management final initialization 6 Clear screen display summary tab...

Page 79: ...ogy IT manager can rest assure his server machines are always taken care Tyan SMDC is not a peripheral card Unlike regular peripheral card such as AGP card Network card or SCSI card SMDC does not require any hardware specific driver As long as a standby power comes into the system SMDC will begin looking after the system Tyan SMDC provides diversified methods to communicate with the hardware IT ma...

Page 80: ...ment to fast and friendly customer support through email By offering plenty of options for users Tyan serves multiple market segments with the industry s most competitive services to support them Tyan s tech support is some of the most impressive we ve seen with great response time and exceptional organization in general Anandtech com Please feel free to contact us directly for this service at tec...

Page 81: ... circuit different from that of the receiver Consult the dealer on an experienced radio television technician for help Notice for Canada This apparatus complies with the Class B limits for radio interference as specified in the Canadian Department of Communications Radio Interference Regulations Cet appareil est conforme aux norms de Classe B d interference radio tel que specifie par le Ministere ...

Reviews: