background image

102-61029/410 - REV. 5 - 09-2020

10

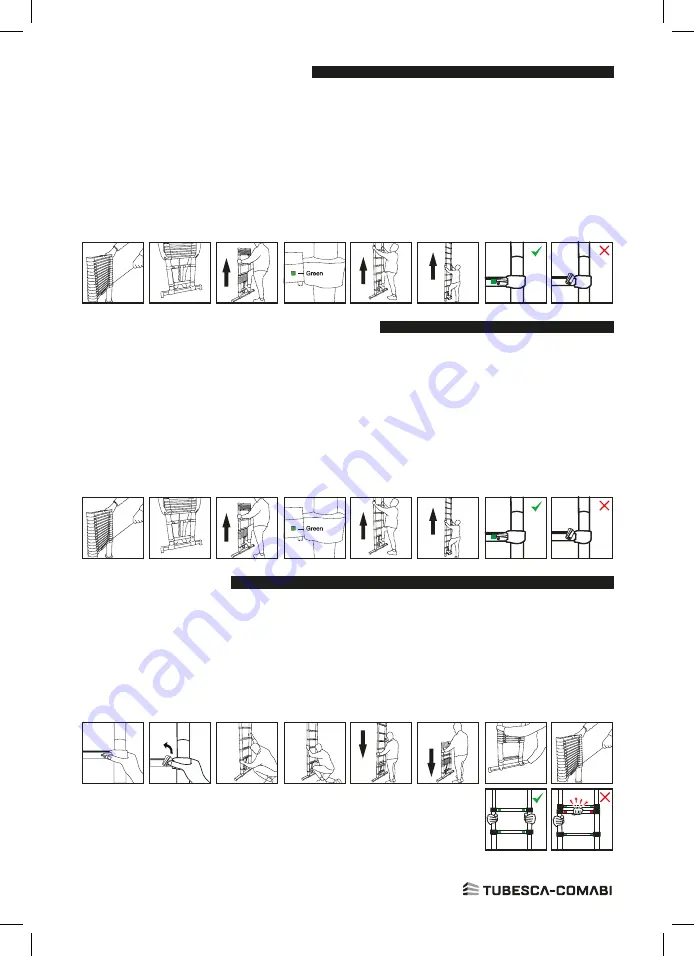
Extending the ladder (partially)

Place the ladder on a sturdy, level surface suitable on which to use the ladder. Release the strap that secures 

the ladder in the “storage configuration”. Place your foot on the bottom rung (closest to the ground). With both 

hands, pull up the 3rd rung – counting from the ground. Lift ladder off the ground very slightly – stabilizers will 

automatically telescope out to the correct extension. 

The green indicator on front of each stabilizer will 

confirm that they are locked in place

. Place your foot on the bottom rung to hold the ladder in place. With 

both hands pull up on the rung that you determine will be the highest point to which you would like to extend 

the ladder. Extend each rung until it is locked in place. You will hear an audible click and see a green indicator 

on the rung below confirming that section is fully extended and locked. Continue extending the ladder all the 

way up. Once fully extended, each section should show a green lock indicator. Visually inspect the ladder for 

any damage, debris and ensure that all open sections are locked.

Extending the ladder (full working height)

Place the ladder on a sturdy, level surface suitable on which to use the ladder. Release the strap that secures 

the ladder in the “storage configuration”. Place your foot on the bottom rung (closest to the ground). With both 

hands, pull up the  3rd rung – counting from the ground. Lift ladder off the ground very slightly – stabilizers 

will automatically telescope out to the correct extension. 

The green indicator on front of each stabilizer will 

confirm that they are locked in place

. Place your foot on the bottom rung to hold the ladder in place. With 

both hands pull up on the rung that you determine will be the highest point to which you would like to extend 

the ladder. Extend each rung until it is locked in place. You will hear an audible click and see a green indicator 

on the rung below confirming that section is fully extended and locked. Continue extending the ladder all the 

way up. Once fully extended, each section should show a green lock indicator. Visually inspect the ladder for 

any damage, debris and ensure that all open sections are locked.

Closing the ladder

Great care should be used when retracting the ladder. Do not place any part of your body incliding hands, 

fingers or thumbs, on, or between rungs or couplings above the closing rung. Ensure that you are on a sturdy 

level surface. Hold the ladder upright. Place thumbs on the release mechanism located on the second to 

bottom rung from the ground. Push each release mechanism inward one at a time to unlock the ladder while 

securing the ladder with the other hand. The entire ladder is now completely unlocked (DO NOT CLIMB 

LADDER AFTER PERFORMING THIS PROCEDURE). Due to our «soft closing» system, the rungs may 

need slight guidance while retracting. Attach the strap that secures the ladder around the top rung. Push the 

stabiliser bars inward to retract each side to its «storage configuration».

Locked

Locked

Lightning latch

Un-Locked

Un-Locked

Proper hand 

placement

Improper hand 

placement

Summary of Contents for 00094829

Page 1: ...er qu aucun montant n est tordu fl chi abim fissur V rifier que les composants sont en bon tat V rifier qu aucune liaison montant chelon n est manquante 1 Description de l quipement X TENSO2 est une c...

Page 2: ...reaux sup rieurs figure 2 et v rifiez que l chelle d passe d au moins un m tre l endroit o vous travaillez figure 3 e REMARQUE lorsque la hauteur souhait e est atteinte l indicateur de verrouillage du...

Page 3: ...la sangle qui maintien l chelle en position de stockage LERANGEMENTDOITSEFAIREENPOSITIONVERTICALEETREPLI E 2 3 Positionnement de l chelle Utilisez toujours l chelle de mani re ce que les m canismes d...

Page 4: ...l chelle l ext rieur par mauvais temps telles que le vent fort Utiliser des chelles non conductrices pour les travaux devant tre r alis s sous tension lectrique Attention aux risques lectriques Ident...

Page 5: ...icateurvertsitu l avant de chaque stabilisateur confirmera qu ils sont bien verrouill s en place Placezvotrepiedsurl chelonle plus bas de l chelle pour maintenir l chelle en place Avec vos deux mains...

Page 6: ...tions to the beam cleats are missing Check that no rungs are missing worn or damaged Check that the locking system remains horizontal and is not missing bent or slack 1 Description of equipement The X...

Page 7: ...d Never use the top three steps Figure 2 for standing and make sure that the ladder is at least one metre higher than the step you need for standing Figure 3 e NOTE When you have extended the ladder t...

Page 8: ...em you may need to guide the steps down gently when closing the ladder c Close the base by pushing it towards the inside of the ladder until it clicks into position then attach the strap for holding t...

Page 9: ...er during transport for example by attaching it and check that it is positioned properly to avoid any damage Do not use the ladder outside in adverse weather conditions such as strong wind Use non con...

Page 10: ...rung counting from the ground Lift ladder off the ground very slightly stabilizers will automatically telescope out to the correct extension The green indicator on front of each stabilizer will confir...

Page 11: ...ci n Comprobar que ning n montante est torcido flexionado estropeado o roto Comprobar que los componentes est n en buen estado Compruebe que no falte ning n enlace al montante escal n 1 Descripci n de...

Page 12: ...ci n se bloquean c Siga desplegando el n mero de pelda os hasta obtener la altura deseada comprobando que cada pelda o est bien desplegado y bloqueado en su posici n antes de desplegar el pelda o sigu...

Page 13: ...a 3 Coloque los pulgares en el mecanismo de desbloqueo situado en el segundo pelda o empezando por abajo figura 5 Seg n el modelo empuje cada mecanismo de desbloqueo hacia el interior o hacia la parte...

Page 14: ...un orificio en el lateral en un material s lido No subirse ni bajarse de la escalera llevando un equipo pesado o dif cil de manipular No use la escalera al aire libre con mal tiempo como viento fuert...

Page 15: ...y autom ticamente a la extensi n correcta El indicador verde en la parte delantera de cada estabilizador confirmar que est n bloqueados Coloque un pie en el primer pelda o para sostener la escalera T...

Page 16: ...he i componenti siano in buone condizioni Verificare che tutti i collegamenti montante gradino siano presenti Verificare che non manchino fissaggi o aggraffature Verificare che i pioli non siano manca...

Page 17: ...i almeno un metro pi in alto rispetto a dove si sta lavorando figura 3 e NOTA quando viene raggiunta l altezza desiderata l indicatore di blocco sulla barra del piolo aperto pi alto prima della serie...

Page 18: ...ONE VERTICALE E RIPIEGATA 2 3 Posizionamento della scala Usare sempre la scala in modo che i meccanismi di sblocco siano rivolti verso se stessi molto IMPORTANTE che la scala sia posizionata ad un ang...

Page 19: ...scale non conduttive per i lavori da eseguire sotto tensione elettrica Attenzione ai rischi elettrici Identificare gli eventuali rischi elettrici dell area di lavoro come le linee in altezza o altre a...

Page 20: ...gio molto leggermente gli stabilizzatori si orienteranno automaticamente verso l estensione corretta L indicatore verde sulla parte anteriore di ogni stabilizzatore confermer che sono bloccati in posi...

Reviews: