MAINTENANCE AND REPAIR INSTRUCTIONS
SPARK PLUG
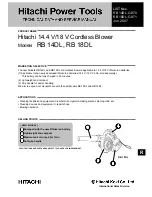
1. To remove spark plug (B) (Fig. 26) for cleaning or
replacement: make sure engine is off, spark plug is
cool, then grasp spark plug boot firmly and remove
from spark plug. Remove spark plug with correct
spark plug tool. Inspect, clean or replace as needed.
2. Spark plug gap = .025" (.635mm) (Figure 25).
3. Torque to 120 inch pounds (12 to 15 N•m). Connect
spark plug boot.
4. If needed, replace spark plug with spark plug RDJ7Y
or equivalent.
STORAGE
Failure to follow these steps may cause varnish to form in
the carburetor which can cause difficult starting or per-
manent damage following storage.
1. Perform all the general maintenance recommended in
the Maintenance Section of your User Manual.
2. Clean exterior of engine and blower tubes.
3. Drain fuel from the fuel tank by running the unit dry or
by removing the fuel cap and tipping the motor hous-
ing/fuel tank over and draining oil/fuel mixture into a
container with the same 2-cycle fuel mixture.
4. After fuel is drained, start engine.
5. Run engine at idle until unit stops. This will purge the
carburetor of fuel.
6. Allow engine to cool (approx. 5 minutes).
7. Using a spark plug wrench, remove the spark plug.
8. Pour 1 teaspoon of clean 2-cycle oil into the
combustion chamber. Pull starter rope slowly several
times to coat internal components. Replace spark
plug.
9. Store unit in a cool, dry place away from any source
of ignition such as an oil burner, water heater, etc.
REMOVING A UNIT FROM STORAGE
1. Remove spark plug.
2. Pull starter rope briskly to clear excess oil from com-
bustion chamber.
3. Clean and gap spark plug or install a new spark plug
with proper gap. (Fig. 25)
4. Prepare unit for operation.
5. Fill fuel tank with proper fuel / oil mixture. See Fuel
and Lubrication Section.
Fig. 25
.025" (.635mm)
Fig. 26
B
MAINTENANCE AND REPAIR INSTRUCTIONS
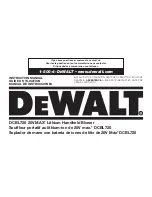
AIR FILTER
To Clean Air Filter:
1. Remove cover (A) by depressing clip on top of cover
and lift filter (B) from air box (Figure 20 & Figure 21).
2. Wash filter in soap and water.
DO NOT USE GASO-
LINE!
3. Air dry filter and cover.
4. Reinstall filter.
NOTE:
Replace filter if frayed, torn, damaged or unable
to be cleaned.
FUEL CAP / FUEL FILTER
NOTE:
Keep vent (A) on fuel cap clean of debris (Figure
22).
Fuel Filter:
1. Completely remove fuel cap from fuel tank (B) to be
able to remove fuel filter (D) from tank. Use a piece of
wire (C) with a hook formed at the end to pull filter
out of tank. (Figure 23)
2. Pull filter (D) off with a twisting motion. (Figure 24)
3. Replace fuel filter (D). (Figure 24)
NOTE:
Never operate the blower without the fuel filter.
Internal engine damage could result!
IDLE ADJUSTMENT
The carburetor was pre-set at the factory for optimum
performance. If further adjustments are necessary take
your blower to a Troy Bilt or other qualified service dealer.
NEVER operate blow-
er without the air fil-
ter. The air filter must be kept clean. If it
becomes damaged, install a new filter.
CAUTION:
Remove fuel from unit
and store in approved
container before starting this procedure. Open
fuel cap slowly to release any pressure which
may have formed in fuel tank.
CAUTION:
Fig. 20
Fig. 21
A
B
Fig. 22
Fig. 23
Fig. 24
A
C
B
D
Spark
Plug
14
15
Summary of Contents for TB25BP
Page 42: ......