8
GB
g) The dust produced when sanding lead-based paints is particularly hazardous to
children, pregnant women, and people with high blood pressure.
DO NOT allow these
people near to the work area, even if wearing appropriate personal protective equipment
h) Whenever possible, use a vacuum dust extraction system to control dust and waste
i) Be especially careful when using a machine for both wood and metal sanding.
Sparks from metal can easily ignite wood dust.
ALWAYS clean your machine thoroughly
to reduce the risk of fire
j
) Empty the dust bag or container (where applicable) frequently during use, before taking
breaks and after completion of sanding.
Dust may be an explosion hazard. DO NOT throw
sanding dust into an open fire. Spontaneous combustion may occur when oil or water
particles come into contact with dust particles. Dispose of waste materials carefully and in
accordance with local laws and regulations.
k) Work surfaces and sandpaper can become very hot during use. If there is evidence of
burning (smoke or ash) from the work surface, stop and allow the material to cool.
DO
NOT touch work surface or sandpaper until they have had time to cool
l) DO NOT touch the moving sandpaper
m) ALWAYS switch off before you put the sander down
n) DO NOT use for wet sanding.
Liquids entering the motor housing can cause severe
electric shocks
o) ALWAYS unplug the sander from the mains power supply before changing
or replacing sandpaper
p) Even when this tool is used as prescribed it is not possible to eliminate all residual risk
factors.
If you are in any doubt as to safe use of this tool, do not use it
WARNING
: Some dust created by power sanding, sawing, grinding, drilling, and other
construction activities contains chemicals known to the State of California to cause cancer
and birth defects or other reproductive harm. Some examples of these chemicals are: lead
from lead-based paints, crystalline silica from bricks and cement and other masonry products,
and arsenic and chromium from chemically treated lumber. Your risk from exposure to these
chemicals varies, depending on how often you do this type of work. To reduce your exposure,
work in a well-ventilated area and with approved safety equipment, such as dust masks that
are specially designed to filter out microscopic particles.
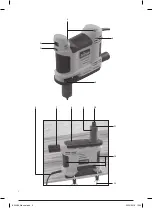
Product Familiarisation
1. Speed Adjustment Dial
2. ON/OFF Switch
3. Bench Mounting Fixing Holes
4. Motor Vents
5. Edge Guide Holes
6. Power Cord
7. Dust Extraction Port Adaptor (removable)
8. Sanding Base
9. Sanding Sleeve
10. Locking Bolt
11. Drum Washer
12. Rubber Grips
13. Bench Mounting Clamps
14. Bench Mounting Mat
15. Sanding Sleeve Drum
16. Edge Guide
17. Edge Guide Locking Screw (2)
18. Additional Sanding Sleeves/Drums
Intended Use
Compact, portable oscillating spindle sander for light-duty edge sanding, curved
internal sanding, or template sanding tasks, either hand-held or bench mounted.
Unpacking Your Tool
• Carefully unpack and inspect your new tool. Familiarise yourself with all its features
and functions
• Ensure that all parts of the tool are present and in good condition. If any parts are missing
or damaged, have such parts replaced before attempting to use this tool
Before Use
WARNING:
Ensure the tool is disconnected from the power supply before attaching or
changing any accessories, or making any adjustments.
Secting the right grade of sanding sleeve
• Sanding sleeves are available in a variety of different grades: coarse (60 grit), medium
(120 grit) and fine (240 grit)
• Use a coarse grit to sand down rough finishes, medium grit to smooth the work,
and fine grit to finish off
• Always use good quality sanding sleeves to maximise the quality of the finished task
• It is advisable to do a trial run on a scrap piece of material to determine the optimum
grades of sandpaper for a particular job. If there are still marks on your work after
sanding, try either going back to a coarser grade and sanding the marks out before
recommencing with the original choice of grit, or try using a new piece of sandpaper to
eliminate the unwanted marks before going on to a finer grit and finishing the job
Fitting a sanding sleeve
WARNING:
Always ensure the tool is switched OFF and the plug is removed from the
mains power supply before fitting or removing sanding sleeves.
Note:
Do not continue to use worn, torn or heavily clogged sanding sleeves. Ensure foreign
objects, such as nails and screws, are removed from the workpiece before starting to sand.
WARNING:
Do not use a sanding sleeve on wood that has previously been used on metal.
This may cause scouring on the wooden surface.
1. Remove the Locking Bolt (10) and Drum Washer (11) (D)
2. Remove the Sanding Sleeve Drum (15)
3. Slide a Sanding Sleeve (9) onto the Sanding Sleeve Drum (A)
4. Replace the Sanding Sleeve Drum back onto the spindle (B)
5. Replace the Drum Washer (C) and retighten the Locking Bolt (D)
Note:
See Fig I for assembly diagram.
Dust extraction
WARNING:
Always connect the sander to a suitable vacuum cleaner or workshop dust
extraction system if the sanding dust contains harmful substances, such as particles from
old paint, varnish, surface coatings, etc. Always dispose of harmful dust according to laws
and regulations.
WARNING:
Take special care to guard against harmful and toxic dusts when sanding
lead-based painted surfaces, woods and metals, particularly if you are unsure about the exact
substance involved. All persons entering the work area must wear a mask specially designed
for protection against the toxic dust and fumes involved. Children and pregnant women MUST
NOT enter the work area. DO NOT eat, drink or smoke in the work area.
• This sander is designed to be connected to a household vacuum cleaner hose or workshop
dust extraction system. This is the preferred and most effective method of dust extraction
• Connect a suitable vacuum hose to the supplied Dust Extraction Port Adaptor (7)
• To remove the Dust Extraction Port Adaptor: turn anti-clockwise so the pins align with the
notches of the dust extraction port then remove
• To replace the Dust Extraction Port Adaptor: insert it with the pins aligned with the dust
extraction port then turn the adaptor clockwise to lock it into place (E)
• The portable spindle sander can be used without the Dust Extraction Port Adaptor and
a compatible dust extraction system; however, it is always recommended to use a
compatible dust extraction system
WARNING:
When sanding metal, always connect the sander to a suitable workshop dust
extraction system. Always clean the tool THOROUGHLY when switching from sanding wood to
sanding metal, and vice versa.
Note:
A dust bag is not supplied with this tool because the tool requires a dust extraction
system for effective dust extraction. Inserting a third-party dust bag into the Dust Extraction
Port Adaptor is not an effective method of extracting dust during use and is not recommended.
Operation
WARNING: ALWAYS
wear eye protection, adequate respiratory and hearing protection, and
suitable gloves when working with this tool.
WARNING:
Do not touch the moving Sanding Sleeve (9).
Note:
Always use clamps to secure your workpiece to a workbench wherever possible.
WARNING: NEVER
allow the sandpaper to completely wear down before replacing it. Failure to
observe these precautionary measures can lead to damage to the Sanding Sleeve Drum (15),
resulting in Sanding Sleeves failing to attach properly.
Switching ON & OFF
WARNING:
Never switch the sander ON when the Sanding Sleeve (9) is in contact with the
workpiece or any other surface. This might cause the operator to lose control over the
machine and lead to serious injury.
1. Connect the power cord to the mains power supply
2. To switch the sander ON, push the ON/OFF Switch (2) to the ‘I’ position
3. To switch the sander OFF, push the ON/OFF Switch (2) to the ‘O’ position
WARNING:
Always wait until the machine has stopped vibrating completely before setting
down. Always disconnect from the power supply after use
Adjusting the speed
WARNING:
Never fit any accessories to the Sanding Sleeve Drum (15) that are not rated to
the maximum no load speed of this device (see ‘Specification’).
• This sander features variable speed control that enables it to be used with a variety of
accessories, and to work on a range of different materials, workpieces and objects
Note:
The Speed Adjustment Dial (1) can be adjusted when the sander is ON or OFF. When
the Speed Adjustment Dial is set to ‘1’ the no load speed of the sander with be 1800min
-1
;
when the Speed Adjustment Dial is set to ‘6’, the maximum no load speed of 3200min
-1
will
be achieved.
825289_Manual.indd 8
22/10/2018 12:54
Summary of Contents for TSPSP650
Page 2: ...2 8 9 10 1 2 3 4 7 11 13 12 5 6 825289_Manual indd 2 22 10 2018 12 54...
Page 3: ...3 5 14 13 16 17 15 18 7 825289_Manual indd 3 22 10 2018 12 54...
Page 4: ...4 H C A B D E F G 825289_Manual indd 4 22 10 2018 12 54...
Page 5: ...5 I J Fig I Fig II 16 17 5 5 825289_Manual indd 5 22 10 2018 12 54...


