background image

54

7. Administration 

(continued)

7.4 Log Server

The Windows-based 

Log Server

 is an administrative utility that records 

all the events that take place on selected B022-U08-IP unit and writes 

them to a searchable database. This chapter describes how to install and 
configure the 

Log Server

.

Note: The Log Server requires the Microsoft Jet OLEDB 4.0 driver in 
order to function properly.

To install the 

Log Server

, do the following:

1.  From the computer that you want to use to host the 

Log Server

open the CD that came with the KVM switch and open the 

Log 

Server Installer

 file. If any security warning dialog boxes appear, 

ignore them and click 

Run

 or 

Open

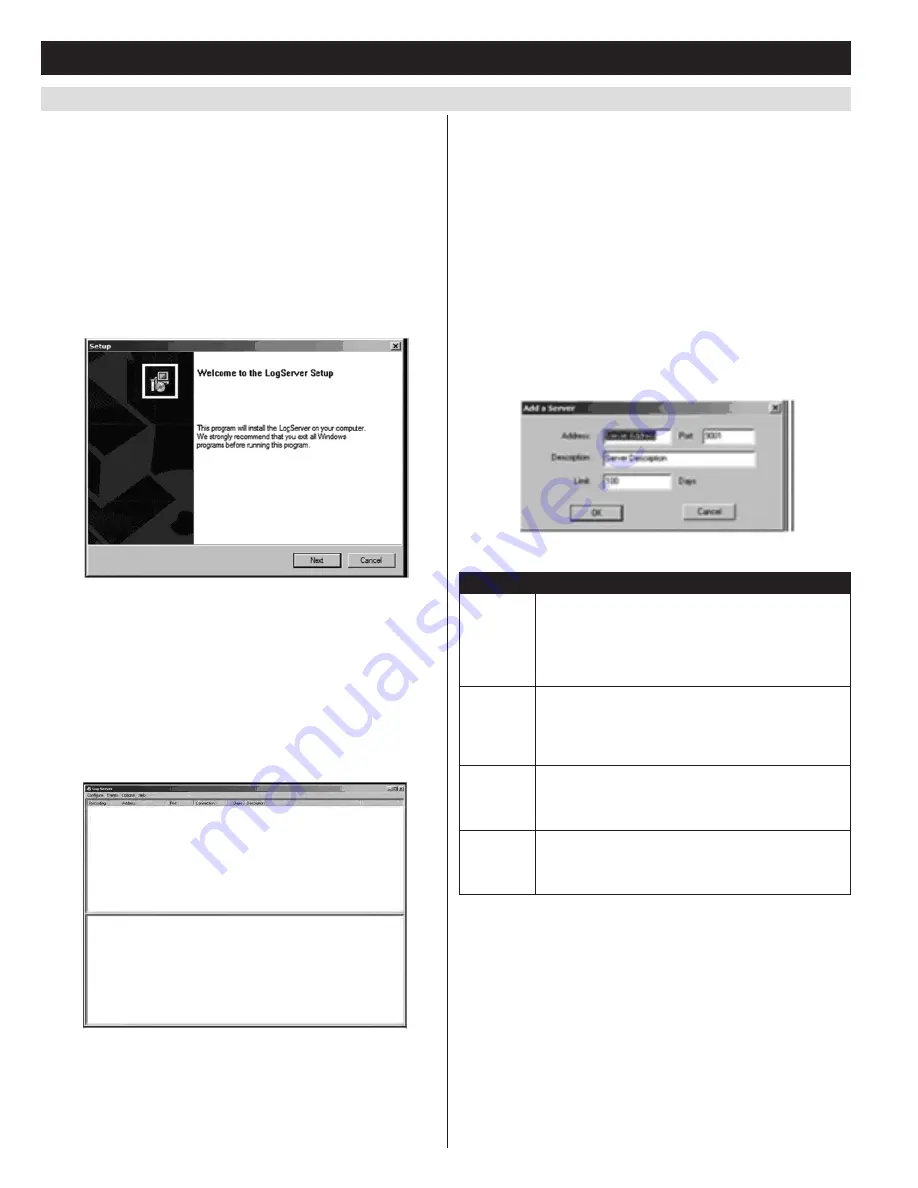
. A 

Log Server

 setup screen 

appears.

2.  Click the 

Next

 button, and then follow the on-screen instructions to 

complete the installation and have the 

Log Server

 program icon 

placed on your desktop.

3.  After installation, and before opening the 

Log Server

 for the first 

time, go to the 

ANMS

 page in the 

Web Management Interface

 or 

Remote OSD

 and enter the MAC address of the computer you 

installed the 

Log Server 

on and an access port that can be used to 

get through a firewall. (See 

ANMS 

section of this manual for 

details.)

4.  Double-click the 

Log Server

 desktop icon. The first time you open 

the 

Log Server

, a screen similar to the one below appears:

The screen is divided into three components:

•  A Menu Bar at the top.
•  A panel that will contain a list of all KVM units in the middle.
•  A panel that will contain an Events List at the bottom.

Menu Bar

The Menu bar consists of four drop-down menus:
•  Configure
•  Events
•  Options
•  Help

Configure

The 

Configure

 menu consists of three functions; 

Add

Edit

 and 

Delete.

Add

Select the 

Add

 function when you need to add a new KVM to the list of 

units that the 

Log Server

 records events for.

Note: You must first add a KVM via the 

Add

 function before the Log 

Server can start recording its events.

When you open the 

Add

 function the following dialog box will appear:

Descriptions of the fields in this dialog box are shown in the table:

Field

Description

Address

This can either be the IP address of the KVM or its 
DNS name (if the network administrator has assigned it 
a DNS name). This value must be entered into the 
ANMS settings screen in order for the KVM to 
communicate with the 

Log Server

. (See the 

ANMS 

section of this manual for details.)

Port

Key in the port number that was specified in the 

Log 

Server

 portion of the 

ANMS

 settings screen. If this 

differs from the port entered in the 

ANMS

 settings 

screen, the 

Log Server

 will not be able to communicate 

with the KVM.

Description

This field is provided so that you can enter in additional 
information that will help differentiate this KVM switch 
from all other KVMs that the Log Server is recording 
information for.

Limit

This specifies the number of days that an event is kept 
in the database before it can be deleted. To remove all 
events that have passed the expiration date set in this 
field, use the 

Maintenance

 function in the 

Events

 menu. 

Edit

Select the Edit function when you need to change the information for 

an existing KVM switch. To edit an existing KVM, simply highlight it 

in the 

Log Server 

list and open the 

Edit

 function from the 

Configure


menu. A dialog box will appear that shows the exact information that 

was entered for the KVM when it was added using the 

Add

 function. 

Edit this information and click 

OK

.

Delete

To delete a KVM switch, simply highlight it in the 

Log Server 

list and 

open the 

Delete

 function from the 

Configure

 menu. A dialog box will 

appear which will display the KVMs information and ask you to click 

OK

 to delete it. If you want to remove it from the list of KVMs being 

tracked by the 

Log Server

, click 

OK

.

Summary of Contents for NetDirector B022-U08-IP

Page 1: ...om support Copyright 2013 Tripp Lite All rights reserved All trademarks are the property of their respective owners The policy of Tripp Lite is one of continuous improvement Specifications are subject to change without notice W arranty Registration register online today for a chance to win a FREE Tripp Lite product www tripplite com warranty ...

Page 2: ...Local Console OSD F7 Auto Scan Function 14 6 4 8 Local Console OSD F8 Logout Function 14 6 4 9 Local Console Pushbuttons 14 6 4 10 Local Console Hotkey Commands 14 6 5 Logging Into the KVM over IP 16 6 5 1 Logging In via Web Browser 16 6 5 2 Logging In via the AP Windows Client 17 6 5 3 Logging In via the AP Java Client 18 6 6 Web Browser and Non Browser Remote Port Access 18 6 6 1 Port Access via...

Page 3: ...er Supply Rubber Feet CD with Owner s Manual Quick Start Guide and Device Files Quick Start Guide 4 Introduction 4 1 Features 1U Rackmount KVM Switch with built in IP access Connect either USB or PS 2 computers using P778 Series USB PS2 Combo KVM Cable Kits no need for separate cable kits Control up to 8 computers on a single KVM switch Daisy chain multiple KVM switches together to increase the nu...

Page 4: ...he Sun Java Website http java com For best results a network transfer speed of at least 128 Kbps is recommended Browsers must support 128 bit data encryption To run the Log Server you must have the Microsoft Jet 0LED8 4 0 or higher driver installed The following equipment must be installed on each computer A VGA SVGA or MultiSync video graphics card with an HD15 port Either PS 2 mouse and keyboard...

Page 5: ...be in the NORMAL position If a firmware upgrade does not perform successfully this switch is flipped to the RECOVER position during the firmware upgrade recovery process See the Firmware Upgrade section of this manual for details 6 Firmware Upgrade Port The RJ11 connector on the included firmware upgrade cable connects to the KVM switch here 7 Power LED The Power LED illuminates blue to indicate t...

Page 6: ...les from the power supplies Never push objects of any kind into or through cabinet slots They may touch dangerous voltage points or short out parts resulting in a risk of fire or electrical shock Do not attempt to service the device yourself Refer all servicing to qualified service personnel If the following conditions occur unplug the device from the wall outlet and bring it to qualified service ...

Page 7: ...ble kit to the console port on the back of the unit and then connecting an external monitor HD15 keyboard USB or PS 2 and mouse USB or PS 2 to the connectors on the cable kit 3 Connect a P778 Series USB PS2 Combo KVM Cable Kit between an available KVM port on the back of the unit and a computer server P778 Series Cable Kits allow you to connect to a computer with either USB or PS 2 keyboard mouse ...

Page 8: ... computer server you wish to add to the installation 6 Connect the included external power supply to the B022 U08 IP and then plug it into a Tripp Lite Surge Suppressor PDU or Uninterruptible Power Supply UPS Turn on the first stage KVM switch The Station ID on the KVM s keyboard panel will display 01 7 Connect the external power supply included with the next stage KVM switch and plug it into a Tr...

Page 9: ...face They are not accessible in the Remote OSD 1 Save the IP Installer exe file from the CD to a desired location on a computer that is on the same network as the KVM 2 Locate the IP Installer exe file that you just saved and double click on it A screen similar to the one below will appear 3 Select your KVM from the Device List Note If the list is empty or your device doesn t appear click the Enum...

Page 10: ... either Windows or non Windows computers When accessed from a computer that is on the same network as the KVM the client will search the network for the device and display it in a device list for you to access If accessed from a computer that is not on the same network as the KVM you must obtain the IP address from your network administrator and manually enter it into the client See the Browser se...

Page 11: ... in the Web Management Interface but it is presented in a different format See the Remote OSD section for details on the difference between it and the Web Management Interface 7 Click on the Administration tab at the top of the screen On this page click on the Network Icon to pull up the Network page From here a fixed IP address can be assigned in the same way as when using a web browser See steps...

Page 12: ...nnected to the KVM switch If you are powering off multiple computers in a daisy chain installation shut down all computers connected to each KVM switch you are powering off Note It is necessary to unplug any computers that have the Keyboard Power On function If left on the KVM switch will continue to receive power via these computers 2 Starting with the first KVM in the installation unplug the KVM...

Page 13: ... displayed QV An arrow in this column indicates that the corresponding port is selected for Quick View scanning A sun symbol in this column indicates that a computer is both connected to the corresponding port and powered ON NAME If a port has been given a name its name appears in this column Click F1 at the top of the OSD or press the F1 key to activate the GOTO function GOTO allows you to search...

Page 14: ...to be entered to access the KVM In addition to using the local console OSD to access connected computers you can access them using the KVM s pushbuttons The B022 U08 IP front panel includes pushbuttons for its ports only Press a pushbutton to bring the KVM s focus to the corresponding port When accessing a connected computer via the local console you can use hotkey commands to operate the KVM swit...

Page 15: ...must exit Skip Mode in order to regain normal control of the console Hotkey Beeper Control To toggle the Beeper on and off key in the following hotkey combination 1 Invoke Hotkey Mode 2 Key in B After you press B the Beeper toggles On or Off The command line displays Beeper On or Beeper Off for one second then the message disappears and you automatically exit Hotkey Mode Computer Keyboard Mouse Re...

Page 16: ...es both the Local Console OSD and the Remote OSD Skip Mode Previous port When typed into the hotkey command line this key invokes Skip Mode When in Skip Mode this key switches KVM focus to the port prior to the currently selected port Skip Mode Next port When typed into the hotkey command line this key invokes Skip Mode When in Skip Mode this key switches KVM focus to the port after the currently ...

Page 17: ... serial number 5 characters per box then click OK 5 Upon entering the serial number the AP Windows Client main screen appears 6 The AP Windows Client will search the network for any KVM switches and display their Model Name and IP Address in the main screen s Server List If the KVM you wish to connect to is displayed in the list highlight it and click the Login button If not type in the IP address...

Page 18: ... and password the screen of the first connected computer on the installation that you have access to is displayed as well as the Remote OSD 6 6 Web Browser and Non Browser Remote Port Access When accessing the KVM switch over IP the connected computers can be accessed using either Windows or Java applications Regardless of which application you use or whether you log in via browser or AP client op...

Page 19: ...se the remote OSD toolbar When the remote OSD toolbar is opened you can hit the Scroll Lock key once more to open the remote OSD When the OSD toolbar is not opened hitting the Scroll Lock key three times will open the remote OSD When the remote OSD toolbar is opened pressing the key will skip to the first accessible port prior to the currently selected port When the remote OSD toolbar is opened pr...

Page 20: ...ion 6 units in from the left 4 Disable Enhance Pointer Precision Windows ME Set the mouse speed to the middle position and disable mouse acceleration Click the Advanced button to get the dialog box for this Windows NT Windows 98 Windows 95 Set the mouse speed to the slowest position Sun Linux Open a terminal session and issue the following command Sun xset m 1Linux xset m 0 Mouse Synchronization P...

Page 21: ...ng in the Configuration tab of the remote OSD or the F3 Set page of the local OSD Panel Array Mode allows connected computers to be simultaneously monitored by dividing the screen into a grid of panels with each panel representing a KVM port When Panel Array Mode is invoked via the remote OSD toolbar it scans the connected computers per the Scan Select setting in the Configuration tab of the remot...

Page 22: ...d off so that only the mouse pointer of the remote computer is displayed Adjust mouse Alt M Aligns the local and remote mouse pointers Substitute Alt key F12 Although all other keyboard input is captured and sent to the remote computer the Alt Tab and Ctrl Alt Del commands are still sent to your local computer In order to use these commands on the remote system another key must be substituted for ...

Page 23: ...her setting will provide more color which may slow down keyboard and mouse response time A lower setting will reduce the amount of information being sent over the network and may improve keyboard and mouse response time Gamma Adjustment If it is necessary to correct the gamma level for the remote video display use the Gamma function in the Video Settings screen Under Basic configuration there are ...

Page 24: ...t the names of the users that you want to send a message to or simply select the All users option to send a message to all users If a user has chosen to Disable Chat its icon displays before the user s name to indicate so If a user has occupied the KVM or the KM the corresponding icon displays before the user s name Compose Panel Type your message into this panel Click Send or press Enter to post ...

Page 25: ...on X X X X Screen Blanker X X X X Logout Timeout X X X Beeper X X X Edit Port Names X X X Set Port Operating Systems X X Hotkey Command Mode On Off X X Hotkey X X Port ID Display Position X X Reset Station IDs X Set Local Keyboard Language X Setup IP Address X X X View Firmware Version X X X Firmware Upgrade X X X Reset Default Values X X X Clear Port Names X X X View Device Name X X View MAC Addr...

Page 26: ...ription ALL Lists all of the ports on the installation that are accessible to the logged on user whether they are powered ON or not POWERED ON Lists all of the ports on the installation that are both accessible to the logged on user and powered ON QVIEW Lists all of the ports on the installation that are set as Quick View ports by an administrator QVIEW POWERED ON Lists all of the ports on the ins...

Page 27: ...e Port ID is displayed Port Number only Port Name only or both Port Number and Port Name The default is to display both Port Number and Port Name SCAN DURATION This setting determines the amount of time spent on each port when in Auto Scan Mode Key in a value from 1 255 seconds and then press the Enter key The default is 5 seconds a setting of 0 zero disables the Auto Scan function altogether SCAN...

Page 28: ...e OSD RESTORE DEFAULT VALUES This allows the Administrator to restore all OSD settings to their factory default values except for the network settings port names and username passwords When this function is accessed a prompt will appear asking if you wish to restore the default settings If yes type in a Y and hit the Enter key If no press the Esc key to go back to the previous menu CLEAR THE NAME ...

Page 29: ...ess the Enter key Press Y to invoke Firmware Upgrade Mode 6 From the computer you downloaded the firmware upgrade to run the downloaded file either by double clicking on it or by opening a command line and entering the full path to it The firmware upgrade utility welcome screen appears 7 Read and agree to the license agreement and then click Next to continue The firmware upgrade utility main scree...

Page 30: ...e first connected computer on the installation that you have access to and the Remote OSD appears with the Main tab displayed See diagram Administrators have access to all features in the OSD whereas Users only have access to the Main tab and Configuration tab The administrative settings of the Remote OSD are described in the following section Just like the F2 LIST function in the local console OS...

Page 31: ...that are both accessible to the logged on user and are powered ON QUICK VIEW Ports that are set as Quick View ports by an administrator QUICK VIEW POWERED ON Ports that are both set as Quick View ports by an administrator and are powered ON The default is ALL Scan Duration Determines how much time is spent on each port during an Auto Scan Key in a value from 0 255 seconds The default is 5 seconds ...

Page 32: ...are not asked to confirm whether you want to delete the selected account it is automatically deleted The table describes the fields and settings that are found in the Add User and Edit User screens Setting Description Username Enter the account username here A minimum of 6 and a maximum of 16 characters are allowed Password Enter the account password here A minimum of 6 and a maximum of 16 charact...

Page 33: ...he firewall the KVM switch will not be found An explanation of the Access Port fields is given in the table Port Description Program This is the port number that must be specified when connecting to the KVM via the AP Windows or Java client The default is 9000 HTTP This port number is for a browser login The default is 80 HTTPS This port number is for a secure browser login The default is 443 Note...

Page 34: ...t access to the KVM switch via the Windows browser and non browser applications J Gives the corresponding account access to the KVM switch via the Java browser and non browser applications L Gives the corresponding account access to the log server on the Web Management Interface V Gives the corresponding account view only access to all ports on the KVM switch PN xxxx Denies the corresponding accou...

Page 35: ...access rights to the KVM Accounts that are not in this group have user access rights to the KVM See the User Management section of this manual for details on account permissions Consult the LDAP S administrator about the appropriate entry for this 10 On the LDAP server set the access rights for each user The following sections describe how to configure LDAP S for use with the KVM switch ANMS LDAP ...

Page 36: ...dministrative Tools Active Directory Schema 2 In the left panel of the screen that comes up select Classes 3 In the right panel right click person and select Properties Select the General tab of the person Properties screen and fill in the fields according to the example 4 Select the Attributes tab of the person Properties screen and click the Add button 5 Select B022 U08 IP AccessRight from the l...

Page 37: ... access the KVM assigned to IP address 10 0 0 164 via the Java browser and non browser applications 10 0 0 168 PN 0102 The corresponding account is denied access to port 2 on station 1 of the KVM chain assigned to IP address 10 0 0 168 The corresponding account does not have access to any other KVMs administered by the LDAP S server 10 0 0 168 PF A The corresponding account is given full access to...

Page 38: ...the following Specify the unicode data directory The default is ucdata Choose the required LDAP schemas The core schema is mandatory Configure the path for the OpenLDAP pid and args start up files The first contains the server pid the second includes command line arguments Choose the database type The default is bdb Berkeley DB Specify the server suffix All entries in the directory will have this ...

Page 39: ... shown in the following figure LDAP Data Stucture An LDAP directory stores information in a tree structure known as the Directory Information Tree DIT The nodes in the tree are directory entries and each entry contains information in attribute value form An example of the LDAP directory tree is shown in the figure DIT Creation The LDAP Data Interchange Format LDIF is used to represent LDAP entries...

Page 40: ...remove a filter from the list simply click on it and hit the corresponding Remove button Note When clicking the Remove button you are not prompted to confirm the removal of the filter it is automatically removed To edit a filter simply click on it and hit the corresponding Edit button Adding Editing a Filter 1 Check the IP Filter Enable or MAC Filter Enable checkbox 2 Click on the corresponding Ad...

Page 41: ...abled Enable Device List When enabled the KVM will show up in the list of recognized devices in the non browser Windows client main screen If not enabled the non browser Windows client will not be able to display it in the list of recognized devices The default is Enabled Force All to Grayscale When enabled the remote display for all users and ports is displayed in black and white In low bandwidth...

Page 42: ...roviding Windows Client and Java Applet applications used in accessing the connected computers the Web Management Interface allows administrators to configure the KVM switch view the log file and manage user accounts This chapter discusses the different sections found in the interface and how you can use them to manage the KVM switch 7 3 1 General Information As previously mentioned the General In...

Page 43: ...work without a DHCP server it boots with a default IP address The default IPv4 and IPv6 addresses can be found on the sticker on the bottom of the unit Follow the steps below to configure the KVM s IPv4 or IPv6 settings accordingly depending on your network 1 To have the IP address pulled automatically via DHCP server make sure that the Obtain an IP address automatically DHCP option is selected 2 ...

Page 44: ... or MAC filter list boxes To remove a filter from the list simply click on it and hit the corresponding Remove button Note When clicking the Remove button you are not prompted to confirm the removal of the filter it is automatically removed To edit a filter simply click on it and hit the corresponding Edit button Adding Editing a Filter 1 Check the IP Filter Enable or MAC Filter Enable checkbox 2 ...

Page 45: ...SF xx Gives the corresponding account full access to a station RADIUS Server access rights examples are given in the following table RADIUS Access Rights Description C The corresponding account has administrator access to the KVM W J L The corresponding account can access the system via the Windows and Java browser and non browser applications and can access the log server on the Web Management In...

Page 46: ...following procedures Install the Windows Support Tools Install the Active Directory Schema Snap In Extend and Update the Active Directory Schema Each of these procedures is described in the following sections Install the Windows Support Tools 1 On your Windows server CD open the Support Tools folder 2 In the right panel of the dialog box that comes up double click SupTools msi 3 Follow along with ...

Page 47: ...on Properties screen and fill in the fields according to the example 4 Select the Attributes tab of the person Properties screen and click the Add button 5 Select B022 U08 IP AccessRight from the list that appears Click OK Extend and Update the Active Directory Schema Edit Active Directory Users with the Extended Schema 1 Run ADSI Edit Installed as part of the Support Tools 2 Open domain and navig...

Page 48: ...e corresponding account access to a station PV xxxx Gives the corresponding account view only access to a port SV xx Gives the corresponding account view only access to a station PF xxxx Gives the corresponding account full access to a port SF xx Gives the corresponding account full access to a station LDAP Server access rights examples are given in the following table Access Rights Description 10...

Page 49: ...ntains the server pid the second includes command line arguments Choose the database type The default is bdb Berkeley DB Specify the server suffix All entries in the directory will have this suffix which represents the root of the directory tree For example with suffix dc tripplite dc com the fully qualified name of all entries in the database will end with dc tripplite dc com Define the name of t...

Page 50: ...he new schema do the following 1 Save the new schema file e g B022 U08 IP schema in the OpenLDAP schema directory 2 Add the new schema to the slapd conf file as shown in the figure 3 Restart the LDAP server 4 Write the LDIF file and create the database entries in init ldif with the ldapadd command as shown in the following example ldapadd f init ldif x D cn Manager dc tripplite dc com w secret Log...

Page 51: ...sh to include optional Admin Check this option to give the account Administrator access rights Administrators have access to all features and configuration settings of the KVM User Check this option to give the account User access rights Users have access to both the Windows Client and Java Client but do not have access to the Log Server or Configuration Settings Select Check this option to Select...

Page 52: ...hen logged in at the same time the first user to access the KVM switch will have control of the selected port and all other users will be able to view that port Mouse Sync Mode Determines how the local and remote mouse pointer movement becomes synchronized Note In order to be able to remotely access computers connected to the KVM via the PS 2 connectors on a KVM cable kit this setting must be set ...

Page 53: ...ort Names or Backup All 3 Click the Save button to create the backup file 4 A prompt will appear asking if you want to save the file or find a program to open it Click the Save button give the file a unique name and save it in a convenient location Restore Configuration User Accounts To erase the configuration settings and or user profile information currently stored on the KVM and replace it with...

Page 54: ...g Server records events for Note You must first add a KVM via the Add function before the Log Server can start recording its events When you open the Add function the following dialog box will appear Descriptions of the fields in this dialog box are shown in the table Field Description Address This can either be the IP address of the KVM or its DNS name if the network administrator has assigned it...

Page 55: ...convention e g 11 04 2012 Start Time Select the time that you want the search to start from End Date Select the date that you want the search to end The format follows the MM DD YYYY convention e g 11 04 2012 End Time Select the time that you want the search to end Pattern Key in text here that you want the search to filter the events by Results The events that matched your search terms are listed...

Page 56: ...nnected to the corresponding KVM switch this field displays Connected If it is not connected this field displays Waiting A connection status of Waiting means that the Log Server is not communicating with the KVM and will not record its events This occurs when the Log Server s MAC address and or port number have not been set properly The MAC address and port for the Log Server computer must be ente...

Page 57: ...ts HD18 Male External Console Cable Yes External Console Cable Connectors KVM Side HD18 Female Computer Side HD15 Female x2 USB A Female x2 PS 2 Female Additional USB Ports 1 Additional USB Ports Version 1 LAN Port RJ45 Female Firmware Upgrade Port RJ11 Female Port Selection Pushbuttons 8 Reset Button Semi Recessed Pushbutton Max Resolution Supported Local Monitor 2048 x 1536 Remote Monitor 1600 x...

Page 58: ...PC Keyboard Sun Keyboard Ctrl T Stop Ctrl F2 Again Ctrl F3 Props Ctrl F4 Undo Ctrl F5 Front Ctrl F6 Copy Ctrl F7 Open Ctrl F8 Paste Ctrl F9 Find Ctrl F10 Cut Ctrl 1 Ctrl 2 Ctrl 3 Ctrl 4 Ctrl H Help Compose Note When using key combinations press and release the first key and then press and release the second key 8 1 OSD Default Settings Setting Default OSD Language English OSD Hotkey Scroll Lock Sc...

Page 59: ...e harmful interference in which case the user will be required to correct the interference at his own expense The user must use shielded cables and connectors with this equipment Any changes or modifications to this equipment not expressly approved by Tripp Lite could void the user s authority to operate this equipment WEEE Compliance Information for Tripp Lite Customers and Recyclers European Uni...

Reviews: